To install a well tank, follow these steps: shut off the power, drain the well tank and system, remove the old tank, install the new tank, replace the pressure switch, connect the pipes, and finally, turn on the power. Installing a well tank is essential for maintaining consistent water pressure in a well system.
By following a few simple steps, you can ensure a successful installation. First, make sure to shut off the power to the well pump. Next, drain the well tank and the water system completely. Once drained, remove the old tank and replace it with the new one.
Don’t forget to also replace the pressure switch. Connect the pipes and fittings, ensuring they are securely fastened. Finally, turn on the power and your new well tank should be ready to go.
Equipment And Tools Needed For The Installation
Installing a well tank is an important step in maintaining a steady supply of water for your household needs. To ensure a smooth installation process, it is crucial to have the right equipment and tools in hand. In this section, we will explore the essential equipment and tools needed for a successful well tank installation.
Choosing the Right Well Tank
In order to choose the right well tank for your installation, there are a few factors to consider. Firstly, determine the size of the tank you require based on your household’s water usage. This can be estimated by considering the number of occupants and their average water consumption.
Additionally, consider the material of the tank. Common options include steel, fiberglass, and polyethylene. Each material has its own advantages and disadvantages, so research and choose the one that best suits your needs.
Lastly, ensure that the well tank you choose is compatible with your existing well pump system. This will ensure efficient operation and compatibility between the two components.
Required Tools for the Installation
Before starting the installation process, gather the necessary tools to ensure a smooth and efficient installation. Below is a list of the tools you will need:
| Tools | Description |
|---|---|
| Adjustable wrench | A wrench with a moveable jaw that can be used to grip and tighten nuts and bolts. |
| Teflon tape | A thin, white tape applied to threaded connections to prevent leaks. |
| Pipe cutter | A tool used to cut through pipes cleanly and evenly. |
| Screwdrivers | Various sizes of screwdrivers for loosening and tightening screws. |
| Pipe wrench | A wrench with serrated jaws used for gripping and turning pipes. |
| Pressure gauge | A gauge used to measure the pressure inside the well tank. |
Safety Precautions to Consider
When working with a well tank installation, it is crucial to prioritize safety. Keep the following safety considerations in mind during the installation process:
- Ensure the power to the well pump is turned off before starting any work.
- Wear appropriate protective gear such as gloves and safety glasses.
- Use caution when cutting pipes to avoid injury.
- Follow manufacturer instructions and guidelines for proper installation.
- Inspect all connections for leaks before turning the well pump back on.
Preparing For The Well Tank Installation
Before you begin the installation process for your well tank, there are a few important steps you need to take to ensure everything goes smoothly. Evaluating the location of the tank, measuring water pressure and flow rate, and determining the tank size are crucial aspects of the preparation process. Let’s dive into each of these steps in detail.
Evaluating the Location of the Tank
The first step in preparing for the well tank installation is to carefully evaluate the location where the tank will be placed. It’s essential to choose a suitable spot that meets certain criteria for optimal performance and convenience.
Here are a few key factors to consider while assessing the location:
- Accessibility: The tank should be easily accessible for maintenance and future inspections.
- Level ground: Ensure the ground is level and stable to prevent any issues with the tank’s stability.
- Proximity to well pump: It is recommended to position the tank reasonably close to the well pump to minimize potential pressure drops.
- Noise and vibration: Keep in mind the noise and vibration generated by the tank. Select a location that minimizes the impact on the surrounding area.
Measuring Water Pressure and Flow Rate
Accurate water pressure and flow rate measurements are crucial for determining the appropriate well tank size and ensuring efficient functioning of your well system.
To measure the water pressure:
- Turn off all water-consuming appliances in your home.
- Connect a pressure gauge to an outdoor water faucet.
- Turn on the faucet and let the water run until it stabilizes.
- Read the pressure displayed on the gauge.
To measure the flow rate:
- Locate the pressure tank or pressure switch near the well pump.
- Carefully open the valve or switch to direct all water flow to an outdoor faucet or a designated area.
- Collect the water in a container for a specific amount of time, such as one minute.
- Measure the collected water and calculate the flow rate in gallons per minute (GPM).
Determining the Tank Size
Choosing the right tank size is crucial for maintaining consistent water pressure, avoiding frequent pump cycling, and ensuring long-lasting performance.
A simple formula for determining the tank size is to consider the number of individuals in your household:
| Number of Individuals | Tank Size |
|---|---|
| 1-2 | 20-30 gallons |
| 3-4 | 30-40 gallons |
| 5 or more | 40 gallons or larger |
Keep in mind that these are general guidelines, and factors such as water usage patterns and specific household needs may require adjustments to the tank size. It’s always advisable to consult a professional to determine the ideal tank size based on your unique situation.
By carefully evaluating the location, measuring water pressure and flow rate, and determining the appropriate tank size, you will be well-prepared for a successful well tank installation. These preparatory steps are essential to ensure a reliable and efficient well system that meets your household’s water demands.
Installing The Well Tank
Installing a well tank is an important step to ensure a steady and consistent water supply in your home. By following these steps, you can successfully install a well tank and enjoy a reliable source of water. In this section, we will guide you through the process of installing a well tank, including shutting off the power and water supply, draining the existing system, mounting the well tank, connecting the pipes and fittings, and installing pressure switches and gauges.
Shutting Off the Power and Water Supply
The first step in installing a well tank is to shut off the power and water supply to the existing system. This will help prevent any accidents or damage during the installation process. Locate the main power switch and turn it off. Then, find the shut-off valve for the water supply and close it tightly.
Draining the Existing System
Before you can start working on the installation, it’s important to drain the existing system. This will remove any water from the pipes and fittings, making it easier to disconnect and install the well tank. To do this, open all the faucets in your home and let the water flow until it stops completely. You can also use a drain valve to remove any remaining water.
Mounting the Well Tank
Once the existing system is drained, you can proceed to mount the well tank. Choose a suitable location near the well pump, ensuring it is on a stable surface. Use a level to make sure it is horizontally straight. Secure the well tank using appropriate brackets or hardware, following manufacturer’s instructions.
Connecting the Pipes and Fittings
With the well tank in place, you can now connect the pipes and fittings. Start by attaching the outlet pipe from the well pump to the piping system connected to the well tank. Use pipe wrenches or appropriate tools to tighten the fittings securely. Ensure that all connections are leak-free and properly sealed using appropriate sealing materials.
Installing Pressure Switches and Gauges
Finally, install the pressure switches and gauges to monitor and control the water pressure in the system. Connect the pressure switch to the electrical supply and adjust it to the desired pressure range. Attach the pressure gauge to a tee fitting on the well tank, ensuring it is easily visible for monitoring. Secure all connections and ensure proper functionality.
By following these steps and guidelines, you can install a well tank effectively and enjoy a reliable water supply for your home. Remember to refer to the manufacturer’s instructions for specific details and recommendations for your well tank installation.
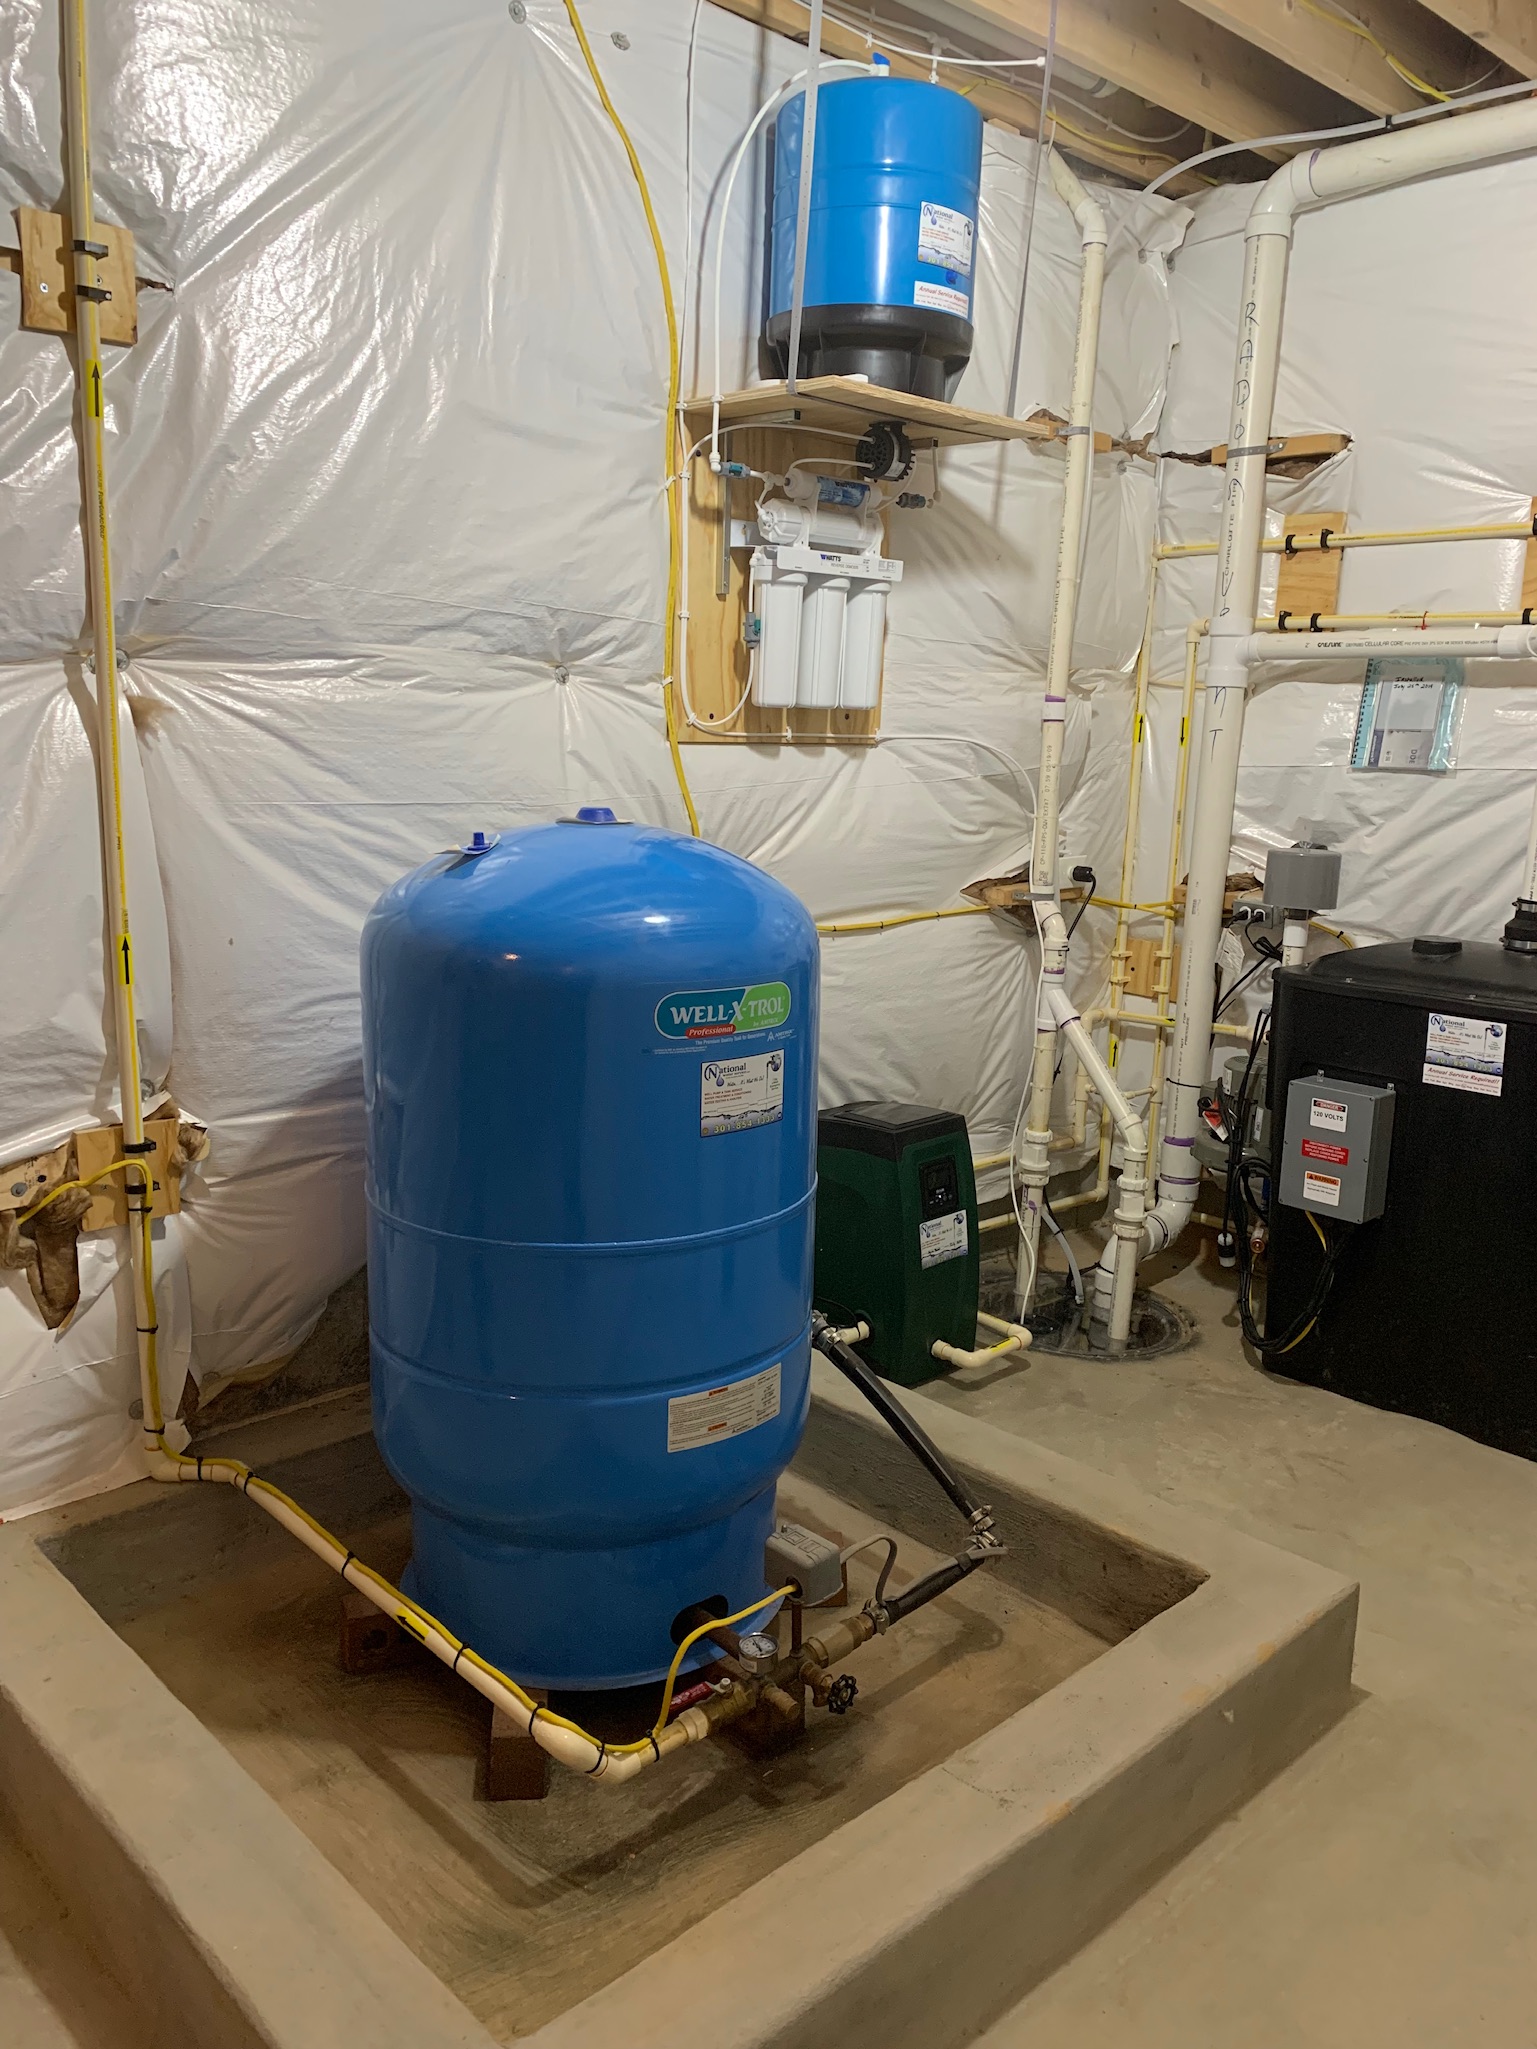
Credit: nationalwaterservice.com
Testing And Troubleshooting
Testing and troubleshooting your well tank is an important step to ensure its proper functioning and longevity. In this section, we will guide you through the necessary tests and adjustments you need to make to guarantee the optimal performance of your well tank.
Testing the Well Tank
In order to test the well tank, there are a few important steps you need to follow:
- First, ensure that the power to the well pump is turned off.
- Next, close the valve that connects the well tank to the main water supply line.
- Open a faucet in your home to release any residual pressure from the system.
- After the water has stopped flowing from the faucet, check the pressure in the tank using a pressure gauge.
- The pressure should be within the manufacturer’s recommended range. If it’s too low or too high, adjustments are needed.
Adjusting Pressure Settings
To adjust the pressure settings of your well tank, follow these steps:
- Locate the pressure switch that controls the operation of the well pump.
- Using a wrench, turn the adjustment screw clockwise to increase the pressure, or counterclockwise to decrease it.
- Make small adjustments at a time and retest the pressure after each adjustment, until it is within the recommended range.
- Once you have achieved the desired pressure, secure the adjustment screw back in place.
Ensuring Proper Pressure Regulation
Proper pressure regulation in your well tank is crucial for its efficient and effective operation. Here are some important measures to take:
- Regularly check the pressure gauge to ensure that the pressure remains within the recommended range.
- If you notice significant fluctuations in pressure, it may indicate a problem with the well tank or pump system, and professional inspection may be necessary.
Troubleshooting Common Issues
While well tanks are designed to be reliable, there are a few common issues that can occur. Here are some troubleshooting steps:
| Issue | Possible Cause | Troubleshooting Steps |
|---|---|---|
| Low water pressure | clogged pipes, a malfunctioning pressure switch, or a faulty well pump | Clean pipes, replace or adjust the pressure switch, or inspect and repair the well pump |
| Frequent cycling of the pump | a waterlogged tank or a malfunctioning pressure switch | Drain and recharge the tank or replace the pressure switch if necessary |
| Excessive noise during operation | loose pipes or a worn-out pressure tank | Tighten the pipes or replace the pressure tank if needed |
By following these testing and troubleshooting guidelines, you can ensure that your well tank is properly installed and functioning optimally. Regular maintenance and prompt resolution of any issues will extend the lifespan of your well tank and provide you with reliable water pressure for years to come.
Maintaining The Well Tank
Just like any other household appliance, maintaining your well tank is essential for ensuring its optimal performance and longevity. By regularly inspecting and cleaning the tank, replacing faulty parts when necessary, and implementing practical measures to extend its lifespan, you can ensure that your well tank remains in excellent working condition.
Regular Inspection and Cleaning
To keep your well tank functioning efficiently, it’s important to conduct regular inspections and cleanings. These steps help prevent the buildup of sediment and minerals that can hinder the tank’s performance over time. Follow these simple guidelines to ensure your tank stays in top shape:
- Start by turning off the electrical power and shutting off the water supply to the tank.
- Inspect the tank’s pressure gauge for any signs of damage or inaccuracy. If necessary, replace it with a new one.
- Check the tank’s air valve to make sure it is intact and functioning properly. If needed, clean or replace it.
- Examine the tank’s interior for sediment or mineral buildup. If present, use a hose or brush to gently clean the inside.
- Inspect all pipe fittings and connections for leaks or wear. Tighten or replace as necessary.
- Finally, switch the electrical power and water supply back on, and observe the tank for any irregularities in its operation.
Replacing Faulty Parts
If you notice any issues during your regular inspections or experience problems with your well tank’s performance, it may be necessary to replace faulty parts. This can help restore the tank’s functionality and prevent further damage. Here are some common parts that may need replacement:
- Pressure Switch: If your well tank is not operating at the correct pressure levels, replacing the pressure switch can solve the problem.
- Pressure Relief Valve: A faulty relief valve can lead to excessive pressure inside the tank. Replace it promptly to prevent potential hazards.
- Check Valve: A malfunctioning check valve can cause water to flow back into the well, affecting the tank’s efficiency. Replace it to maintain proper water flow.
- Bladder: In a pre-charged well tank, if the bladder becomes damaged or ruptured, the tank’s performance will be compromised. Replace the bladder to restore optimal functioning.
Extending the Life of the Well Tank
To extend the lifespan of your well tank, consider implementing the following measures:
- Regular Maintenance: By following the inspection and cleaning steps mentioned above on a regular basis, you can prevent major issues and ensure your tank lasts for many years.
- Proper Pressure Settings: Make sure the tank’s pressure is set within the recommended range. Adjustments may be necessary to avoid overworking the tank and prolong its lifespan.
- Water Quality: Ensuring your well water is filtered and free from excessive minerals or sediments can help minimize wear and tear on the tank.
- Temperature Control: Protect your well tank from extreme temperatures by insulating it properly. This helps prevent damage and reduces the strain on the tank’s components.
By consistently maintaining your well tank and promptly addressing any issues that arise, you can ensure its optimal performance and extend its overall lifespan. Regular inspections, appropriate cleanings, and necessary replacements will help you avoid major problems and enjoy a reliable water supply for years to come.
Additional Considerations For Well Tank Installation
Additional Considerations for Well Tank Installation
When it comes to installing a well tank, there are a few additional considerations that can help ensure a smooth installation process and reliable performance. In this article, we will explore three important aspects that should be taken into account: installing a pressure relief valve, using a check valve, and considering water treatment systems.
Installing a Pressure Relief Valve
One of the crucial steps in installing a well tank is installing a pressure relief valve. This valve is designed to protect your well tank and plumbing system from excessive pressure buildup. Without a pressure relief valve, the tank could be at risk of bursting, which could lead to serious damage and potential injury.
To install a pressure relief valve, follow these steps:
- Locate the tee fitting on top of the well tank. This fitting should have a threaded opening.
- Apply plumber’s tape to the threads of the pressure relief valve.
- Screw the pressure relief valve into the threaded opening until it is firmly in place.
- Tighten the valve using an adjustable wrench, ensuring a secure connection.
Once installed, the pressure relief valve will provide an additional layer of safety and help maintain optimal pressure levels within the well tank.
Using a Check Valve
A check valve is another essential component that should be considered during well tank installation. This valve allows water to flow in one direction, preventing backflow and ensuring a continuous water supply to your household.
Here’s how you can use a check valve in your well tank installation:
- Determine the direction of water flow in your plumbing system.
- Install the check valve in the correct orientation. The arrow on the valve body indicates the direction of water flow.
- Connect the check valve to the plumbing system using appropriate fittings and connectors.
By using a check valve, you can prevent water from flowing back into the well and keep your water supply clean and uncontaminated.
Considering Water Treatment Systems
In addition to pressure relief valves and check valves, it is important to consider water treatment systems during well tank installation. Water treatment systems can help improve the quality and safety of your water supply by removing contaminants, such as bacteria, viruses, and chemicals.
There are various types of water treatment systems available, including:
| System Type | Description |
|---|---|
| UV Disinfection | Uses ultraviolet light to kill bacteria and viruses in the water. |
| Reverse Osmosis | Filters water through a membrane to remove impurities. |
| Activated Carbon | Uses carbon filters to adsorb and remove chemicals and odors. |
When choosing a water treatment system, consider the specific contaminants present in your well water and select a system that can effectively address those concerns.
In conclusion, by paying attention to these additional considerations for well tank installation, you can ensure the longevity and proper functioning of your well tank system. Remember to install a pressure relief valve, use a check valve, and consider water treatment systems suitable for your water quality needs.
Frequently Asked Questions For How To Install Well Tank
How Do I Add A Water Storage Tank To My Well?
To add a water storage tank to your well, follow these steps: 1. Determine the tank’s size based on your water needs. 2. Find a suitable location close to the well and ensure proper support for the tank. 3. Install a pump and connection to divert water from the well to the tank.
4. Connect the tank to your plumbing system for a consistent water supply. 5. Regularly maintain and monitor the tank to ensure optimal functionality.
Can You Replace A Well Tank Yourself?
Yes, you can replace a well tank yourself. However, it is recommended to hire a professional to ensure proper installation and avoid potential problems.
Where Do You Put A Well Pressure Tank?
The well pressure tank should be installed near the water pump or the main water supply line. It is usually placed in a basement, crawl space, or utility room to ensure easy access and maintenance. Keep in mind that local codes and regulations may vary, so consult a professional for specific installation requirements.
Can I Add A Storage Tank To My Well?
Yes, you can add a storage tank to your well. It allows you to store extra water and ensures a steady supply. Adding a storage tank is a simple and effective solution for managing water usage, especially during times of high demand or when your well produces more water than needed.
Conclusion
Installing a well tank is a crucial step in ensuring proper water supply and pressure in your home. By following the simple steps outlined in this guide, you can confidently install a well tank on your own. Remember to gather the necessary tools, follow safety precautions, and consult professional help when needed.
With the right knowledge and careful execution, you can enjoy a well-functioning water system that meets your household’s needs.