To install a water filter in a Keurig, first remove the water reservoir, then insert the water filter into the bottom of the reservoir and align it with the opening.
Why Use A Water Filter In Your Keurig Coffee Maker
When it comes to brewing a perfect cup of coffee, the quality of water plays a crucial role. This is why many coffee enthusiasts choose to use a water filter in their Keurig coffee maker. Not only does it improve the taste and quality of your coffee, but it also protects your machine against mineral buildup. In this article, we will explore the benefits of using a water filter in your Keurig and guide you on how to install one.
Benefits of using a water filter in Keurig
Using a water filter in your Keurig coffee maker has several advantages:
Improved taste and quality of coffee
One of the primary reasons to use a water filter in your Keurig is to enhance the taste and quality of your coffee. Tap water can contain impurities such as chlorine, minerals, and sediment, which can negatively impact the flavor of your brew. By filtering out these contaminants, a water filter ensures that you are left with clean and pure water, resulting in a more flavorful and enjoyable cup of coffee.
Protection against mineral buildup
Mineral buildup can occur over time in your Keurig due to the presence of hard water. These minerals, such as calcium and magnesium, can clog the internal components of your machine, leading to decreased performance and potential breakdowns. By using a water filter, you can effectively reduce the mineral content in the water, protecting your Keurig and extending its lifespan.
The installation of a water filter in your Keurig coffee maker is a simple and straightforward process. It typically involves acquiring a compatible water filter, removing the water reservoir of your Keurig, inserting the filter into the designated location, and reattaching the reservoir. Detailed instructions can be found in your Keurig’s user manual or on the manufacturer’s website.
Considering the numerous benefits, using a water filter in your Keurig coffee maker is a wise investment. It not only enhances the taste and quality of your coffee but also protects your machine from mineral buildup, ensuring a delightful brewing experience every time. So, why wait? Install a water filter in your Keurig today and savor the perfect cup of coffee.
Types Of Water Filters For Keurig Coffee Makers
When it comes to enjoying a perfect cup of coffee from your Keurig coffee maker, the quality of water used plays a crucial role. Using a water filter ensures that you have clean and pure water, enhancing the taste and aroma of your coffee. In this article, we’ll explore the different types of water filters available for Keurig coffee makers, including charcoal filters and reverse osmosis filters. Let’s dive in!
Different options available in the market
When looking for a water filter for your Keurig coffee maker, you’ll come across various options in the market. Each type has its own unique features, advantages, and suitability. Here are the most common types you can consider:
| Type | Description | Advantages |
|---|---|---|
| Charcoal Filters | These filters contain activated charcoal that helps to remove impurities, chlorine, and unpleasant odors from the water. |
|
| Reverse Osmosis Filters | These filters utilize a semi-permeable membrane to remove impurities, heavy metals, and dissolved solids from the water. |
|
These are just a couple of options available in the market, and you can choose the one that fits your specific needs and preferences. Now, let’s dive deeper into each type to understand their functionalities and benefits.
Overview of charcoal filters
Charcoal filters are a popular choice for Keurig coffee makers due to their excellent filtration capabilities. These filters contain activated charcoal, which is known for its ability to effectively absorb impurities and odors. When water passes through the charcoal filter, it captures contaminants such as chlorine, sediment, and volatile organic compounds (VOCs), leaving you with clean and fresh-tasting water for brewing your coffee.
One of the key advantages of charcoal filters is their ability to enhance the flavor of your coffee by removing any unpleasant tastes and odors caused by impurities. Additionally, these filters also help in reducing mineral buildup inside your coffee maker, enhancing its longevity and performance. Installing and replacing charcoal filters is a breeze, making them a convenient choice for Keurig coffee maker owners.
Overview of reverse osmosis filters
Reverse osmosis filters, also known as RO filters, are highly effective in providing high-quality water for your Keurig coffee maker. These filters use a semi-permeable membrane to remove impurities, heavy metals, and dissolved solids from the water. During the reverse osmosis process, water is forced through the membrane, leaving behind contaminants while producing clean and purified water.
One of the significant advantages of reverse osmosis filters is their ability to remove a wide range of contaminants, including bacteria, viruses, pesticides, and chlorine, ensuring you have the purest water for your coffee. These filters have a longer lifespan compared to other types, requiring less frequent replacements. Reverse osmosis filters deliver exceptional water quality and can be an excellent investment for those seeking superior purification.
In conclusion, choosing the right water filter for your Keurig coffee maker is essential for a delightful brewing experience. Whether you opt for a charcoal filter for its taste-enhancing properties or a reverse osmosis filter for its robust purification, the choice ultimately depends on your preferences and the quality of water in your area. Make the right choice, and enjoy a perfect cup of coffee every single time!
Step-By-Step Guide: Installing A Water Filter In Your Keurig
If you want to enjoy the best-tasting coffee from your Keurig brewer, installing a water filter is a simple yet effective solution. A water filter helps remove impurities from the water, ensuring that your coffee is free from any unwanted flavors or odors. In this step-by-step guide, we will walk you through the process of installing a water filter in your Keurig, so you can enjoy the perfect cup of coffee every time.
Preparing the water filter cartridge
The first step in installing a water filter in your Keurig is to prepare the water filter cartridge. Start by soaking the cartridge in cold water for a few minutes. While the cartridge is soaking, rinse the water reservoir to remove any debris or residue that may be present. Once the cartridge has been soaked, remove it from the water and give it a quick rinse to ensure it is clean.
Accessing the water reservoir in your Keurig
Next, you need to access the water reservoir in your Keurig. Start by powering off the brewer and unplugging it from the electrical outlet. Lift the lid of the brewer to reveal the water reservoir. Remove the reservoir by lifting it straight up and away from the brewer. Set the reservoir aside for now.
Inserting the water filter cartridge
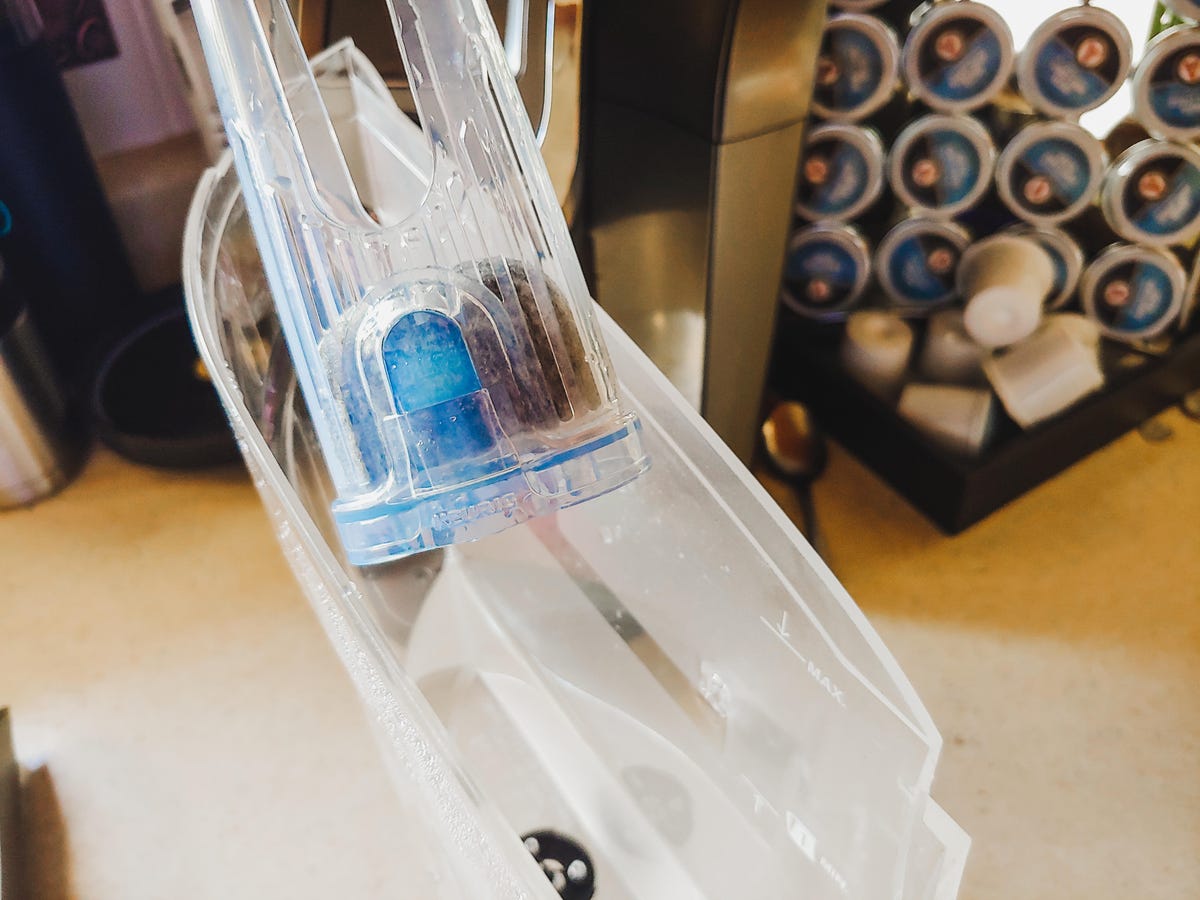
Now that the water reservoir is out of the way, it’s time to insert the water filter cartridge into the Keurig. Take the soaked and rinsed cartridge and insert it into the bottom of the water reservoir. Ensure that the filter is facing outward and the flat side of the cartridge is facing down. Gently press the cartridge into place, making sure it is securely inserted.
Properly aligning the water filter
To ensure the water filter functions properly, it is essential to align it correctly. Look for the indicator lines on the side of the water reservoir. These lines will guide you in aligning the filter properly. Adjust the filter so that it lines up with the indicator lines, ensuring a secure fit.
Securing the water reservoir back onto the Keurig
With the cartridge in place and properly aligned, it’s time to secure the water reservoir back onto the Keurig. Hold the reservoir at a slight angle and slide it into the brewer, making sure it sits securely in its place. Lower the lid of the brewer to close it, and plug the brewer back into the electrical outlet.
Congratulations! You have successfully installed a water filter in your Keurig. Now you can enjoy a cleaner, better-tasting cup of coffee every time you brew.
Troubleshooting And Maintenance Tips For Water Filters In Keurig
Common issues and how to fix them
Keurig water filters play a crucial role in ensuring you have clean, filtered water every time you brew your favorite cup of coffee. However, like any other appliance, water filters can sometimes encounter issues. In this section, we will discuss some common problems you may face with your Keurig water filter and provide troubleshooting tips to get them fixed promptly.1. Slow water flow
If you notice that the water flow from your Keurig machine has become slow or restricted, it could be due to a clogged water filter. Here’s what you can do to fix it: – Remove the water reservoir from the Keurig machine. – Take out the water filter from the reservoir. – Rinse the water filter under cold running water to remove any debris or buildup. – Reinsert the filter back into the reservoir, ensuring it is properly aligned. – Fill the reservoir with water and place it back into the Keurig machine. If the slow water flow persists, it might be a sign that the water filter needs replacement. Moving on to our next topic, let’s discuss the regular maintenance and replacement schedule for Keurig water filters.Regular maintenance and replacement schedule for filters
Frequent maintenance and timely replacement of your Keurig water filter are essential to ensure the longevity and effectiveness of the filtration system. Here’s what you need to know: – Clean the water filter holder and reservoir every 1-2 months, or as needed, to prevent any buildup or clogs. – Replace the Keurig water filter every 2 months or after every 60 tank refills, whichever comes first. – Use only genuine Keurig water filters to maintain the quality and performance of your machine. By following this maintenance and replacement schedule, you can ensure that your Keurig water filter continues to provide you with clean and great-tasting coffee.Cleaning the water reservoir and filter holder
Cleaning the water reservoir and filter holder is an important part of maintaining your Keurig water filter system. Here’s how you can do it effectively: 1. Cleaning the water reservoir: – Empty the water reservoir and remove it from the Keurig machine. – Rinse the reservoir with warm soapy water, making sure to remove any residue or buildup. – Thoroughly rinse the reservoir with clean water to remove any soap traces. – Allow the reservoir to air dry completely before reattaching it to the machine. 2. Cleaning the filter holder: – Remove the water filter from the holder (if present) and set it aside. – Rinse the filter holder with warm water to remove any coffee grounds or debris. – Use a soft brush or sponge to gently scrub the holder, ensuring all surfaces are clean. – Rinse the holder with clean water to remove any remaining residue. – If needed, repeat the cleaning process for stubborn stains or buildup. Remember to avoid using harsh chemicals or abrasive materials while cleaning, as they can damage the water filter system. Following these steps will help maintain the cleanliness and functionality of your Keurig water filter and ensure that you continue to enjoy fresh and delicious coffee every day.Additional Tips For Optimal Performance
Ensuring the proper installation of a water filter in your Keurig is just the first step towards enjoying a consistently great cup of coffee. To maintain the optimal performance of your machine and brew the best-tasting coffee every time, it is important to take note of a few additional tips. These tips will not only extend the lifespan of your Keurig but also enhance the flavor and quality of your brew.
Quality of water used for brewing
The quality of water you use to brew your coffee can greatly impact the taste and overall experience. Using filtered or purified water will not only improve the flavor, but it will also prevent mineral build-up and scale inside your Keurig, prolonging its life and ensuring efficient performance. Consider investing in a water filtration system or using bottled or distilled water for a consistently delicious cup of joe.
Regular descaling of your Keurig
Over time, mineral deposits and scale can accumulate inside your Keurig, affecting its performance and taste. It is crucial to regularly descale your machine to remove these build-ups and maintain its optimal functioning. Follow the manufacturer’s instructions for descaling, which typically involve running a descaling solution through the machine. This process will help remove any impurities and ensure that your Keurig continues to brew excellent coffee.
Proper storage of unused filters
Keeping your unused water filters in the proper condition is crucial for their effectiveness. When not in use, store the filters in a clean and dry place, away from any potential contaminants. This will ensure that the filters remain in good condition and are ready for use when you need them. Avoid exposing the filters to excessive moisture or heat, as this can compromise their performance.
By considering these additional tips for optimal performance, you can make the most out of your Keurig and enjoy a consistently delicious coffee experience. Taking care of your machine and using the right water and filters will not only enhance the taste, but also extend the lifespan of your Keurig, making it a valuable investment for your coffee-loving lifestyle.
Credit: www.cnet.com
Frequently Asked Questions On How To Install Water Filter In Keurig
How Do You Install A Keurig Water Filter?
To install a Keurig water filter, follow these steps: 1. Soak the filter in water for 5 minutes. 2. Detach the water reservoir. 3. Insert the filter into the filter holder. 4. Reattach the water reservoir. 5. Run several water-only brew cycles.
Enjoy your filtered coffee!
How Do You Install The Water Filter In A Keurig K Supreme Plus?
To install the water filter in a Keurig K Supreme Plus, simply open the water reservoir lid and remove the old filter. Rinse the new filter under cold water for 5 seconds, then insert it into the filter holder. Place the filter holder back into the reservoir and close the lid.
Where Do I Change The Water Filter In My Keurig?
To change the water filter in your Keurig, locate the filter holder in the reservoir. Twist and remove the old filter, then insert a new one. Make sure it aligns properly and replace the reservoir. Enjoy fresh, filtered water with your Keurig!
Where Does The Water Filter Go In A Keurig K Cafe?
The water filter in the Keurig K Cafe is located inside the water reservoir.
Conclusion
Installing a water filter in your Keurig can greatly improve the taste and quality of your coffee. With the simple steps outlined in this blog post, you can easily install a water filter in your Keurig machine and enjoy a better brewing experience.
Remember to follow the manufacturer’s instructions and replace the filter regularly for optimal results. Start brewing delicious, filtered coffee today!