To install a single hole faucet, follow these steps: Position the faucet base on the sink, insert the faucet’s tailpiece through the sink hole, secure it with a mounting nut, and connect the water supply lines.
Understanding The Single Hole Faucet
Understanding the Single Hole Faucet
When it comes to upgrading your bathroom or kitchen, choosing the right faucet is essential. One popular option is the single hole faucet, known for its sleek design and easy installation process. But what exactly is a single hole faucet, and how does it differ from other types? In this article, we will explore the key features and components of a single hole faucet, as well as the benefits it offers for your home.
Differentiating Single Hole Faucet from other types
A single hole faucet is precisely what it sounds like – a faucet that requires only one hole for installation. This design simplicity sets it apart from other types of faucets, such as the widespread faucet or the wall-mounted faucet. While widespread faucets require three separate holes for installation and wall-mounted faucets need a hole through which the plumbing connects to the wall, the single hole faucet eliminates the need for additional spaces and simplifies the installation process.
Components and features of Single Hole Faucet
Before you embark on installing a single hole faucet, it’s crucial to understand its components and features. These include:
| Component | Feature |
|---|---|
| Spout | The spout is the part of the faucet where the water flows out. It can vary in length and shape, allowing you to choose a style that complements your overall bathroom or kitchen design. |
| Handle | The handle controls the flow and temperature of the water. Single hole faucets typically come with a single lever handle, which makes it easy to adjust both the water pressure and temperature. |
| Base Plate | The base plate, sometimes referred to as an escutcheon, is an optional component. It conceals any extra holes in your sink or countertop that may not be in use. |
| Cartridge | The cartridge is the heart of the faucet. It regulates the flow of water and ensures smooth operation. Single hole faucets often feature high-quality cartridges that provide durability and reliability. |
Benefits of installing a Single Hole Faucet
Installing a single hole faucet offers several advantages:
- Simplicity: The single hole design makes installation quick and straightforward, reducing the chances of any leaks or complications.
- Aesthetic Appeal: The sleek and minimalistic appearance of single hole faucets adds a touch of elegance to any bathroom or kitchen.
- Space-saving: With only one hole required, a single hole faucet helps conserve space on your sink or countertop, maximizing functionality in smaller areas.
- Ease of Use: The single lever handle allows for easy temperature and water flow control, enhancing user convenience.
- Easy Maintenance: Single hole faucets are generally easier to clean and maintain due to their streamlined design.
In conclusion, understanding the single hole faucet is crucial when considering a faucet upgrade. By differentiating it from other types, familiarizing yourself with its components and features, and recognizing its benefits, you can make an informed decision to enhance the functionality and aesthetics of your bathroom or kitchen.
Choosing The Right Faucet For Your Needs
When it comes to renovating your bathroom or simply upgrading a worn-out faucet, choosing the right single hole faucet can make all the difference in both style and functionality. With so many options available in the market today, it’s important to consider a few factors before making your final decision. In this article, we will guide you through the process of selecting the perfect single hole faucet for your bathroom needs.
Factors to consider when selecting a Single Hole Faucet
Before you start browsing through the various single hole faucet options, it’s important to keep in mind a few essential factors. These factors will help you narrow down your choices and ensure that you make the right purchase for your bathroom renovation or upgrade:
Quality and Durability
The first and foremost factor to consider is the quality and durability of the faucet. Look for faucets made from high-quality materials such as solid brass or stainless steel, as they are known for their longevity and resistance to tarnish or corrosion. Investing in a durable faucet will save you from the hassle and expense of frequent replacements in the future.
Water Efficiency
Water conservation is an important consideration in today’s environmentally conscious world. Look for single hole faucets that are WaterSense certified, as they are designed to reduce water consumption without compromising on performance. These faucets can help you save both water and money in the long run.
Spout Height and Reach
The spout height and reach of the faucet should be chosen based on your specific needs and the size of your sink or countertop. A higher spout height allows for easier filling of tall containers, while a longer reach ensures that water is directed to the center of the sink, minimizing splashing.
Handle Accessibility and Functionality
Consider the accessibility and functionality of the faucet handles. Single hole faucets typically come with either a single lever or separate handles for hot and cold water. Choose a handle style that is easy to grip and control, ensuring convenience and comfort during everyday use.
Popular brands and models of Single Hole Faucets
When it comes to selecting a single hole faucet, there are various popular brands and models available in the market. Here are a few renowned brands known for their quality and style:
| Brand | Model |
|---|---|
| Moen | Arbor Single Hole Faucet |
| Delta | Cassidy Single Hole Faucet |
| Kohler | Purist Single Hole Faucet |
These are just a few examples, and there are many more reputable brands to explore. Researching different brands and models will help you find a single hole faucet that meets your aesthetic preferences and functional requirements.
Tips for matching the faucet style with your bathroom decor
Choosing a single hole faucet that complements your bathroom decor is crucial for creating a cohesive and visually appealing space. Here are a few tips to help you match the faucet style with your bathroom decor:
- Consider the overall style and theme of your bathroom. Is it modern, traditional, or transitional?
- Look for faucets that have a similar finish or color to the other fixtures in your bathroom, such as towel bars, showerheads, or cabinet hardware.
- Pay attention to the design details on the faucet, such as the shape of the spout or the handles. Ensure that these details align with the overall aesthetic of your bathroom.
- If you have a small bathroom, consider opting for a sleek and minimalistic faucet design to create an illusion of space.
By considering these tips and paying attention to the details, you can ensure that your single hole faucet seamlessly integrates into your bathroom decor, enhancing the overall ambiance of the space.
Preparing For The Installation Process
Before you begin the installation process of a single-hole faucet, it is important to take a few necessary steps to ensure a smooth and successful installation. This includes gathering the necessary tools and materials, shutting off the water supply, and removing the old faucet while ensuring the area is clean for the new installation.
Gathering the necessary tools and materials
In order to install a single-hole faucet, you will need to gather a few essential tools and materials. It is always helpful to have everything you need in one place before you start, ensuring a stress-free installation process. Here is a list of the tools and materials you will need:
| Tools | Materials |
|---|---|
|
|
Shutting off the water supply
Before you begin removing the old faucet, it is crucial to shut off the water supply. This will prevent any leaks or water damage during the installation process. Follow these steps to shut off the water:
- Locate the shut-off valves under the sink.
- Turn the handles clockwise to shut off the water supply.
- Test the water by turning on the faucet; no water should come out if the shut-off valves are closed properly.
Removing the old faucet and cleaning the area
Once you have shut off the water supply, it’s time to remove the old faucet and clean the area to prepare for the new installation. Follow these steps:
- Use the adjustable wrench and/or the basin wrench to loosen and disconnect the water supply lines from the faucet.
- Remove any additional connections such as nuts or mounting brackets securing the old faucet to the sink.
- Take out the old faucet and set it aside.
- Wipe down the area to ensure it is clean and free from any debris or old plumber’s putty.
By following these steps, you will be well-prepared to install your new single-hole faucet and ensure a successful and hassle-free installation process.
Credit: www.homedepot.com
Step-By-Step Installation Guide
Installing a single hole faucet in your bathroom sink can instantly update the look of your space and enhance its functionality. With just a few simple steps, you can have a sleek and modern faucet that will elevate your bathroom’s style. In this step-by-step installation guide, we will walk you through the process of installing a single hole faucet with ease.
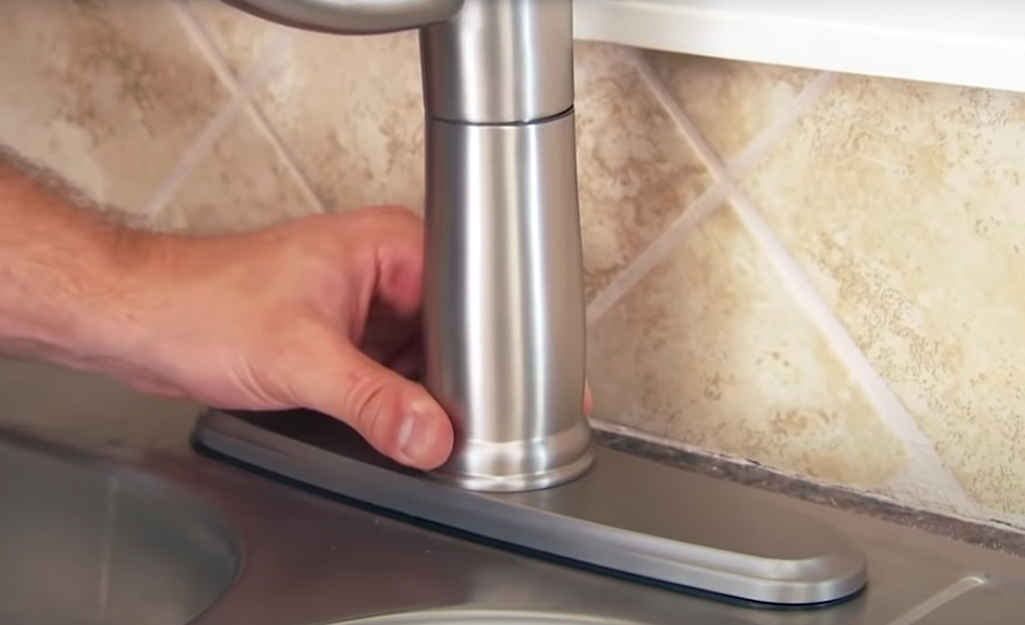
Positioning and securing the faucet base
To start the installation process, first, ensure that your sink is clean and free from any debris. Place the faucet base over the mounting holes on your sink, making sure that the appropriate supply lines are aligned with the corresponding holes.
Next, secure the faucet base to the sink using the provided mounting hardware. Depending on the manufacturer, this hardware may include screws, nuts, or brackets. Tighten the hardware securely using a screwdriver or wrench, ensuring the faucet is firmly attached to the sink.
Connecting the water supply lines
Note: Before proceeding with this step, make sure to shut off the water supply to the sink.
Once the faucet base is securely in place, locate the two water supply line valves positioned underneath your sink. These valves should be connected to the hot and cold water lines. Turn off both valves by rotating them clockwise.
Next, take the flexible supply lines included with your faucet and connect them to the corresponding valves. Make sure to match the hot water supply line to the hot water valve and the cold water supply line to the cold water valve. Tighten the connections securely using an adjustable wrench, being careful not to over-tighten.
Installing the faucet handle and spout
With the water supply lines connected, it’s time to install the faucet handle and spout. Start by carefully inserting the handle into the designated lever opening on top of the faucet base. Press it down firmly until it is securely in place.
Next, slide the spout into the opening on the faucet base. Make sure it fits snugly and aligns properly with the handle. Use the provided hardware to secure the spout if required, following the manufacturer’s instructions.
Testing for leaks and making final adjustments
Before completing the installation, it is important to test the faucet for any leaks and make any necessary adjustments. Turn on the water supply valves by rotating them counterclockwise. Slowly open the faucet handle to allow water to flow.
Check all connections for leakage, including the supply lines, faucet handle, and spout. Tighten any connections as needed to eliminate leaks. Once you have ensured there are no leaks, carefully inspect the faucet’s operation, making sure the handle and spout move smoothly.
Congratulations! You have successfully installed your single hole faucet. Enjoy the enhanced functionality and style it brings to your bathroom.
Trouble-Shooting Common Installation Issues
Installing a single-hole faucet can be a quick and straightforward process, but like any plumbing project, there can be unexpected obstacles along the way. Don’t fret! In this section, we’ll guide you through troubleshooting some of the most common installation issues you may encounter when installing a single-hole faucet. Read on to learn how to deal with leaks and drips, address water pressure problems, and fix loose or wobbly faucet parts.
Dealing with leaks and drips
If you notice water leaks or drips after installing your single-hole faucet, it’s important to address them promptly to avoid any potential water damage. Here are a few steps you can take to fix this issue:
- Check the supply lines: The first thing you should do is ensure that the supply lines are tightly connected to both the faucet and the shut-off valves. You can use a wrench to tighten them if necessary.
- Inspect the O-rings: Leaks can also occur if the O-rings inside the faucet assembly are worn out or damaged. Carefully remove the faucet handle and spout to access the O-rings. If you notice any signs of wear or tear, replace them with new ones.
- Apply plumber’s tape: Sometimes leaks can be caused by loose connections between the various components of the faucet. To prevent this, apply plumber’s tape to the threaded connections before reassembling the faucet. This will create a secure and watertight seal.
- Consider a valve replacement: If the above steps didn’t resolve the issue, it’s possible that the faucet’s cartridge or valve may be faulty. In this case, you may need to replace the valve assembly to eliminate the leaks and drips.
Addressing water pressure problems
If you’re experiencing low water pressure after installing your single-hole faucet, there are a few potential causes and solutions you can try:
- Check the aerator: The aerator, located at the end of the faucet spout, can sometimes become clogged with debris or mineral buildup. Unscrew the aerator and clean it thoroughly to restore proper water flow.
- Inspect the supply valves: Ensure that the shut-off valves underneath the sink are fully open. If they are partially closed, it can restrict the water flow to the faucet. Turn the valves counterclockwise to open them completely.
- Verify the water pressure throughout your home: If the low water pressure issue persists, it may be a problem with the overall water supply in your home. Check other faucets and fixtures to see if the low pressure is present everywhere. If this is the case, you may need to contact a professional plumber.
Fixing loose or wobbly faucet parts
If you find that certain parts of your single-hole faucet are loose or wobbly, follow these steps to ensure a stable and secure installation:
- Tighten the mounting nut: The mounting nut, located underneath the sink, holds the faucet securely in place. Use a wrench to tighten this nut, ensuring that the faucet is stable and doesn’t move around.
- Inspect the base plate or escutcheon: If your single-hole faucet comes with a base plate or escutcheon, check if it is properly aligned and tightened. Adjust as necessary to eliminate any wobbliness.
- Consider using additional support: In some cases, using a silicone adhesive to secure the faucet to the countertop or sink can provide extra stability. Follow the manufacturer’s instructions and apply a thin bead of adhesive around the base of the faucet.
By following these troubleshooting steps, you’ll be able to overcome common installation issues and enjoy a fully functional and leak-free single-hole faucet. Remember to always exercise caution and refer to the manufacturer’s instructions for specific guidance on your faucet model. Happy installing!
Maintaining And Caring For Your Single Hole Faucet
Regular Cleaning and Maintenance Tips
Keeping your single hole faucet clean and well-maintained is essential for its longevity and performance. Regular cleaning helps prevent the buildup of dirt, grime, and mineral deposits, ensuring that your faucet not only looks great but also functions optimally. Here are some practical tips on how to clean and maintain your single hole faucet:- Start by turning off the water supply to the faucet.
- Remove any loose debris or residue from the surface of the faucet using a soft cloth or sponge.
- Mix warm water with a mild soap or detergent to create a cleaning solution.
- Dampen a cloth or sponge with the cleaning solution and gently wipe the entire surface of the faucet, paying extra attention to areas prone to buildup, such as the spout and handles.
- Rinse the faucet thoroughly with clean water to remove any soap residue.
- Dry the faucet with a soft, lint-free cloth to prevent water spots or discoloration.
- For stubborn stains or mineral deposits, you can use a mixture of equal parts white vinegar and water. Apply the solution to a cloth or sponge and gently rub the affected area, then rinse with clean water.
- Regularly check and tighten any loose screws or fittings to prevent leaks or wobbling.
Troubleshooting Common Maintenance Issues
Despite proper maintenance, you may encounter some common issues with your single hole faucet. Understanding how to troubleshoot these problems can save you time and money. Here are a few common maintenance issues and their solutions:- Dripping faucet: If your faucet is leaking, it may be due to a worn-out washer or O-ring. Replace the washer or O-ring to fix the issue.
- Low water pressure: Mineral deposits can accumulate and clog the aerator, resulting in reduced water pressure. Remove the aerator, clean it thoroughly, and reinstall it to resolve the problem.
- Squeaking or stiff handle: Over time, the handle mechanism can become stiff or squeaky. Apply a silicone-based lubricant to the handle to improve its operation.
- Leaky connections: If you notice water leaking from the connections between the faucet and the water supply lines, tighten the connections using an adjustable wrench.
Extending the Lifespan of Your Single Hole Faucet
Taking proactive measures to extend the lifespan of your single hole faucet ensures that you can enjoy its functionality and aesthetic appeal for years to come. Here are a few tips to help you prolong the lifespan of your faucet:- Regularly clean and maintain your faucet, as discussed earlier, to prevent the buildup of dirt and mineral deposits.
- Avoid using harsh chemicals or abrasive cleaners that can damage the finish of your faucet. Stick to mild soap or detergent and vinegar for cleaning.
- Be gentle when operating the faucet handles and avoid excessive force to prevent wear and tear.
- If you live in an area with hard water, consider installing a water softener to minimize the formation of mineral deposits.
- Periodically check for any signs of leakage or damage and address them promptly to prevent further issues.
Frequently Asked Questions
Are Single Hole Faucets compatible with all sinks?
Single hole faucets are designed to be versatile and can be compatible with most sinks. However, it is still essential to check the specifications of both the faucet and the sink before installation. This will ensure a proper fit and prevent any complications.
Can a Single Hole Faucet be installed without professional help?
Installing a single hole faucet is generally a straightforward process and can often be done without professional assistance. However, it is important to have a basic understanding of plumbing and the necessary tools before attempting the installation. If you feel unsure or uncomfortable with the process, it is recommended to consult a professional plumber.
How long does it take to install a Single Hole Faucet?
The time required to install a single hole faucet can vary depending on your level of experience and the complexity of the installation. On average, it may take around 30 minutes to an hour for a relatively simple installation. However, if additional steps or adjustments are needed, it could extend the installation time.
Frequently Asked Questions For How To Install Single Hole Faucet
How Do You Install A Single-Hole Bathroom Faucet?
To install a single-hole bathroom faucet: 1. Gather the necessary tools: wrench, silicone sealant, and plumber’s tape. 2. Turn off the water supply. 3. Remove the old faucet and clean the sink surface. 4. Install the new faucet by inserting it into the hole and tightening the mounting nut.
5. Connect the water supply lines and use plumber’s tape for a secure seal. Done!
How Do You Install A Single Handle Pull Out Faucet?
To install a single handle pull out faucet, follow these steps: 1. Shut off the water supply. 2. Remove the old faucet and clean the area. 3. Install the new faucet using the manufacturer’s instructions. 4. Connect the water supply lines.
5. Turn on the water and test the faucet for leaks.
Is A Single-Hole Bathroom Faucet Better?
Yes, a single-hole bathroom faucet is better because it requires less space, is easier to install, and offers a sleek, modern look. It also provides convenience and accessibility, allowing for easy control of water temperature and flow with just one handle.
Is A Single-Hole Faucet Better Than A 3 Hole?
A single-hole faucet is typically better than a 3-hole faucet because it offers a more streamlined appearance and is easier to clean. It also gives you more flexibility in terms of positioning on your countertop or sink.
Conclusion
To sum up, installing a single-hole faucet is a straightforward process that can be completed with just a few simple steps. By gathering the necessary tools and materials, following the manufacturer’s instructions, and taking your time, you can successfully replace or upgrade your faucet.
Remember to turn off the water supply, disconnect the old faucet, and properly align and secure the new one. With a little patience and attention to detail, you can enjoy the convenience and functionality of your new single-hole faucet in no time.