To install radon mitigation, first conduct a radon test to determine the levels. Then, hire a professional radon mitigation contractor to install a system tailored to your specific needs.
Radon gas is a harmful substance that can accumulate in homes and pose serious health risks. It is a radioactive gas that is released from the soil and can enter your home through cracks and openings in the foundation. Long-term exposure to radon can lead to lung cancer, making it crucial to mitigate its presence.
This article will guide you on how to install radon mitigation, a process that involves testing for radon levels, hiring a professional contractor, and ensuring the proper installation of a mitigation system. By following these steps, you can ensure a safer and healthier living environment for you and your family.
Understanding The Risks Associated With Radon Exposure
What is Radon and Why is it Dangerous?
Radon is a radioactive gas that is naturally occurring in the environment. It is colorless, odorless, and tasteless, making it virtually impossible to detect without proper testing. Radon is formed from the natural decay of uranium in soil, rock, and water, and it can seep into homes and buildings through cracks in the foundation, gaps in construction materials, and sump pump pits.
Radon is classified as a highly dangerous substance due to its radioactive properties. When inhaled, radon particles can damage the cells lining the lungs and increase the risk of developing lung cancer. In fact, radon exposure is the leading cause of lung cancer among non-smokers and the second leading cause among smokers.
Exploring the Health Risks of Prolonged Radon Exposure
Prolonged exposure to radon gas can have serious health consequences. The radioactive particles emitted by radon gas can become trapped in the lungs, where they release radiation that damages the DNA in lung cells. Over time, this damage can lead to the development of lung cancer.
It is important to note that the risk of developing lung cancer due to radon exposure is influenced by several factors, including the concentration of radon in the air, the duration of exposure, and individual susceptibility. However, the only way to determine the radon levels in your home is by conducting a radon test.
Luckily, there are effective ways to mitigate the risks associated with radon exposure. Installing a radon mitigation system in your home can help to reduce radon levels and minimize the potential for health issues. This is especially important if you live in an area with high levels of radon or if you spend a significant amount of time in the basement or lower levels of your home where radon typically accumulates.
Performing A Radon Test
Performing a Radon Test Radon gas is a silent and invisible threat that can seep into our homes from the surrounding soil. Therefore, it is crucial to perform a radon test to determine the level of radon gas present in your home. Conducting this test will help you assess if further action is required to mitigate the radon levels and safeguard your family’s health. In this section, we will explore different methods for radon testing, interpreting test results, and the recommended action levels to ensure your home remains radon-free.Different methods for radon testing
There are two primary methods used to test for radon gas: short-term testing and long-term testing.Short-term testing
Short-term radon testing involves using devices such as charcoal canisters, alpha track detectors, or electronic monitors. These methods typically yield results within 2 to 7 days, providing a snapshot of the radon levels in your home during that time frame. Short-term testing is an effective starting point, especially if you need immediate results or are planning to sell your home.- Charcoal canisters: These are small containers filled with activated charcoal, which absorbs radon gas. They can be placed in several locations within the home to get an accurate average reading.
- Alpha track detectors: These detectors use a special film to record the impact of alpha radiation, allowing the measurement of radon levels over a specific period.
- Electronic monitors: These devices continuously measure and display the radon levels on a digital screen, providing real-time information. They are convenient for obtaining immediate results.
Long-term testing
Long-term radon testing involves using devices that measure radon levels over an extended period, usually 90 days or more. This testing method provides a more comprehensive understanding of the average radon concentration in your home. It is particularly useful for determining seasonal variations in radon levels and providing a more accurate assessment of your long-term exposure.- Alpha track detectors: These detectors, when left undisturbed for an extended period, accumulate significant alpha particles tracks, offering precise results.
- Electret Ion Chambers (E-PERM): E-PERM devices are highly sensitive and measure the difference in electrical potential between two electret chambers, indicating the concentration of radon gas.
- Continuous radon monitors: These electronic devices continuously measure and record radon levels, providing a detailed analysis of fluctuations over an extended period.
Interpreting test results and recommended action levels
Once you have conducted a radon test, it is essential to understand the results and take appropriate action accordingly. The test results will be provided in units of picocuries per liter (pCi/L), indicating the concentration of radon gas in the air. The Environmental Protection Agency (EPA) has established recommended action levels to guide homeowners:- Average radon levels below 2 pCi/L: Although this is an ideal scenario, it is nearly impossible to achieve a completely radon-free environment. However, maintaining levels below 2 pCi/L minimizes health risks.
- Average radon levels between 2 and 4 pCi/L: If your test results fall within this range, it is recommended to consider mitigation efforts. Taking action to reduce the radon levels will further decrease potential health hazards.
- Average radon levels above 4 pCi/L: If your radon test results exceed 4 pCi/L, it is crucial to take immediate action. High levels of radon gas pose significant health risks, and professional mitigation services should be contacted promptly to eliminate the problem.
Hiring A Professional Radon Mitigation Contractor
When it comes to installing a radon mitigation system, it’s crucial to hire a certified professional radon mitigation contractor. Radon is a colorless and odorless gas that is known to be a leading cause of lung cancer. Therefore, it’s essential to take the necessary steps to protect yourself and your family from this harmful gas. Hiring a certified professional not only ensures the proper installation of the radon mitigation system but also guarantees your peace of mind. In this article, we will discuss why it’s important to work with a certified professional and provide you with a list of questions to ask when interviewing potential contractors.
Why it’s important to work with a certified professional
Working with a certified professional for your radon mitigation needs is of the utmost importance. Here are a few reasons why:
- Expertise: Certified professionals have undergone specialized training and possess the necessary knowledge and skills to effectively mitigate radon gas. They are well-versed in the latest techniques and technologies to ensure the most efficient and reliable installation.
- Compliance with Regulations: Certified professionals adhere to industry standards and regulatory guidelines when installing radon mitigation systems. They are familiar with local building codes and regulations, ensuring that the system is installed correctly and meets all necessary requirements.
- Guaranteed Results: By hiring a certified professional, you can be confident that the radon mitigation system will effectively reduce radon levels in your home. These professionals have the expertise to assess your specific situation, design a customized solution, and monitor the system’s performance to ensure its effectiveness.
Questions to ask when interviewing potential contractors
During the process of finding the right radon mitigation contractor, it’s crucial to ask the right questions to make an informed decision. Consider the following questions when interviewing potential contractors:
- Are you certified by the National Radon Proficiency Program (NRPP) or the National Radon Safety Board (NRSB)?
- How many radon mitigation systems have you installed in the past?
- Do you offer a warranty for your radon mitigation system?
- Can you provide references from previous clients?
- What is your process for assessing the radon levels in my home?
- How do you determine the appropriate radon mitigation system for my specific situation?
- What is the estimated timeline and cost for the installation?
- Will you obtain all necessary permits and handle the paperwork?
- Do you offer post-installation radon testing to ensure the system’s effectiveness?
By asking these questions, you can gain valuable insights into the contractor’s qualifications, experience, and commitment to quality. Remember to choose a contractor who not only meets the necessary certifications but also demonstrates a thorough understanding of radon mitigation techniques and a track record of successful installations.
Credit: www.dep.pa.gov
Selecting The Right Radon Mitigation System For Your Home
Understanding the different types of mitigation systems
When it comes to radon mitigation, there are several types of systems to choose from. Each system uses different techniques to reduce the concentration of radon gas in your home. Understanding these different types will help you make an informed decision about which system is best for your home.
The most common types of radon mitigation systems include:
- Subslab Depressurization (SSD) System: This is the most common and effective type of radon mitigation system. It involves creating suction beneath your home’s foundation to draw radon gas from the soil. Through the use of pipes and a fan, the gas is vented outside, preventing it from entering your living space.
- Sump Hole Mitigation System: This system is similar to the SSD system, but it focuses on utilizing an existing sump hole or pit. A pipe is installed into the sump hole, and a fan is used to pull radon gas from beneath the foundation, directing it outside.
- Block-Wall Suction System: This system is specifically designed for homes with concrete block foundations. Pipes are installed into the hollow cores of the blocks, and a fan is used to create suction, pulling radon gas from the blocks and venting it outside.
- Crawl Space Depressurization System: If your home has a crawl space, this system may be the best option. It involves covering the crawl space floor with a vapor barrier and installing a fan to draw radon gas from the space, directing it outside.
Factors to consider when choosing the best system for your home
When selecting the right radon mitigation system for your home, there are a few important factors to consider. These factors will ensure that you choose a system that is tailored to your specific needs and effectively reduces radon levels.
1. Cost
The cost of a radon mitigation system can vary depending on the type of system and the size of your home. It’s important to consider your budget and find a system that balances cost-effectiveness with effectiveness in reducing radon levels.
2. Foundation Type
The type of foundation your home has will play a role in determining which system is best suited for your needs. Different systems are designed to work with different types of foundations, such as concrete slab, crawl space, or block walls.
3. Radon Levels
You should also consider the radon levels in your home when choosing a mitigation system. If your radon levels are exceptionally high, you may need a more advanced system or additional components to effectively reduce the gas concentration.
4. Installation Process
Consider the complexity and time required for the installation process. Some systems may be more straightforward and require minimal invasive work, while others may be more complex and time-consuming.
5. Maintenance and Warranty
Lastly, consider the maintenance requirements and warranty offered with the system. Ensure that you understand the maintenance tasks involved and that the system comes with a warranty to protect your investment.
By considering these factors, you can select the right radon mitigation system for your home, providing you with peace of mind and a safe living environment. Remember, when it comes to radon gas, it’s better to take proactive measures and invest in a reliable mitigation system.
Assessing The Cost Of Radon Mitigation
When it comes to the safety of your home and family, it’s crucial to address potential health hazards such as radon gas. Radon is a colorless, odorless gas that can seep into your home through cracks and openings in the foundation, posing a significant risk to occupants. Installing a radon mitigation system can help reduce radon levels and create a healthier living environment. However, before embarking on this project, it’s essential to understand the costs involved in radon mitigation.
BREAKING DOWN THE EXPENSES INVOLVED IN INSTALLATION
Installing a radon mitigation system requires professional expertise to ensure its effectiveness. The cost of radon mitigation can vary depending on various factors, including the size of your home, foundation type, and the complexity of the installation process. Here is a breakdown of the potential expenses you can expect:
1. Initial Testing
Before proceeding with radon mitigation, it’s crucial to conduct an initial radon test to determine the current radon levels in your home. These tests typically involve using specialized equipment and can cost between $100 to $300. This step is necessary to assess the severity of the radon issue and plan an effective mitigation strategy.
2. Mitigation System Design
Once the radon levels have been assessed, a radon mitigation system design is necessary. This involves identifying the most appropriate mitigation method for your home and determining the placement of mitigation components. The cost for this design can range from $300 to $600, depending on the complexity of your home’s structure.
3. Mitigation System Installation
The installation of a radon mitigation system typically requires professional assistance. The installation process involves creating a system that effectively redirects radon gas from your home’s interior to the outside, ensuring it is safely dispersed. The cost of installation can vary based on factors such as the size of your home, the complexity of the system, and any necessary modifications to your home’s structure. On average, you can expect to pay between $1,500 to $3,500 for the installation of a radon mitigation system.
POTENTIAL LONG-TERM COST SAVINGS AND BENEFITS OF MITIGATION
While the initial cost of radon mitigation may seem significant, it’s essential to consider the long-term cost savings and benefits associated with this investment. Here are some factors to keep in mind:
1. Health Benefits
The primary benefit of radon mitigation is the improvement in indoor air quality and the reduction of associated health risks. Long-term exposure to high radon levels can increase the risk of developing lung cancer. By installing a radon mitigation system, you are taking a proactive step in safeguarding the health of your family.
2. Increased Home Value
A home with a radon mitigation system in place is generally more desirable among buyers. This means that if you decide to sell your home in the future, having a radon mitigation system can increase its market value. Buyers are often willing to pay a premium for homes with lower health risks and a maintained radon-free environment.
3. Potential Energy Savings
Radon mitigation systems can contribute to energy savings by improving your home’s overall efficiency. These systems effectively seal cracks and openings in your foundation, preventing the escape of conditioned air and reducing the workload on your HVAC system. As a result, you may notice a decrease in energy costs over time.
In conclusion, assessing the cost of radon mitigation is a crucial step in ensuring the safety and well-being of your home and family. Though there may be initial expenses involved, the long-term benefits, including improved health, increased home value, and potential energy savings, make radon mitigation a worthwhile investment.
Preparing Your Home For Mitigation
Before installing a radon mitigation system in your home, it’s essential to properly prepare the installation area. This not only ensures the effectiveness of the system but also promotes the safety and accessibility of the process. By following the necessary precautions, you can avoid potential complications and make the installation smooth. In this section, we will discuss two crucial aspects of preparing your home for radon mitigation, which are clearing the installation area and ensuring accessibility, as well as steps to protect your personal belongings during the installation.
Clearing the Installation Area and Ensuring Accessibility
One of the primary steps in preparing your home for radon mitigation is clearing the installation area. This helps in creating a clean and clutter-free space for the mitigation system installation. Here are some tips to ensure a well-prepared installation area.
- Remove any obstacles: Take a walk around the installation area and remove any objects or furniture that might obstruct the installation process. This includes clearing away any stored items, furniture, or equipment that could hinder the technician’s work.
- Provide easy access: Ensure that the installation area is easily accessible to the technician. Clear pathways leading to the installation area, remove any debris or hazards that could impede access, and make sure that doors, windows, and gates are easy to open and close.
- Secure pets: During the installation process, it’s crucial to keep pets away from the installation area. Find a safe place for them in another part of the house or perhaps with a friend or neighbor temporarily.
By clearing the installation area and ensuring accessibility, you are not only making the installation easier for the technician but also reducing the risk of any accidents or damage that might occur due to obstacles in the way.
Steps to Protect Personal Belongings During Installation
Protecting your personal belongings during the radon mitigation installation is paramount. Although the process is relatively non-invasive, taking a few precautions will give you peace of mind. Here are some steps you can follow to protect your belongings:
- Remove fragile items: Before the installation begins, remove any fragile or valuable items from the immediate vicinity of the installation area. This includes items such as glassware, delicate decorations, and sensitive electronic devices. Store them in a safe place until the installation is complete.
- Cover or seal nearby items: If there are items that cannot be easily removed from the room, such as heavy furniture or appliances, cover them with plastic sheets or tarps to protect them from dust or debris that may be generated during the installation process.
- Communicate with the technician: Prior to the installation, discuss any specific concerns you have about the protection of your belongings with the radon mitigation technician. They can provide additional guidance and take extra precautions if necessary.
By taking these preventive measures, you can safeguard your personal belongings from potential dust or debris and ensure a worry-free installation process.
Installing The Active Soil Depressurization System
When it comes to radon mitigation, one of the most effective methods used is the installation of an Active Soil Depressurization (ASD) system. This system effectively reduces indoor radon levels by creating a pressure differential that prevents radon gas from entering the living spaces. In this article, we will walk you through the installation process of an ASD system, giving you a clear understanding of the steps involved.
Overview of the installation process
The installation of an ASD system involves several key steps that must be followed to ensure its effectiveness. These steps include:
- Site assessment and system design
- Component installation and configuration
- Post-installation testing and monitoring
Let’s explore each of these steps in detail and understand what they entail.
Explanation of the components involved in an active soil depressurization system
An active soil depressurization (ASD) system consists of various components that work together to effectively mitigate radon gas. Understanding these components is crucial for a successful installation. Here are the main components involved:
Suction point:
The suction point is the location in the soil where a PVC pipe is connected to create a pressure differential. It is usually positioned in the lowest level of the building, such as the basement or crawl space, near the foundation.
PVC piping:
The PVC piping acts as a pathway for radon gas to be redirected from the suction point to the exterior of the building. It is essential to use high-quality PVC piping that is resistant to the corrosive nature of radon gas.
Fan:
The fan is the heart of the ASD system. It creates the necessary suction to draw radon gas from the soil, through the piping, and expel it safely outside the building. The fan should be properly sized and installed to ensure optimal radon reduction.
System monitor:
A system monitor is an optional component but highly recommended. It allows you to continuously monitor the performance of the ASD system, ensuring it is functioning as intended. Any deviations or issues can be detected early, allowing for timely maintenance or repairs.
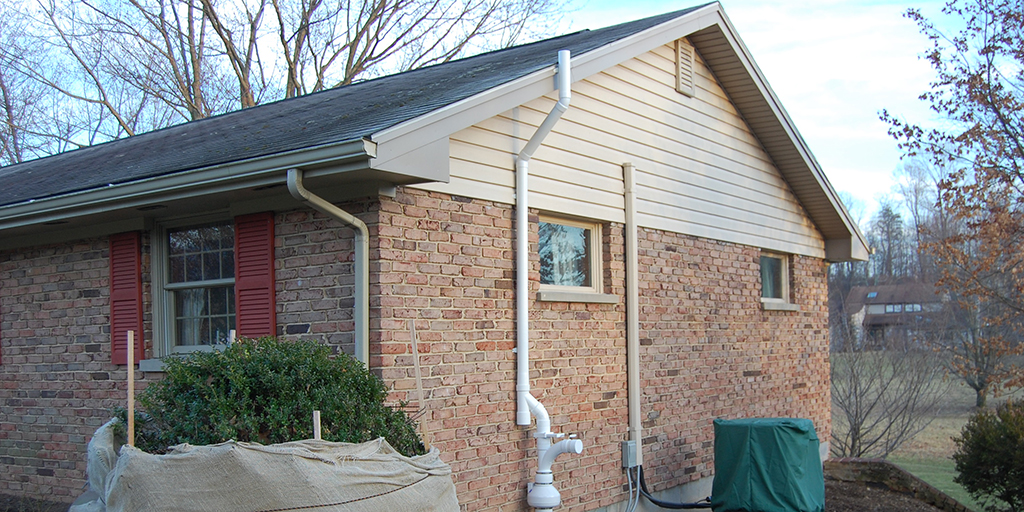
Vent stack:
The vent stack is the visible part of the ASD system that extends above the roofline. It serves as the outlet for the expelled radon gas. The vent stack must meet specific height and distance requirements to effectively disperse the gas away from windows or other openings.
By understanding the primary components of an ASD system, you are better equipped to oversee its installation and ensure its proper functioning. The next step is to perform a thorough site assessment and design a system that suits your specific radon mitigation needs.
Post-Installation Testing And Monitoring
Importance of post-installation testing to ensure the system’s effectiveness
Once you have successfully installed a radon mitigation system in your home, it is crucial to conduct post-installation testing to ensure its effectiveness in reducing radon levels. This testing process plays a vital role in verifying whether the system is functioning as intended and providing you and your family with a safer living environment.
Post-installation testing involves measuring radon levels in your home after the mitigation system has been implemented. This allows you to assess whether the radon reduction system is effectively mitigating the radon gas to acceptable levels. It is important to note that radon levels can fluctuate over time, and therefore, it is necessary to conduct post-installation testing to verify the system’s ongoing performance.
By conducting post-installation testing, you can ensure that the radon mitigation system you have installed is functioning optimally to reduce the risk of radon exposure. Regular testing will also provide you with peace of mind, knowing that your home’s indoor air quality remains safe for you and your loved ones.
Recommended frequency for monitoring radon levels after installation
After installing a radon mitigation system, it is crucial to monitor radon levels periodically to ensure the continued effectiveness of the system. The frequency of monitoring will depend on various factors, including the initial radon levels in your home and the performance of the mitigation system.
Typically, it is recommended to conduct radon testing every two years to ensure that radon levels remain within acceptable limits. However, if the initial radon levels were significantly high, it is advisable to conduct more frequent testing, such as annually or semi-annually, to closely monitor the effectiveness of the mitigation system.
It is also important to bear in mind that changes in your home’s foundation or ventilation system may affect the performance of the radon mitigation system. Therefore, if you make significant alterations to your home, consider conducting post-alteration radon testing to ensure that the system continues to provide adequate protection from radon gas.
Monitoring radon levels after installation is vital to protecting your health and ensuring the ongoing effectiveness of your radon mitigation system. Regular testing will enable you to identify any potential issues promptly and take appropriate measures to maintain a safe indoor environment.
Regular Maintenance And Upkeep Of The Mitigation System
Regular maintenance and upkeep of the radon mitigation system is essential to ensure its efficiency and functionality. By following a few simple steps, you can ensure that your system continues to effectively reduce radon levels in your home and protect your family’s health.
Steps to maintain the system’s efficiency and functionality
- Check for blockages: Periodically inspect the system for any blockages or obstructions that may hinder the airflow. Clear away any debris, leaves, or other materials that might accumulate around the system’s exhaust vent to maintain optimal airflow.
- Inspect fan operation: The fan is a crucial component of the radon mitigation system. Regularly check if the fan is operating smoothly and listen for any unusual noises. If you notice any issues, such as lack of airflow or excessive vibration, consult a professional for further inspection and potential repairs.
- Monitor pressure levels: Keep an eye on the pressure levels within the system. You can use a manometer, which is a simple device that measures the pressure differentials in the system. If you observe any significant fluctuations, it may indicate a ventilation problem or a need for maintenance.
- Replace air filters: Radon mitigation systems often include air filters to remove additional contaminants from the air. Check the manufacturer’s recommendations for the frequency of filter replacement. Dirty or clogged filters can reduce system efficiency, so it’s important to keep them clean.
- Inspect seals and connections: Regularly inspect the seals and connections of the radon mitigation system, especially around its entry point into your home. Look for any signs of deterioration or damage, such as cracks, gaps, or loose fittings. It’s crucial to ensure a tight seal to prevent radon from entering your living spaces.
Signs that indicate the need for repairs or upgrades
- Increased radon levels: If you notice a significant increase in radon levels in your home, despite having a mitigation system in place, it may indicate a problem with the system. Contact a professional to assess the situation and determine if repairs or upgrades are necessary.
- Unusual odors or sounds: If you detect any strange smells or hear unusual noises emanating from the system, it could suggest a malfunction or an issue that requires attention. Promptly address these signs to ensure the continued functionality of your radon mitigation system.
- Visible damage: Inspect the components of the system for any visible damage, such as cracks in pipes or dislodged fittings. These damages can negatively impact the system’s effectiveness and should be repaired promptly.
- System age: Over time, a radon mitigation system may experience wear and tear, reducing its efficiency. If your system is nearing its expected lifespan, consider consulting a professional for an evaluation and potential upgrades.
Regular maintenance and prompt attention to any signs of malfunction or damage are crucial for ensuring the effectiveness and functionality of your radon mitigation system. By following these steps and being vigilant about necessary repairs or upgrades, you can continue to protect your home and loved ones from the dangers of radon.
Exploring Advanced Radon Mitigation Techniques
Radon is a harmful radioactive gas that can seep into homes and pose serious health risks. While traditional radon mitigation techniques such as soil suction and sealing are effective, there are advanced methods that can provide an even greater level of protection. In this article, we will explore alternative techniques for mitigating radon and discuss their potential advantages and limitations.
Overview of alternative methods for mitigating radon
When it comes to radon mitigation, it’s important to understand that there are various techniques available, each targeting different sources of radon entry. These alternative methods go beyond the conventional approaches and offer homeowners a more comprehensive solution. Let’s take a closer look at some of these advanced mitigation techniques:
- Subslab depressurization: This technique involves creating a vacuum beneath the home’s foundation, effectively extracting the radon-laden soil gas before it enters the living space. A series of suction pipes and a specialized fan are installed to draw the radon gas from beneath the foundation and safely vent it outside.
- Crawl space encapsulation: For homes with crawl spaces, this method involves sealing off the entire area to prevent radon gas from infiltrating the living areas. A durable vapor barrier is installed on the floor and walls of the crawl space, along with a ventilation system that directs any radon gas to the exterior of the house.
- Heat recovery ventilation: This innovative technique not only mitigates radon but also improves indoor air quality. A mechanical ventilation system is installed to constantly exchange stale air with fresh outdoor air. This helps dilute any radon gas present and maintains a healthier living environment.
The potential advantages and limitations of advanced mitigation techniques
While advanced radon mitigation techniques offer enhanced protection, it’s important to consider their potential advantages and limitations before making a decision:
| Advantages | Limitations |
|---|---|
|
|
In conclusion, exploring advanced radon mitigation techniques can provide homeowners with a higher level of protection against this hazardous gas. By understanding the alternative methods available and considering their advantages and limitations, individuals can make an informed decision to ensure a safer and healthier living environment for themselves and their families.
Frequently Asked Questions For How To Install Radon Mitigation
What Is Radon And Why Is It Dangerous?
Radon is a radioactive gas that occurs naturally in the environment. It can seep into homes and poses a serious health risk as it is the second leading cause of lung cancer.
How Does Radon Mitigation Work?
Radon mitigation systems reduce indoor radon levels by creating a pressure difference, preventing radon entry and directing it out of the home.
Can I Install A Radon Mitigation System Myself?
While it’s possible to install a radon mitigation system yourself, it is highly recommended to hire a professional to ensure proper installation and effectiveness.
How Long Does The Radon Mitigation Installation Process Take?
The duration of the installation process depends on various factors, including the size of the property and the complexity of the system. Generally, it can take anywhere from a few hours to a day.
Are There Any Ongoing Maintenance Requirements For Radon Mitigation Systems?
Radon mitigation systems typically require minimal maintenance, such as checking the fan periodically and ensuring it is functioning properly. It’s a good idea to schedule a professional inspection every few years.
Can Radon Be Completely Eliminated By A Mitigation System?
Radon mitigation systems are designed to reduce radon levels to an acceptable range. While they can significantly decrease radon concentrations, it’s unlikely to eliminate it entirely. Regular testing is recommended to ensure long-term safety.
Conclusion
Installing radon mitigation is a crucial step in ensuring a safe and healthy environment for your home. By following the step-by-step guide outlined in this blog post, you can effectively mitigate radon gas and reduce the risk of associated health problems.
Remember, proper installation techniques and regular maintenance are key to the long-term effectiveness of your mitigation system. Take action today, and enjoy peace of mind knowing that you have taken the necessary measures to protect your loved ones.