To install a new valve stem, start by removing the old one using pliers. Then, insert the new stem into the valve hole and tighten it with a wrench until secure.
Finally, inflate the tire to the recommended pressure and check for any leaks.
Tools And Materials Required For Valve Stem Installation
When it comes to installing a new valve stem on your tire, having the right tools and materials is essential. Not only will it make the process easier, but it will also ensure that the installation is done correctly and that your tire remains safe and secure. Below are the key tools and materials you will need:
Valve Stem
The valve stem is the small, rubber or metal valve that allows air to be pumped into your tire. It is an essential part of your tire’s inflation system, and replacing it when damaged or worn is important for maintaining proper tire pressure and preventing leaks. Make sure to choose a valve stem that is compatible with your tire and valve type.
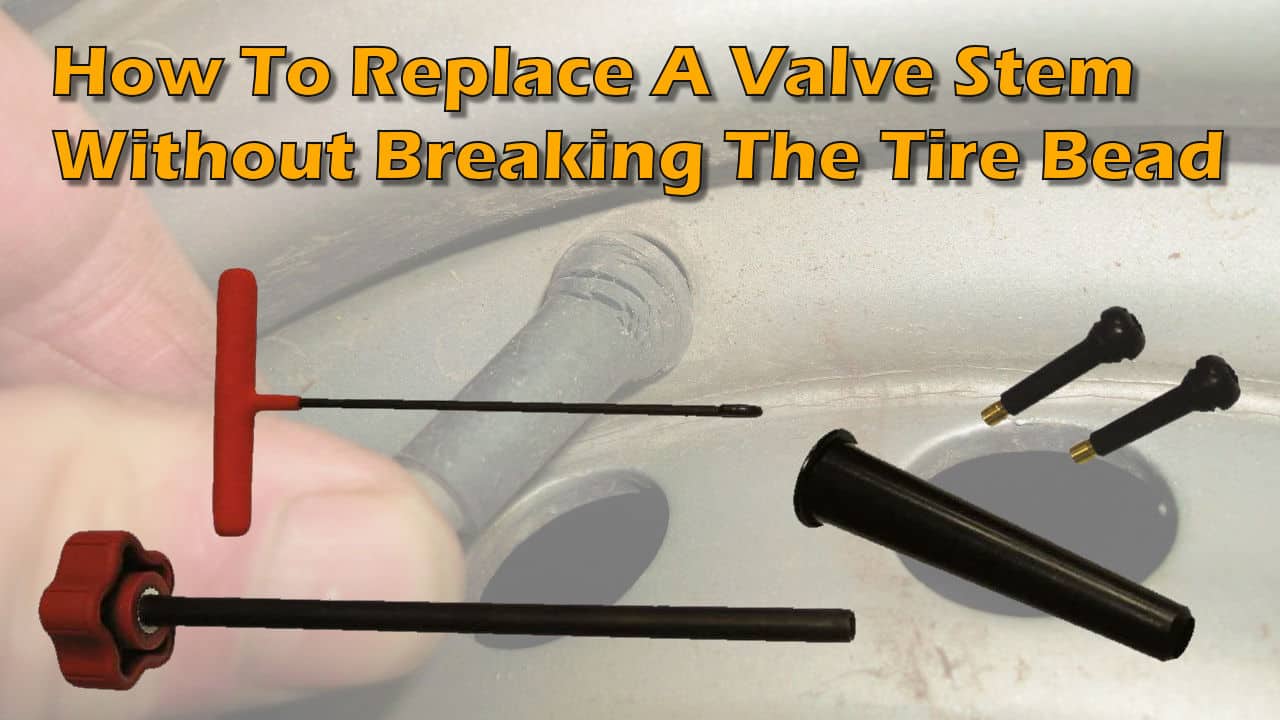
Valve Stem Remover Tool
A valve stem remover tool is a specialized tool designed to remove the old valve stem from your tire. It allows for easy and safe removal without causing any damage to the tire or rim. This tool is a must-have for valve stem replacement as it simplifies the entire process.
Tire Pressure Gauge
A tire pressure gauge is used to measure the air pressure inside your tire. It is important to have an accurate gauge to ensure that your tire is properly inflated after installing the new valve stem. An under-inflated tire can affect your vehicle’s handling, fuel efficiency, and overall safety.
Lubricant
A lubricant, such as a water-based tire mounting lubricant, is necessary for easily inserting the new valve stem into the valve hole. It helps in reducing friction and prevents damage to the valve stem during installation.
Tire Iron
A tire iron, commonly known as a lug wrench, is a tool used to remove or tighten the lug nuts on your tire. Although not directly related to valve stem installation, it is essential to have a tire iron handy in case you need to remove the tire to access the valve stem.
Air Compressor
An air compressor is used to inflate your tire to the proper pressure once the new valve stem is installed. It is essential to have an air compressor with the necessary PSI rating for your specific tire.
By having all of these tools and materials ready, you will be well-prepared to install a new valve stem on your tire. Remember to follow proper safety precautions and refer to your vehicle’s manual for specific instructions. With a little care and attention, you’ll have a properly functioning tire in no time!
Preparing For Valve Stem Replacement
Before you can replace your valve stem, there are a few essential steps you need to take to ensure a smooth and successful installation. By following these guidelines, you’ll prevent any mishaps and be on your way to a properly functioning valve stem.
Checking the tire pressure
Before you begin replacing the valve stem, it’s crucial to check the tire pressure. This step is important as it allows you to identify any potential issues and ensures the tire is properly inflated.
- Start by using a tire pressure gauge to measure the air pressure in each tire.
- Compare the reading on the gauge with the manufacturer’s recommended tire pressure.
- If the tire pressure is too low, add air until it reaches the appropriate level. On the other hand, if it’s too high, release some air until it matches the recommended pressure.
Finding the appropriate replacement valve stem
Next, you need to find the right replacement valve stem for your tire. To do this, follow these steps:
- Remove the damaged valve stem and clean the area around it to ensure a proper fit.
- Measure the diameter and length of the valve stem to determine the size you need.
- Cross-reference the measurements with the available valve stem options to find the right one for your tire.
- Once you have the replacement valve stem, make sure it matches the characteristics of the old one in terms of material and type.
Identifying the wheel position
Before you start the replacement process, it’s important to identify the position of the wheel and its corresponding valve stem. This step will help you keep track of the tire’s location and prevent any confusion during reinstallation.
| Wheel Position | Valve Stem Location |
|---|---|
| Front left | Left side of the wheel |
| Front right | Right side of the wheel |
| Rear left | Left side of the wheel |
| Rear right | Right side of the wheel |
By noting the wheel position and corresponding valve stem location, you can ensure that you reinstall the new valve stem in the correct position, eliminating any potential issues with tire rotation or alignment.
With these preparatory steps, you are now ready to replace your valve stem. The proper tire pressure, the appropriate replacement valve stem, and identifying the wheel position will make the installation process easier and more efficient.
Step 1: Removing The Old Valve Stem
When it comes to replacing a valve stem on your tire, the first step is to remove the old one. This might seem like a daunting task, but with the right tools and techniques, it can be a relatively simple process. Follow these steps to successfully remove the old valve stem:
Loosening the valve cap
The first thing you will need to do is to loosen the valve cap. This will make it easier to deflate the tire later on. Simply use your fingers to twist the cap counterclockwise until it comes off. If the cap is tight, you can use a wrench to gently loosen it. Be careful not to force it or you may damage the valve stem.
Deflating the tire
Once the valve cap is removed, it’s time to deflate the tire. This step is crucial to ensure the safe removal of the valve stem. You can either use a tire pressure gauge or simply press on the valve core with a small tool or your fingernail to release the air. Make sure to push firmly and hold until you hear a hissing sound indicating that the air is escaping. Repeat this process until the tire is completely deflated.
Using the valve stem remover tool to extract the old valve stem
Now that the tire is deflated, it’s time to remove the old valve stem. This task requires a valve stem remover tool, which can be easily purchased at any automotive store. Place the tool over the valve stem and twist it counterclockwise to loosen and extract the old stem. You may need to apply some force, but be careful not to apply too much pressure that could damage the rim or valve stem hole. Keep twisting until the old valve stem is completely removed from the tire.
In conclusion, the first step in installing a new valve stem is to remove the old one. By following these steps and taking proper precautions, you can successfully removing the old valve stem and prepare the tire for the installation of a new one.
Step 2: Prepping The New Valve Stem
Once you have removed the old valve stem, it’s time to prep the new one for installation. This step involves applying lubricant to the valve stem, inserting it into the valve hole, and securing it with a nut. Following these instructions will ensure a smooth and secure installation for your new valve stem.
Applying lubricant to the valve stem
To ensure smooth operation and reduce friction, it’s important to apply lubricant to the new valve stem before installation. Lubricant helps the stem slide easily into the valve hole and prevents it from getting stuck or damaged.
To apply the lubricant, follow these steps:
- Clean the valve stem with a cloth or rag to remove any dirt or debris.
- Apply a small amount of lubricant to the entire surface of the stem.
- Spread the lubricant evenly using your finger or a clean cloth.
Make sure not to apply excessive lubricant, as this can cause it to run into the valve hole and interfere with the seal.
Inserting the valve stem into the valve hole
Once the valve stem is properly lubricated, it’s time to insert it into the valve hole. Follow these steps:
- Hold the new valve stem between your thumb and forefinger, ensuring that the threaded end is facing outwards.
- Gently insert the tip of the valve stem into the valve hole.
- Slightly twist the stem as you push it in to help it glide smoothly into place.
- Continue pushing until the entire stem is inserted into the valve hole.
Ensure that the stem is inserted straight and centered in the hole to ensure a proper fit.
Securing the valve stem with a nut
Once the valve stem is in place, it’s time to secure it with a nut. The nut creates a tight seal and prevents the valve stem from coming loose during use.
To secure the valve stem, follow these steps:
- Take the nut provided with the valve stem and place it onto the threaded end of the stem.
- Tighten the nut by turning it clockwise using an adjustable wrench or a valve stem tool.
- Continue tightening until the nut feels secure and snug against the valve hole.
Ensure not to overtighten the nut, as this can damage the valve stem or the valve hole.
With these steps, you have successfully prepped the new valve stem for installation. The lubricant ensures a smooth operation, while inserting the stem and securing it with a nut guarantees a secure and tight fit. You are now ready to move on to the next step in installing the new valve stem.
Step 3: Inflating The Tire
Now that you have successfully installed a new valve stem, it’s time to inflate the tire and get it ready to hit the road again. This step is crucial to ensure proper tire performance and safety. Follow these simple instructions to complete the tire inflation process.Connecting the Air Compressor to the Valve Stem
Connecting your air compressor to the valve stem is the first step in inflating your tire. You’ll need an air compressor with a compatible nozzle to achieve this. Here’s how you can do it:- Attach the nozzle of your air compressor to the valve stem. Make sure it is securely connected to avoid any air leaks during the inflation process.
- Ensure the air compressor is turned off before attaching the nozzle to the valve stem.
- If your air compressor has a pressure gauge, take note of the current tire pressure.
Gradually Inflating the Tire to the Recommended Pressure
Now that you have securely connected the air compressor to the valve stem, it’s time to start inflating the tire. Follow these steps to ensure a smooth and safe inflation process:- Turn on the air compressor and allow the tire to inflate gradually.
- Keep an eye on the pressure gauge attached to the air compressor and ensure that you inflate the tire to the recommended pressure level. Refer to your vehicle’s manual or the tire sidewall for the correct pressure.
- Avoid overinflating the tire, as it can lead to decreased tire performance and potential safety hazards. Gradually inflate the tire in small increments, checking the pressure after each increment until you reach the desired pressure level.
Checking for Leaks Using Soapy Water
After you have inflated the tire to the recommended pressure, it’s essential to check for any air leaks. This step will help you ensure the tire is properly sealed and safe to use. Follow these steps to check for leaks:- Prepare a soapy water solution by mixing mild soap with water.
- Apply the soapy water solution to the valve stem and the area around it.
- Observe the valve stem and surrounding area for any bubbles forming. Bubbles indicate air leakage.
- If you notice any bubbles, tighten the valve stem or replace it if necessary. A properly sealed valve stem is critical for optimal tire performance and safety.
Step 4: Finishing Touches
After successfully removing the old valve stem and installing the new one, you are almost done with the valve stem replacement process. However, before you consider it complete, there are a few final touches that you need to take care of to ensure everything is in proper order. These quick steps will help you wrap up the job and get your tire ready for a safe and smooth ride.
Removing the Air Compressor and Disconnecting the Valve Stem
Now that you have securely tightened the new valve stem, it’s time to remove the air compressor and disconnect it from the stem. First, switch off the air compressor and unplug it from the power source. Safely detach the air hose from the valve stem by turning it counterclockwise.
Reinstalling the Valve Cap
Protecting your valve stem from dirt, dust, and debris is crucial for its long-term functionality. Reinstall the valve cap tightly by screwing it clockwise onto the valve stem. Ensure that the cap is snugly fitted to prevent any air leakage and to maintain optimal tire pressure.
Checking the Tire Pressure Once Again
After completing the valve stem replacement, it is essential to double-check the tire pressure to ensure it matches the recommended levels. Use a tire pressure gauge to measure the pressure accurately. If needed, add air to inflate the tire to the desired pressure. Remember to refer to your vehicle’s manual or the sidewall of the tire for the correct pressure range.
Once you have checked and adjusted the tire pressure, make sure to inspect the tire visually for any signs of damage or irregularities. In case of any concerns, consult a professional for guidance.
By following these final steps and taking care of the finishing touches, you can be confident that your new valve stem is correctly installed and your tire is ready to hit the road smoothly and safely.
Troubleshooting Common Issues
After successfully installing a new valve stem, you might come across a few common issues that can hamper the proper functioning of your tire. In this section, we will discuss how to troubleshoot and address these issues, ensuring your valve stem replacement is a success. Let’s dive in!
Dealing with overtightened or damaged valve stems
One of the most common issues encountered after valve stem replacement is when the valve stem gets overtightened or damaged during the installation process. This can lead to air leaks or difficulties in inflating the tire. To address this problem, follow these steps:
- Use a valve core tool to remove the valve core from the valve stem.
- Inspect the valve stem for any signs of overtightening or damage, such as cracks or tears. If you notice any issues, replace the valve stem with a new one.
- When installing the new valve stem, ensure it is securely tightened according to the manufacturer’s specifications. Avoid overtightening, as this can cause damage.
If you find that the valve stem is still not functioning properly or the tire continues to leak air, it’s recommended to seek professional assistance to prevent further damage.
How to address leaks or slow air loss after valve stem replacement
If you notice leaks or slow air loss from your tire after replacing the valve stem, follow these steps to address the issue:
- Inspect the valve stem for any visible signs of leaks, such as bubbles or hissing sounds.
- If there are visible leaks, ensure that the valve stem is securely tightened. You can use a valve stem cap wrench to tighten it further.
- If tightening doesn’t resolve the issue, try applying a small amount of soapy water to the valve stem area. If you see bubbles forming, it indicates a leak. In this case, you may need to replace the valve stem with a new one.
- If you are experiencing slow air loss without any visible leaks, it could be due to a faulty valve core. Try removing the valve core using a valve core tool and inspect it for signs of damage or debris. Clean or replace the valve core if necessary.
Remember to always consult your tire manufacturer or a professional mechanic if you are unsure or unable to resolve the leaks or slow air loss issue.
Revisiting the installation process if the tire still doesn’t hold air
If you have followed the troubleshooting steps mentioned above but your tire still doesn’t hold air, it might be necessary to revisit the installation process. Here are some additional steps to consider:
- Verify that the valve stem has been installed correctly and securely. Ensure that it is aligned properly with the valve hole in the rim.
- Inspect the valve hole in the rim for any damages or obstructions. Clean the area and remove any debris that may be obstructing the valve stem’s proper seating.
- Double-check that the valve stem components, such as the grommet and washer, are in good condition and properly positioned.
- If you are still experiencing air loss, it’s essential to seek professional help or consult the tire manufacturer for further assistance. They will have the expertise and tools to diagnose and resolve any underlying issues.
By following these troubleshooting steps, you can address common issues that may arise after valve stem replacement. Ensuring the proper functioning of your tire is essential for your safety and optimal performance.
Credit: m.roadkillcustoms.com
Frequently Asked Questions On How To Install New Valve Stem
Can You Replace The Valve Stem On Your Own?
Yes, you can replace the valve stem on your own. Just follow the proper instructions and use the necessary tools for a successful replacement.
How Do You Replace A Valve Stem Yourself?
To replace a valve stem yourself, follow these steps: 1. Locate the valve stem on the tire. 2. Remove the valve cap. 3. Use a valve stem remover tool to take out the old stem. 4. Insert the new stem into the hole.
5. Tighten the nut on the new stem with pliers. Remember to inflate the tire and check for leaks.
How Do You Replace A Valve Stem Without Removing A Tire?
To replace a valve stem without removing a tire, you’ll need a valve stem tool. Insert the tool into the valve stem, turn it counterclockwise to remove the old stem, and clockwise to install the new one. Make sure the tire is deflated before attempting this task.
How Do You Put A Valve Stem On A New Tire?
To put a valve stem on a new tire, first, remove the old valve stem if necessary. Next, lubricate the new stem and insert it into the valve hole. Push it in and secure it in place with a valve stem tool.
Finally, inflate the tire to the recommended pressure.
Conclusion
Installing a new valve stem is a simple and essential task for maintaining your vehicle’s tire pressure. By following the step-by-step instructions in this blog post, you can easily replace a faulty valve stem and ensure proper inflation of your tires.
Regular maintenance like this can extend the lifespan of your tires and improve their overall performance. So, don’t wait any longer to take care of this important task and keep your tires in optimal condition.