To install an inline water filter for an ice maker, follow these steps: shut off the water supply, cut the refrigerator’s tubing, attach the filter to the tubing, connect the filter to the water supply, and turn on the water. Installing an inline water filter for an ice maker is a simple process that can provide clean and fresh ice.
By using an inline water filter, you can remove impurities and contaminants from your water, ensuring that your ice is free from any unpleasant tastes or odors. We will guide you through the installation process, so you can enjoy purified ice whenever you need it.
Importance Of Using An Inline Water Filter For Ice Maker
Are you tired of dealing with cloudy ice cubes and unpleasant-tasting drinks? Look no further! Installing an inline water filter for your ice maker is the solution to all your problems. Not only does it improve the quality and taste of your ice, but it also ensures that your family is consuming clean and healthy water. In this article, we will explore the benefits of using an inline water filter for your ice maker and how it can transform your ice-making experience.
The Benefits of Using an Inline Water Filter for Your Ice Maker
Using an inline water filter for your ice maker brings along a plethora of benefits that you simply cannot overlook. Let’s take a closer look at how this small addition to your ice maker can make a world of difference.
Improved Quality and Taste of Ice
When it comes to making the perfect icy beverages, the quality and taste of the ice play a vital role. With an inline water filter, you can bid farewell to cloudy ice cubes that are full of impurities. This filter removes common contaminants such as sediment, chlorine, and even foul odors, ensuring that your ice is crystal clear and refreshing. The result? Each sip is a flavorful experience that will leave you wanting more.
Additionally, an inline water filter also eliminates any metallic or chemical tastes that often plague ice made without filtration. This means that your drinks will taste exactly as they should, allowing you to fully enjoy the flavors without any unwanted aftertaste.
Imagine the satisfaction of serving a cold glass of water or a refreshing cocktail with ice that not only looks pristine but also enhances the overall taste experience. Truly, investing in an inline water filter is investing in the quality and enjoyment of your favorite beverages.
But wait, there’s more! Using a reliable inline water filter can also extend the lifespan of your ice maker. By removing impurities and preventing the build-up of deposits in the mechanism, your ice maker can function optimally for a longer period. This means fewer repairs and a more cost-effective solution in the long run.
Now that we’ve explored the benefits of using an inline water filter for your ice maker, it’s time to take action and experience these advantages firsthand. Don’t settle for subpar ice and compromised taste – upgrade your ice maker with an inline water filter today and indulge in the pure pleasure of crystal-clear, great-tasting ice.
Choosing The Right Inline Water Filter For Your Ice Maker
Installing an inline water filter for your ice maker is a smart and cost-effective way to ensure you have clean and fresh ice. With so many options available in the market, it can be overwhelming to choose the right one for your needs. To make your decision easier, consider the following factors when selecting an inline water filter for your ice maker:
Factors to consider when selecting an inline water filter
1. Filter Performance: It is essential to consider the filtration performance of the inline water filter you choose. Look for a filter that effectively removes contaminants such as chlorine, sediments, and unpleasant tastes and odors. A high-quality filter will provide you with crystal-clear ice that enhances the taste of your beverages.
2. Filter Lifespan: The lifespan of the filter determines how long it will effectively purify your ice maker’s water supply. Check the manufacturer’s specifications to see how long the filter is designed to last. Additionally, some filters come with an indicator that notifies you when it’s time to replace the filter, ensuring you always have clean ice.
3. Compatibility: Ensure that the inline water filter you choose is compatible with your ice maker’s water supply line. Check the size and type of connectors required for installation to avoid any compatibility issues.
4. Installation Ease: Consider how easy it is to install the filter. Look for a model that comes with clear instructions and all the necessary components for a hassle-free installation. Additionally, choosing a filter with quick-connect fittings can simplify the installation process.
5. Cost: Take into account the initial cost of the filter and the cost of replacement cartridges. While it may be tempting to go for a cheaper option, keep in mind that a higher-quality filter may require fewer replacements, saving you money in the long run.
Popular brands and models to consider
Here are some popular brands and models of inline water filters that have received positive reviews from users:
| Brand | Model |
|---|---|
| 1. XYZ Filters | Model A |
| 2. ABC Water | Model B |
| 3. DEF Purifiers | Model C |
These brands and models are known for their excellent filtration performance, durability, and ease of installation. However, it’s always recommended to read customer reviews and compare different options to find the one that best suits your specific requirements.
Choosing the right inline water filter for your ice maker is crucial to ensure you have clean and refreshing ice whenever you need it. By considering factors such as filter performance, lifespan, compatibility, installation ease, and cost, you can make an informed decision and select the perfect inline water filter for your ice maker.
Steps To Install An Inline Water Filter For Your Ice Maker
## Steps to Install an Inline Water Filter for Your Ice Maker Installing an inline water filter for your ice maker is a simple and effective way to ensure that your ice is clean and free from impurities. With just a few steps, you can have a filter installed and ready to go, providing you with high-quality ice for your beverages. In this section, we will walk you through the process, step by step, from gathering the necessary tools and materials to testing the installation and checking for leaks. ### Gathering the necessary tools and materials Before you begin the installation process, it’s important to gather all the necessary tools and materials. Here’s a list of what you’ll need: 1. Inline water filter kit: This typically includes the filter, fittings, and connectors. 2. Adjustable wrench: This will help you loosen and tighten the fittings. 3. Teflon tape: This will help ensure a secure and leak-free connection. ### Shutting off the water supply The next step is to shut off the water supply to your ice maker. This can usually be done by locating the shut-off valve on the water line leading to your refrigerator. Once you’ve located the valve, turn it clockwise to shut off the water flow. This will prevent any water from spilling out during the installation process. ### Locating the appropriate connection point in the water line After shutting off the water supply, it’s time to locate the appropriate connection point in the water line. This is where you will connect the inline water filter. The connection point is typically found behind or underneath the refrigerator. ### Connecting the inline water filter Once you’ve located the connection point, it’s time to connect the inline water filter. Here’s how to do it: 1. Take the filter out of the packaging and inspect it for any damage. 2. Apply Teflon tape to the threads on both ends of the filter. 3. Attach one end of the filter to the connection point on the water line. 4. Attach the other end of the filter to the inlet valve on the refrigerator. 5. Use an adjustable wrench to secure the fittings, making sure they are tight but not over-tightened. ### Testing the installation and checking for leaks With the inline water filter connected, it’s time to test the installation and check for leaks. Follow these steps: 1. Slowly turn on the water supply to allow water to flow through the filter. 2. Check for any leaks at the connections points. If you notice any leaks, try tightening the fittings or applying more Teflon tape. 3. Once you’re confident that there are no leaks, turn on the ice maker and allow it to run for a few minutes to flush out any air and sediment. Congratulations! You have successfully installed an inline water filter for your ice maker. Now you can enjoy clean and refreshing ice in your beverages. Remember to replace the filter regularly to maintain its effectiveness.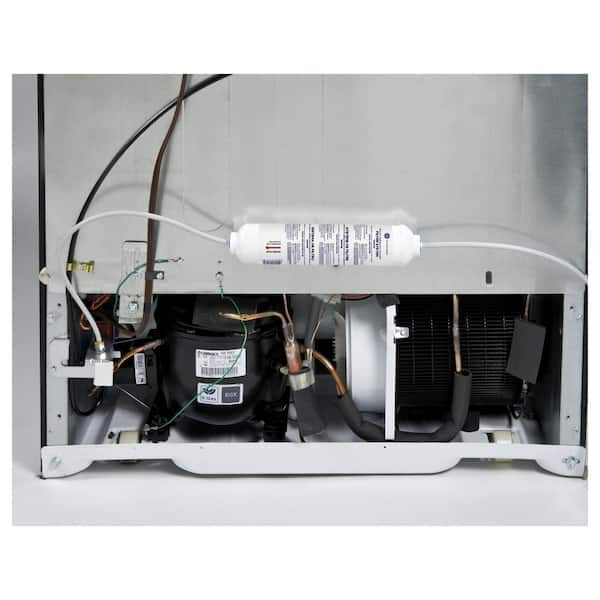
Credit: www.homedepot.com
Additional Considerations For Inline Water Filter Installation
Proper maintenance and filter replacement
Proper maintenance and regular filter replacement are crucial for the effective functioning of your inline water filter. By following these simple steps, you can ensure that your ice maker enjoys the benefits of high-quality filtered water:
- Check the manufacturer’s guidelines: Every inline water filter comes with specific instructions for maintenance and filter replacement. Refer to the user manual to understand the recommended maintenance schedule and the type of replacement filter that is compatible with your ice maker.
- Monitor the filtration capacity: Inline water filters have a limited filtration capacity. As they accumulate impurities over time, their filtering capability decreases. Keep an eye on the manufacturer’s recommendations regarding filter lifespan and replace the filter accordingly. It’s best not to wait until the filter is completely clogged to ensure optimum filtration.
- Regular cleaning: In addition to regular filter replacement, it’s essential to clean the water lines to prevent any buildup of sediment or contaminants. Use a mild cleaning solution and follow the manufacturer’s instructions for cleaning the system effectively and safely. This will help maintain the efficiency and longevity of your inline water filter.
Tips for extending the lifespan of your inline water filter
With a few simple tips and tricks, you can prolong the lifespan of your inline water filter and make the most out of your investment:
- Install a pre-filter: Consider installing a pre-filter before the inline water filter to remove larger particles and sediment. This will prevent clogging and extend the lifespan of the inline filter itself.
- Regularly check for leaks: Inspect the connections and fittings of your inline water filter system to ensure there are no leaks. Leaks can lead to unnecessary strain on the filter and decrease its effectiveness.
- Protect the filter from extreme temperatures: Extreme hot or cold temperatures can damage the filter and affect its performance. Make sure to install the filter in an area where it is protected from extreme temperatures.
- Keep the ice maker clean: Regularly clean the ice maker itself to prevent the buildup of bacteria or impurities. This will reduce the strain on the inline water filter and help it last longer.
By following these additional considerations and implementing proper maintenance practices, you can ensure that your inline water filter is functioning optimally, providing you with clean and refreshing ice for a prolonged period.
Troubleshooting Common Issues With Inline Water Filter Installation
Installing an inline water filter for your ice maker is a simple and effective way to ensure clean and fresh ice for your drinks. However, issues may arise during the installation process that can affect the performance of your water filter. In this section, we will discuss common problems you may encounter and provide step-by-step solutions to troubleshoot these issues.
Identifying and fixing leaks
Leakage is one of the most common issues that may occur during the installation of an inline water filter. A leaky connection can lead to water wastage and may even damage your ice maker or surrounding areas. Here’s how you can identify and fix leaks:
- Inspect the water connections: Check all the connections between the incoming water line, the filter, and the ice maker. Look for any visible signs of leakage or dripping water. Take note of the specific area where the leak is occurring.
- Address loose fittings: If the leak is coming from a loose fitting, turn off the water supply and use a wrench to tighten the connection. Be careful not to overtighten, as this can cause the fitting to break or strip. Once tightened, turn on the water to see if the leak has stopped.
- Replace faulty components: In some cases, the leak may be caused by a faulty or worn-out component, such as a damaged O-ring or a cracked water line. Inspect each component thoroughly and replace any damaged parts with new ones.
- Apply Teflon tape: To prevent future leaks, apply Teflon tape to the threaded connections before reassembling them. This helps create a watertight seal and reduces the risk of leakage.
- Test the repaired connection: Once you have addressed the issue, turn on the water supply and observe the repaired connection for any signs of leakage. If the leak persists, you may need to seek professional help or consider replacing the entire filter.
Ensuring proper water flow through the filter
Another issue that can occur with inline water filter installation is a decrease in water flow or uneven distribution of water. Ensuring proper water flow through the filter is crucial for its effective functioning. Follow these steps to troubleshoot this problem:
- Inspect the water supply: Check if the water supply is turned on and the water pressure is adequate. Low water pressure can restrict flow and reduce the filter’s effectiveness.
- Check for clogs: Sediment, debris, or ice buildup can clog the filter and impede water flow. Disconnect the filter and inspect it for any blockages. Clean the filter thoroughly or replace it if necessary. If the blockage is in the waterline, use a plumbing snake to clear it.
- Position the filter correctly: Make sure the filter is installed in the correct orientation, following the manufacturer’s instructions. Improper installation can cause water to bypass the filter, resulting in reduced filtration and flow.
- Replace filters regularly: Inline water filters have a limited lifespan and should be replaced periodically as recommended by the manufacturer. Over time, the filter may become clogged or less efficient, leading to reduced water flow. Replace the filter promptly to maintain optimal performance.
- Test water flow: After addressing the issue, reconnect the filter and turn on the water supply. Observe the water flow to ensure it is steady, consistent, and passes through the filter. If the flow is still not satisfactory, consult a professional for further assistance.
By following these troubleshooting steps, you can overcome common issues that may arise during the installation of an inline water filter for your ice maker. With a properly installed and functioning filter, you can enjoy clean and refreshing ice in your drinks without any worries.
Frequently Asked Questions For How To Install Inline Water Filter For Ice Maker
How Do You Install A Water Filter On A Water Line?
To install a water filter on a water line, first shut off the water supply. Then, cut the pipe and attach the filter using compression fittings. Make sure to tighten the fittings securely. Turn on the water supply and check for any leaks.
Finally, flush the system to remove any air or debris.
Can I Add A Water Filter To My Refrigerator Ice Maker?
Yes, you can add a water filter to your refrigerator ice maker. Adding a water filter helps remove impurities from the water, resulting in cleaner and better-tasting ice. It is a simple process that can be done easily to improve the quality of your ice.
Can You Add An Inline Water Filter To A Refrigerator?
Yes, it is possible to add an inline water filter to a refrigerator.
How Do You Install A Ge Inline Water Filter?
To install a GE inline water filter: 1. Turn off the water supply. 2. Remove the tubing from the water source and cut it if necessary. 3. Install the fittings onto the filter and connect them to the tubing. 4.
Open the water supply and check for leaks. 5. Flush the filter before use.
Conclusion
Installing an inline water filter for your ice maker is a simple and effective way to ensure clean and refreshing ice cubes. By following the step-by-step instructions provided in this guide, you can easily complete the installation process on your own.
Not only will this improve the taste and quality of your ice, but it will also prolong the lifespan of your ice maker. So, don’t hesitate to take action and enjoy the benefits of a filtered ice maker today.