Installing a hand-held showerhead is a simple process. Begin by removing your existing showerhead and ensuring the shower arm is clean and dry.
Then, wrap plumber’s tape around the threaded end of the shower arm and screw on the mounting bracket for the hand-held showerhead. Attach the hose to the bracket and connect the other end of the hose to the hand-held showerhead.
Finally, turn on the water and test for any leaks. Enjoy the convenience and flexibility of your new hand-held showerhead. Introducing a hand-held showerhead can greatly enhance your showering experience by allowing you to easily control the direction and flow of water. Whether you want to target specific areas of your body or need a flexible showering option, a hand-held showerhead is a popular choice. In this guide, we will walk you through the steps to install your hand-held showerhead, providing you with an efficient and hassle-free solution for upgrading your shower. With a few simple steps, you can enjoy the convenience of a hand-held showerhead in no time.
Tools Required
Before you begin installing a handheld shower head, make sure you have the following tools on hand:
- Wrench: A wrench is essential for loosening and tightening various parts of the shower head. It allows you to securely fasten the shower head in place once it’s installed.
- Thread seal tape: Also known as plumber’s tape, this thin white tape is used to create a watertight seal between the shower head and the water supply pipe. Applying it correctly ensures there are no leaks.
- Adjustable pliers: These pliers are necessary for gripping and turning different components during the installation process. They provide the necessary leverage to ensure a tight fit without damaging the shower head.
- Screwdriver: Depending on the shower head model, you may need a screwdriver to remove any screws or fasteners holding the old shower head in place. It can also be helpful for making any necessary adjustments during installation.
Having these tools readily available will make the installation process smooth and efficient.
Preparation
Before you can enjoy the invigorating experience of a hand-held shower head, it’s important to properly prepare for the installation process. Taking the necessary steps beforehand will ensure a smooth and successful installation. Here’s what you need to do:
Turn off the water supply
The first step in preparing to install a hand-held shower head is to turn off the water supply. Locate the shut-off valve, which is typically located near the shower or bathtub. Rotate the valve clockwise until it is completely closed. This will prevent any water from flowing through the plumbing system while you work on replacing the shower head.
Remove the old shower head
Now that the water supply is turned off, it’s time to remove the old shower head. This process may vary depending on the type of shower head you currently have installed. Most commonly, shower heads can be unscrewed by hand or with the help of a wrench. Wrap a cloth or towel around the shower arm to protect the surface and use the necessary tools to loosen and remove the old shower head.
If you’re unsure how to remove your specific shower head, refer to the manufacturer’s instructions or consult with a professional plumber.
Once the old shower head is successfully removed, inspect the shower arm to ensure it is free from any debris or mineral deposits. Use a soft brush or cloth to clean the shower arm if necessary, as a clean surface will help ensure a tight and leak-free connection with the new hand-held shower head.
Now that you’ve completed the preparation steps, you’re ready to move on to the next phase of the installation process. In the next section, we’ll guide you through the steps of selecting and installing your new hand-held shower head, allowing you to enjoy a refreshing shower experience.
Selecting The Right Hand Held Shower Head
When it comes to upgrading your shower experience, installing a hand held shower head can make a world of difference. Not only do these versatile shower heads provide convenience and flexibility, but they also offer a spa-like experience right in the comfort of your own bathroom. But before you rush out to buy a new hand held shower head, it’s important to select the right one that meets your specific needs and preferences.
Consider the Spray Settings
One of the key factors to consider when selecting a hand held shower head is the spray settings it offers. Different shower heads come with varying spray patterns and intensities, so it’s important to find one that suits your preferences. Whether you prefer a gentle rainfall-like flow or a powerful massaging spray, make sure to read the product description carefully to ensure it offers the spray settings you desire.
Determine the Hose Length
Another crucial aspect to consider is the hose length of your hand held shower head. The hose length will determine how far you can extend the shower head from the bracket, allowing you to have maximum maneuverability and flexibility during your shower. Measure the distance between the shower bracket and the desired area where you plan to use the shower head, and choose a hose length that suits your needs.
It’s also important to consider the material and finish of the hand held shower head. Look for a durable and corrosion-resistant material that will ensure longevity. Additionally, pay attention to the installation process and whether or not it requires any additional tools or professional help.
Selecting the right hand held shower head is crucial to enhancing your shower experience. By considering factors such as spray settings and hose length, you can find the perfect shower head that meets your specific needs and preferences. Upgrade your bathroom oasis today and enjoy the luxury and convenience of a hand held shower head.
Installing The Mounting Bracket
A hand-held shower head can enhance your shower experience by providing convenience and flexibility. But before you can enjoy the benefits of a hand-held shower head, you need to install it properly. In this article, we will walk you through each step of the installation process, starting with installing the mounting bracket.
Position the bracket in desired location
The first step in installing the mounting bracket is to decide where you want to position it. Take into consideration the height and accessibility for everyone who will be using the shower. Most people prefer to install it at a height that allows for comfortable showering while standing or sitting.
Keep in mind that the bracket should also be within reach of the existing showerhead’s water supply pipe. This will ensure a smooth installation process without the need for major modifications to your plumbing system.
Mark the mounting holes
Once you have determined the desired location for the bracket, use a pencil or marker to mark the position of the mounting holes. It’s important to ensure that the bracket is level, so use a level tool to guide you.
Make sure to mark the holes accurately, as any discrepancies can lead to misalignment during the installation process. Taking your time to measure and mark the holes correctly will save you from potential headaches later on.
Drill holes and attach the bracket
Now that you have marked the mounting holes, it’s time to drill the holes and attach the bracket. Use an electric drill with an appropriate drill bit to create the holes. Be mindful of the type of wall material you have (e.g., ceramic, acrylic, or tile) and adjust the drill speed accordingly to avoid damage.
After drilling the holes, insert the provided wall anchors into the holes. These anchors will provide stability and support for the mounting bracket. Carefully align the bracket with the wall anchors and secure it in place using the provided screws.
Ensure that the bracket is firmly attached to the wall and double-check for any wobbling or looseness. A properly secured bracket is crucial for the stability and longevity of your hand-held shower head.
Congratulations! You have successfully installed the mounting bracket for your hand-held shower head. In the next step, we will guide you through the process of connecting the shower hose and shower head for a complete installation.
Attaching The Hand Held Shower Hose
Once you have installed the mount securely and positioned it at the desired height, it’s time to attach the hand held shower hose. Follow these simple steps to ensure a secure and leak-free connection.
Apply Thread Seal Tape to the Hose
Before screwing the hose onto the mount, it is important to apply thread seal tape to ensure a tight seal and prevent any water leakage. Thread seal tape, also known as Teflon tape, is a thin white tape that helps create a watertight seal when applied to threaded connections.
Here’s how to apply thread seal tape:
- Start at the end of the hose where the connection will be made.
- Hold the end of the tape against the threads and wrap it around in a clockwise direction.
- Continue wrapping the tape around the threads, making sure to overlap the previous layer slightly.
- Tear the tape off cleanly once you’ve wrapped it around a few times.
- Press the end of the tape against the hose to secure it in place.
Screw the Hose onto the Mount
Now that you have applied thread seal tape to the hose, it’s time to screw it onto the mount. Ensure a secure connection by following these steps:
Here’s how to screw the hose onto the mount:
- Gently align the threads on the hose with those on the mount.
- Hold the hose with one hand and the mount with the other hand.
- Start by turning the hose clockwise to engage the threads.
- Continue turning the hose until it is securely tightened onto the mount.
- Ensure that the connection is snug but not too tight to avoid damaging the threads.
With the hand held shower hose securely attached to the mount, you are now ready to enjoy the convenience and flexibility of a handheld shower head. If you notice any leaks, double-check the connection and make sure the thread seal tape is properly applied. Now, it’s time to step into the shower and experience the luxurious spray of your new hand held shower head!
Connecting The Hand Held Shower Head
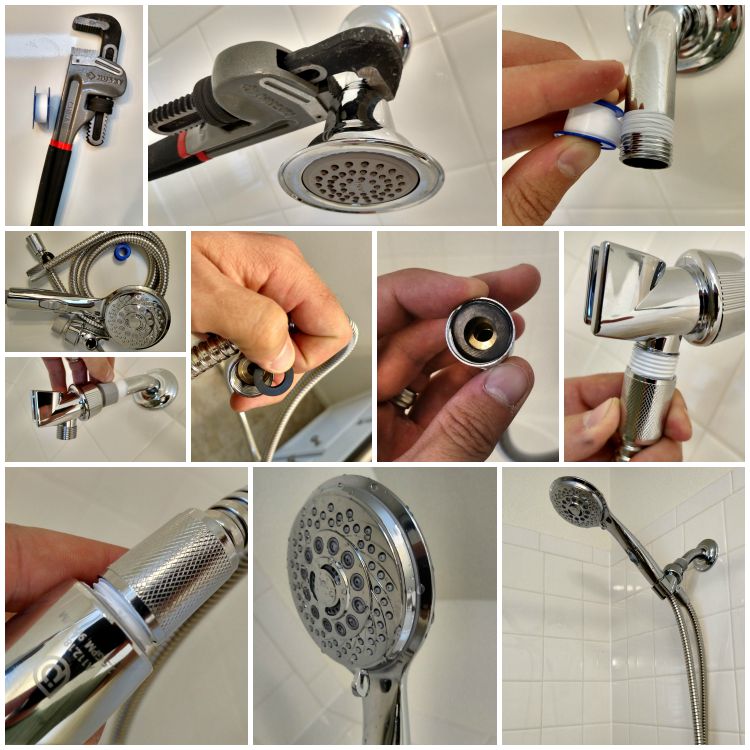
Installing a hand held shower head is a quick and easy way to enhance your shower experience. One important step in this process is connecting the shower head to the hose. By following these simple steps, you can have your new hand held shower head up and running in no time.Attach the shower head to the hose
To begin, locate the end of the hose that will attach to the hand held shower head. It is typically equipped with a threaded connector, designed to secure the shower head in place. Take the shower head and align its threaded connector with the end of the hose. Once aligned, firmly twist the shower head onto the hose in a clockwise direction. Make sure to hold the hose steady while turning the shower head to prevent any twisting or tangling. Continue twisting until the shower head is securely attached to the hose.Tighten using adjustable pliers
For extra security, you can use adjustable pliers to ensure a tight connection between the shower head and the hose. Gently grasp the shower head with one hand and the pliers with the other. Position the pliers securely around the outer ring of the shower head’s threaded connector. Apply a small amount of pressure and turn the pliers in a clockwise direction to tighten the connection. Be careful not to overtighten, as this could damage the threading or cause leaks. Once the connection feels secure, release the pliers and check for any signs of movement or looseness. By following these steps, you can easily connect your hand held shower head to the hose and enjoy a refreshing and convenient shower experience. Remember to test the connection for any leaks or loose fittings before fully completing the installation process.Testing And Adjustments
Testing and Adjustments: Once you have successfully installed your new handheld shower head, it’s time to test it out and make any necessary adjustments to ensure optimal performance. It’s important to check the water supply, look for leaks, and fine-tune the spray settings to suit your preferences. This section will guide you through each step to ensure a smooth and effective showering experience.
Turn on the water supply
Before testing your newly installed handheld shower head, start by turning on the water supply. This will allow water to flow through the shower head and help identify any initial issues. Gently turn the water valve to the “on” position and listen for any unusual noises or vibrations. If everything appears normal, proceed to the next step.
Check for leaks
After turning on the water supply, it’s crucial to check for any leaks around the shower head connections. Carefully inspect the area where the shower head attaches to the hose or the shower arm. If you notice any water drips or leaks, you may need to tighten the connections. A quick adjustment with a wrench or your hand should do the trick. It’s also a good idea to run your fingers along the connections to verify if there are any hidden leaks.
Adjust the spray settings
Now that your handheld shower head is securely connected and leak-free, it’s time to adjust the spray settings. Most handheld shower heads come with different spray options, such as a gentle rainfall, pulsating massage, or a concentrated jet spray. Explore each setting to find your desired water pressure and spray pattern.
Typically, there will be a switch or a dial on the shower head itself to adjust the spray. Experiment with different settings to find the perfect combination of water pressure and spray coverage for your personal preferences.
Pro Tip: When adjusting the spray settings, consider the water pressure in your home. If you have low water pressure, selecting a more powerful spray setting may result in a weaker stream. Alternatively, if you have high water pressure, be mindful not to choose a setting that is too forceful, as it may be uncomfortable or wasteful.
Once you have tested your handheld shower head, made any necessary adjustments, and achieved your desired spray settings, you are ready to enjoy a refreshing and customized shower experience. Don’t forget to periodically re-check for leaks and make further adjustments if needed to ensure your handheld shower head continues to perform at its best.
Credit: www.withourbest.com
Maintenance And Cleaning
Maintenance and cleaning is an essential part of keeping your hand held shower head in optimal condition. Regularly removing mineral deposits and thoroughly cleaning the shower head and hose will help ensure continuous water flow and prevent any potential clogging issues. In this section, we will discuss the necessary steps to maintain and clean your hand held shower head effectively. By following these guidelines, you can prolong the lifespan of your shower head and enhance your overall shower experience.
Remove mineral deposits regularly
Over time, mineral deposits can accumulate in your hand held shower head, leading to reduced water pressure and uneven spray patterns. It is essential to remove these deposits regularly to maintain the efficiency of your shower head.
To remove mineral deposits, follow these simple steps:
- Gently unscrew the shower head from the hose or bracket.
- Fill a bowl or basin with equal parts of vinegar and warm water.
- Place the shower head in the vinegar solution, ensuring that it is fully submerged.
- Allow the shower head to soak for at least 30 minutes, or longer if the mineral deposits are stubborn.
- After soaking, use an old toothbrush or a small brush to scrub away any remaining deposits.
- Rinse the shower head thoroughly with clean water.
- Screw the shower head back onto the hose or bracket, ensuring it is securely tightened.
Clean the shower head and hose
In addition to removing mineral deposits, it is essential to clean both the shower head and the hose regularly. This helps maintain proper hygiene and ensures optimal water flow.
Follow these steps to clean the shower head and hose:
- Gently unscrew the shower head from the hose or bracket.
- Fill a bowl or basin with warm water and a mild soap or cleaning solution.
- Submerge the shower head and hose in the soapy water.
- Using a soft cloth or sponge, gently scrub the surfaces of the shower head and hose to remove any dirt or grime.
- Rinse both the shower head and hose thoroughly with clean water.
- Wipe them dry with a clean towel or cloth.
- Screw the shower head back onto the hose or bracket, ensuring it is securely tightened.
By following these simple maintenance and cleaning steps, you can ensure that your hand held shower head remains in excellent condition. Regular removal of mineral deposits and thorough cleaning of the shower head and hose will result in better water pressure, enhanced spray patterns, and an overall improved shower experience.
Troubleshooting
Low Water Pressure
If you’re experiencing low water pressure with your hand-held shower head, don’t panic! There are a few common causes and troubleshooting steps you can take to address this issue. Firstly, check that the water shut-off valve is fully open. Sometimes, it can be accidentally bumped or partially closed, resulting in reduced water flow. Ensure that the valve is completely open to allow maximum water pressure. Secondly, inspect the shower head for any mineral deposits or clogged nozzles. Over time, water impurities can build up and restrict the flow. To address this, detach the shower head from the hose and soak it in a mixture of equal parts white vinegar and water. This will help dissolve mineral deposits and unclog the nozzles. After soaking for about 30 minutes, rinse the shower head thoroughly and reattach it to the hose. This simple step can often restore the water pressure to its optimal level. If neither of these troubleshooting steps resolves the low water pressure issue, it might be worth considering the overall plumbing system in your house. Sometimes, outdated or faulty plumbing can be the root cause of low water pressure. In such cases, it may be necessary to consult a professional plumber to assess and rectify the problem.Leaking Connections
Leaking connections can be a frustrating problem to encounter when installing a hand-held shower head. Luckily, there are a few steps you can take to address and resolve this issue. Firstly, ensure that all connections are tightly secured. Use a wrench or pliers, if necessary, to tighten any loose connections. Be cautious not to overtighten as this can cause damage to the fittings. If the leaking persists, check the rubber washers or O-rings. These small components are often responsible for creating a watertight seal and preventing leaks. Over time, they can become worn or damaged, leading to leaks. Replace any worn or damaged washers or O-rings with new ones to ensure a secure connection. In some cases, the issue may stem from incompatible or mismatched parts. It’s important to ensure that all components, such as the shower head, hose, and fittings, are compatible and designed to work together. If you suspect that a mismatched part is causing the leak, consider purchasing a complete set or consulting the manufacturer for guidance. By following these troubleshooting steps, you can effectively address low water pressure and leaking connection issues when installing your hand-held shower head. Remember to double-check all connections and perform routine maintenance to keep your shower head functioning optimally.Frequently Asked Questions On How To Install Hand Held Shower Head
Can I Add A Handheld Shower Head To My Existing Shower Head?
Yes, you can easily add a handheld shower head to your existing shower head. Simply remove the old shower head, attach a diverter valve, and connect the handheld shower head to the valve. Enjoy the convenience and versatility of a handheld shower head in your existing shower setup.
How Do You Install A Shower Head With A Hose?
To install a shower head with a hose, first unscrew and remove the existing shower head. Then, apply plumber’s tape to the threaded end of the shower arm. Next, screw the hose onto the shower arm tightly but be careful not to overtighten.
Finally, attach the shower head to the other end of the hose and test for any leaks. Enjoy your new shower experience!
Where Is The Best Place To Put A Handheld Shower Head?
The best place to put a handheld showerhead is at a height and angle that allows for comfortable use. It should be easily reachable and adjustable to suit individual preferences. Typically, it is installed on a shower wall or can be attached to a shower arm for added flexibility.
How Do You Put A Hand Shower In?
To install a hand shower, follow these steps: 1. Start by turning off the water supply and removing the existing showerhead. 2. Attach the hand shower holder to the wall or shower arm. 3. Connect the hand shower hose to the holder and tighten the connections.
4. Finally, attach the hand shower to the other end of the hose. 5. Turn on the water supply and test the hand shower for proper functionality.
Conclusion
Installing a hand-held showerhead can significantly upgrade your showering experience. By following the simple steps outlined you can effortlessly transform your bathroom into a spa-like oasis. Don’t forget to consider the water pressure and make adjustments accordingly. With a variety of options available in the market, finding the perfect hand-held showerhead that suits your needs and style will be easy.
Say goodbye to mundane showers and hello to a refreshing and invigorating bathing experience!