To install a geothermal heat pump, locate a suitable area for the ground loop system and then connect it to the heat pump unit. Now, let’s dive into how you can install a geothermal heat pump system.
Geothermal heat pumps are an efficient and eco-friendly way to heat and cool your home. By harnessing the stable temperature of the earth, these systems can provide consistent heating and cooling throughout the year. We will walk you through the step-by-step process of installing a geothermal heat pump to help you achieve optimal comfort and energy savings in your home.
So, let’s get started and learn how to install a geothermal heat pump.
Credit: scliving.coop
What Is A Geothermal Heat Pump System?
Definition of a Geothermal Heat Pump System
A geothermal heat pump system is an energy-efficient heating and cooling solution for homes and buildings that taps into the Earth’s natural heat to provide comfortable indoor temperatures. It harnesses the constant temperature below the Earth’s surface to transfer heat into or out of your living space.
How it Works and its Benefits
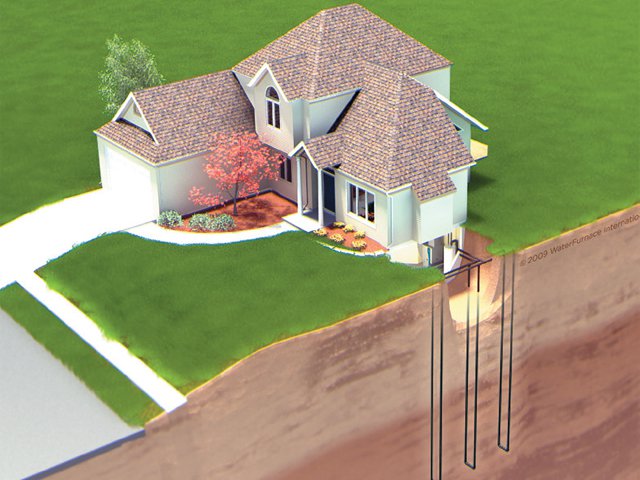
The geothermal heat pump system operates on a simple principle – using the stable temperature of the ground to provide heating or cooling for your home. It consists of a loop system buried underground, a heat pump unit, and a distribution system within your building.
The loop system is either an open or closed loop. An open-loop system draws water from a well, circulates it through the heat pump, and then discharges it back into the ground or another well. A closed-loop system, on the other hand, circulates a refrigerant solution through a series of underground pipes, extracting heat in the winter and depositing it back into the ground in the summer.
The heat pump unit houses a compressor and a heat exchanger. In the heating mode, the heat pump extracts heat from the ground or the water and raises its temperature to a higher level, suitable for indoor use. In the cooling mode, the process is reversed, with heat being transferred from the indoor environment to the cooler ground or water.
The benefits of installing a geothermal heat pump system are numerous. Firstly, it significantly reduces energy consumption compared to traditional heating and cooling systems. This translates into lower utility bills and long-term savings. Additionally, geothermal systems are eco-friendly, as they do not burn fossil fuels and produce no greenhouse gases or emissions. They also have a longer lifespan than most conventional HVAC systems, with minimal maintenance requirements.
The Importance of Installing a Geothermal Heat Pump System
Installing a geothermal heat pump system is a smart investment that brings countless advantages. One of the key benefits is its high energy efficiency, which can result in substantial cost savings over time. Geothermal systems are designed to deliver consistent, comfortable temperatures year-round, no matter the weather conditions.
Another crucial reason to opt for a geothermal heat pump system is its positive environmental impact. By harnessing renewable energy from the Earth, these systems minimize our carbon footprint and reduce dependence on non-renewable energy sources. They contribute to a greener future and help combat climate change.
Moreover, geothermal heat pumps operate silently, eliminating the noise associated with traditional HVAC units such as air conditioners or furnaces. They also improve indoor air quality by reducing the circulation of dust, allergens, and pollutants that can affect our health and well-being.
In conclusion, the installation of a geothermal heat pump system not only offers energy-efficient heating and cooling but also provides environmental benefits, noise reduction, and improved air quality. With its long lifespan and low maintenance requirements, this sustainable solution stands out as an excellent choice for any home or building.
Assessing Your Property
Installing a geothermal heat pump system is a wise choice for homeowners looking to save on energy costs and reduce their carbon footprint. Before diving into the installation process, it’s crucial to assess your property to determine its suitability for a geothermal heat pump system. This involves checking property eligibility, analyzing soil conditions, and determining available space for heat pump components.
Checking Property Eligibility for Geothermal Heat Pump System
To ensure that your property is eligible for a geothermal heat pump system, there are a few key factors to consider. First, you need to examine the size and layout of your property. Geothermal systems work best on properties with ample outdoor space, such as yards or open areas adjacent to the house. Additionally, the property should have proper accessibility for drilling or excavation, which is necessary for the installation of the underground loop system.
Moreover, it’s important to check for any local or state regulations or restrictions regarding geothermal installations. Some areas have specific requirements or permits that need to be obtained before installing a geothermal heat pump system. Make sure to check with your local authorities to ensure compliance with these regulations.
Analyzing Soil Conditions for Heat Pump Installation
Soil conditions play a crucial role in the efficiency and effectiveness of a geothermal heat pump system. Before installation, it is essential to analyze the soil composition on your property. Different soil types, such as sandy, loamy, or clayey soils, have distinct heat transfer properties. Soil with good thermal conductivity allows for better heat absorption and dissipation.
To analyze soil conditions, you can consult a professional geotechnical engineer who can assess the soil’s thermal conductivity, moisture content, and other factors. Based on their analysis, they can provide recommendations on the most suitable heat exchanger design, such as a vertical or horizontal loop system, to maximize the performance of your geothermal heat pump system.
Determining Available Space for Heat Pump Components
Another crucial aspect when assessing your property is determining the available space for heat pump components. Geothermal heat pump systems consist of various components, including the heat pump unit, pipes, and ductwork. These components need adequate space for installation both indoors and outdoors.
Indoors, you need to ensure that the designated area for the heat pump unit has enough space for proper airflow and easy access for maintenance. Outdoors, you must consider the installation of the underground loop system. This system requires sufficient open space that is free from obstructions like trees, utility lines, or underground structures that could interfere with the drilling process.
Conclusion
Assessing your property is the first step towards installing a geothermal heat pump system efficiently. By checking property eligibility, analyzing soil conditions, and determining available space for heat pump components, you can ensure the successful installation and optimal performance of your geothermal heat pump system.
Calculating Heating And Cooling Loads
Understanding heating and cooling load calculations
Before you can install a geothermal heat pump, it’s crucial to accurately calculate the heating and cooling loads of your home. These calculations determine the amount of heating and cooling capacity required to efficiently maintain a comfortable indoor environment throughout the year. Understanding and correctly assessing these loads is essential to ensure optimal performance and energy efficiency of your geothermal heat pump system.
Heating load calculations involve determining the amount of heat energy needed to keep your home warm during winter. Cooling load calculations, on the other hand, focus on the amount of cooling required to keep your home comfortably cool during hotter months. By accurately calculating these loads, you can select the appropriate size of the geothermal heat pump that will effectively meet your comfort needs.
Factors to consider when calculating loads
Several factors come into play when calculating heating and cooling loads for your home. These factors include:
- The size and layout of your home
- The insulation levels in your walls, attic, and basement
- The type and quality of doors and windows
- The orientation of your home towards the sun
- The presence of air leaks
- The number of occupants in your home
- The heat-generating appliances and electronics present
- The local climate
Each of these factors must be carefully evaluated during the load calculation process to ensure accurate results.
Determining the appropriate size of the geothermal heat pump
Once you have assessed the heating and cooling loads of your home, it’s time to determine the appropriate size of the geothermal heat pump. Undersized heat pumps could struggle to meet your comfort requirements, while oversized ones may cycle on and off frequently, leading to inefficiency and increased wear and tear.
To select the right size, it’s recommended to consult a professional HVAC contractor or use load calculation software specifically designed for this purpose. These tools take into account the calculated heating and cooling loads, and other variables such as the efficiency of the heat pump and the characteristics of the ground loop system. By bringing these pieces of information together, you can confidently choose the ideal geothermal heat pump size that will provide optimum performance and energy savings for your home.
Sizing And Designing The System
When it comes to installing a geothermal heat pump system, one of the most critical steps is sizing and designing the system to ensure optimal performance and energy efficiency. This involves choosing the right geothermal heat pump system for your needs, determining the number of required ground loops, and designing the distribution system. In this section, we will delve into each of these aspects in detail, guiding you through the process of sizing and designing your geothermal heat pump system.
Choosing the right geothermal heat pump system for your needs
Choosing the right geothermal heat pump system is crucial to ensure that it meets your heating and cooling requirements efficiently. There are several factors to consider when selecting a system:
- The size of your property: The size of your property will determine the capacity of the heat pump system you need. It is essential to choose a system that is adequately sized to provide optimal heating and cooling performance.
- Climate conditions: The climate conditions in your area play a significant role in determining the required capacity of the system. If you live in an area with extreme heat or cold, you may need a larger heat pump system to accommodate the additional heating or cooling demand.
- Energy efficiency: Look for a geothermal heat pump system that is ENERGY STAR® certified. These systems are designed to meet strict energy efficiency standards, helping you save on energy consumption and costs.
Determining the number of required ground loops
The number of ground loops required for your geothermal heat pump system depends on various factors, such as the size of your property, the soil composition, and the desired heating and cooling capacity. Ground loops are responsible for transferring heat between the earth and the heat pump system.
To determine the number of required ground loops, a professional installer will perform a geothermal site assessment. This assessment involves analyzing factors such as soil properties, available land space, and heat transfer requirements. Based on this analysis, the installer will be able to recommend the appropriate number of ground loops for your system.
Designing the distribution system for optimal performance
The distribution system of your geothermal heat pump plays a vital role in delivering heated or cooled air throughout your property. To ensure optimal performance, it is crucial to design the distribution system correctly. Here are some key considerations:
- Airflow design: Proper airflow design helps distribute heated or cooled air evenly across all rooms. It involves determining the correct duct sizes, balancing the airflow, and avoiding airflow restrictions or leaks.
- Zoning: Implementing a zoning system allows you to control the temperature of different areas or zones independently. This can enhance energy efficiency and personal comfort by only heating or cooling the required zones.
- Insulation: Adequate insulation in the distribution system prevents heat loss or gain, ensuring that the air reaching the rooms is at the desired temperature. Proper insulation also helps reduce energy wastage and improves overall system efficiency.
By considering these aspects and working with a knowledgeable installer, you can design a distribution system that maximizes the performance and efficiency of your geothermal heat pump system.
Sizing and designing a geothermal heat pump system requires careful consideration of various factors, including property size, climate conditions, energy efficiency, and distribution system design. It is recommended to consult with a geothermal heat pump professional who can assess your specific requirements and offer tailored solutions. With the right system in place, you can enjoy efficient heating and cooling throughout the year while minimizing your environmental footprint.
Drilling And Excavation
When it comes to installing a geothermal heat pump, drilling and excavation are two crucial steps that ensure the ground loop system is properly installed. The drilling process involves creating holes in the ground, while excavation involves digging trenches or pits for various components of the heat pump system. In this section, we will provide an overview of the drilling process for ground loops, discuss excavation requirements, and highlight the importance of ensuring proper access and safety during drilling and excavation.
Overview of drilling process for ground loops
The drilling process is a vital step in installing a geothermal heat pump system. It involves creating vertical or horizontal holes in the ground to insert the pipes that make up the ground loop. The type of drilling method used depends on the soil and site conditions, as well as the space available for installation. Here are the common drilling methods used:
- Vertical drilling: This method involves drilling deep, vertical holes in the ground using a drilling rig. These holes can range from 100 to 400 feet deep, depending on the size of the system and the heat transfer requirements. Vertical drilling is typically used when there is limited space available.
- Horizontal drilling: In situations where sufficient land area is available, horizontal drilling can be used. This method involves drilling trenches horizontally, usually at a depth of 4 to 6 feet. The length of the trenches depends on the size of the system and the heat transfer requirements. Horizontal drilling is often preferred when space is not a constraint.
The drilling process requires careful planning and expertise to ensure the holes are drilled accurately and to the required depth. It is essential to work with professionals who have experience in geothermal drilling to ensure the success of the installation.
Excavation requirements for installing the heat pump
Excavation plays a crucial role in the installation of a geothermal heat pump system. It involves digging trenches or pits to accommodate various components, including the heat pump unit, the piping system, and other necessary equipment. Here are the key excavation requirements to consider:
- Trenching: Trenches are typically required for the placement of the ground loop pipes. The depth and width of the trenches depend on the specific design of the system and the soil conditions. It is crucial to dig the trenches to the correct dimensions to ensure proper placement of the pipes.
- Pit excavation: Excavating pits is necessary to install the heat pump unit and other equipment. The size and depth of the pits depend on the specific requirements of the heat pump unit and the space needed for maintenance and repairs. Proper positioning and sizing of the pits are essential for easy access and functionality of the system.
Excavation needs to be done carefully to avoid any damage to existing structures or utilities. It is important to consult with professionals who can accurately assess the excavation requirements and ensure the safe and accurate installation of the heat pump system.
Ensuring proper access and safety during drilling and excavation
During drilling and excavation, ensuring proper access and safety measures are in place is of utmost importance. Here are some key considerations:
- Site preparation: Before drilling and excavation can begin, the site needs to be prepared. This includes clearing the area, marking utilities, and ensuring there is enough space for equipment and personnel to move around safely.
- Protective measures: Safety precautions, such as wearing protective gear and using safety barriers, should be implemented during drilling and excavation to prevent accidents and protect workers.
- Monitoring: Constant monitoring of drilling and excavation activities is necessary to ensure that the process is carried out in accordance with safety guidelines. Regular inspections help identify any potential issues and mitigate risks.
By adhering to proper access and safety protocols, you can ensure that the drilling and excavation process is carried out smoothly, minimizing the risk of accidents and ensuring the successful installation of the geothermal heat pump system.
Installing The Ground Loops
When it comes to installing a geothermal heat pump system, one of the crucial steps is installing the ground loops. Ground loops are vital for the geothermal system, as they allow for heat exchange between the earth and the heat pump. In this article, we will explore the different types of ground loops, guidelines for loop spacing and depth, as well as the process of sealing and pressure testing the loops.
Different types of ground loops and their installation methods
There are two main types of ground loops used in geothermal heat pump systems: horizontal loops and vertical loops. Horizontal loops are typically used when there is enough open land available, while vertical loops are suitable for areas with limited space.
Horizontal loops: These loops are installed by placing trenches horizontally in the ground. The length of the trench is determined based on the size of the system. The trenches are then filled with a loop pipe, typically made of high-density polyethylene (HDPE) to ensure durability and long lifespan. The loops are arranged in a coiled or S-shaped pattern to maximize the heat exchange with the ground.
Vertical loops: Unlike horizontal loops, vertical loops are installed by drilling boreholes into the ground. A drilling rig is used to create vertical boreholes, typically ranging from 100 to 400 feet deep. Once the boreholes are created, loop pipes are inserted into the holes. The pipes are usually U-shaped or double U-shaped to maximize the heat exchange with the surrounding ground. The boreholes are then backfilled with a sealing material such as grout to ensure stability and prevent any leaks.
Guidelines for loop spacing and depth
Proper loop spacing and depth are crucial for the optimal performance of the geothermal heat pump system. The spacing and depth requirements may vary depending on factors such as soil type, heat load, and climate conditions. Here are some general guidelines to follow:
- For horizontal loops, the spacing between trenches should typically be around 10 to 15 feet.
- Vertical loop spacing can vary depending on the size of the system, but a minimum of 10 feet between boreholes is recommended.
- The depth of the loops is determined by factors such as frost depth and the type of soil. In general, loops should be installed below the frost line to prevent freezing.
- It is essential to consult local building codes and standards to ensure compliance with specific requirements in your area.
Sealing and pressure testing the loops
After the installation of the ground loops, it is crucial to seal and pressure test the loops to ensure they are leak-free and operating efficiently. Here’s the process:
- First, all connections and joints of the loop pipes should be properly sealed using appropriate fittings and sealants. This helps to prevent any leaks that could impact the system’s performance.
- Next, a pressure test should be conducted to check for any leaks in the loops. This involves pressurizing the loop system with air or water to a specified pressure level and monitoring for any pressure drop over a certain time period.
- If any leaks are detected, they should be promptly repaired before proceeding with the installation of the heat pump system. Regular maintenance and checks are essential to ensure the loops continue to operate at their optimal level.
By following these guidelines and ensuring proper installation and testing of the ground loops, you can set the foundation for a highly efficient and reliable geothermal heat pump system.
Connecting The Heat Pump Components
Properly connecting the heat pump components is a crucial step in the installation process. It ensures that the system functions efficiently and provides optimal heating and cooling for your home. In this section, we will guide you through the steps of installing the heat pump unit and air handler system, connecting the ground loops to the unit, and ensuring efficient refrigerant flow and electrical connections.
Installing the heat pump unit and air handler system
The first step in connecting the heat pump components is installing the heat pump unit and air handler system. This involves finding an appropriate location for the unit, ensuring proper clearance for air circulation, and securely mounting the unit. It is essential to follow the manufacturer’s instructions for proper installation and to ensure that all electrical and refrigerant connections are made according to industry standards.
During the installation process, it is crucial to ensure that the unit is level and stable. This ensures efficient operation and minimizes the risk of any potential damage. Additionally, proper insulation around the unit prevents any heat loss or gain, further enhancing the system’s efficiency.
Properly connecting the ground loops to the unit
The next step in connecting the heat pump components is connecting the ground loops to the unit. The ground loops are an integral part of a geothermal heat pump system, as they utilize the stable temperatures beneath the earth’s surface to provide consistent heating and cooling.
During this installation step, it is essential to adhere to the manufacturer’s guidelines. The ground loops should be laid out in a specific configuration and buried at an appropriate depth. The connections between the ground loops and the heat pump unit must be made securely and sealed properly to avoid any leakage.
Ensuring efficient refrigerant flow and electrical connections
An efficient refrigerant flow and proper electrical connections are vital for the optimal performance of a geothermal heat pump system. These connections ensure the transfer of heat between the unit and the ground loops, providing your home with comfortable temperatures throughout the year.
Ensuring a smooth refrigerant flow involves connecting the refrigerant lines according to the manufacturer’s specifications. These lines should be insulated to prevent any heat loss along the way. It is also crucial to evacuate any air or moisture from the system before charging it with refrigerant.
Proper electrical connections are essential for the safe and reliable operation of the heat pump system. Following the electrical wiring diagram provided by the manufacturer, connect the power supply and controls to the unit. Ensure that all connections are tight, secure, and free of any loose wires that could cause malfunctions or safety hazards.
By following these steps and adhering to the manufacturer’s instructions, you can effectively connect the heat pump components and ensure that your geothermal heat pump system operates at its highest efficiency, providing you with cost-effective heating and cooling for years to come.
Testing And Commissioning
Testing and commissioning are crucial steps in the installation process of a geothermal heat pump system. These steps ensure that the system is functioning optimally and efficiently. In this section, we will discuss two important aspects of testing and commissioning: pressure and flow testing the system, and evaluating system performance and efficiency. We will also touch upon the final inspections and adjustments that ensure the system is ready to provide years of reliable heating and cooling. So let’s dive right in and explore these key steps in installing a geothermal heat pump system.Pressure and Flow Testing the System
One of the first steps in testing and commissioning your geothermal heat pump system is performing pressure and flow tests. Pressure testing helps identify any leaks in the system, ensuring that it operates at optimum efficiency. It involves pressurizing the system to a specified level and monitoring any drop in pressure, which would indicate a leak. Flow testing is equally important as it ensures that the system is circulating the required amount of water to facilitate efficient heat exchange. This is usually done by measuring the flow rate of water through the system and comparing it to the manufacturer’s specifications. If the flow rate is not within the recommended range, adjustments may need to be made to optimize the system’s performance.Evaluating System Performance and Efficiency
Once the pressure and flow testing is complete, the next step is to evaluate the system’s performance and efficiency. This involves monitoring key performance indicators such as the temperature difference between the inlet and outlet water, the electrical power consumption of the heat pump, and the overall efficiency of the system. By analyzing these metrics, you can determine if the system is operating at its maximum capacity and efficiency. If any discrepancies are identified, adjustments can be made to optimize the system’s performance. Additionally, this evaluation helps you understand the energy savings and environmental benefits of your geothermal heat pump system.Conducting Final Inspections and Adjustments
After pressure and flow testing, as well as evaluating system performance and efficiency, it’s time to conduct final inspections and make any necessary adjustments. These inspections ensure that all components of the system are installed according to the manufacturer’s specifications and local codes. During this phase, technicians may check for proper electrical connections, confirm the integrity of the ground loop, and inspect the heat pump unit for any potential issues. They will also ensure that the system is correctly calibrated and all settings are optimized for maximum efficiency. In conclusion, testing and commissioning are crucial steps in the installation of a geothermal heat pump system. Pressure and flow testing, evaluating system performance and efficiency, as well as conducting final inspections and adjustments, ensure that your system is ready to provide reliable heating and cooling for years to come. So, make sure to follow these steps diligently to ensure the proper functioning and longevity of your geothermal heat pump system.Regular Maintenance Practices
Regular maintenance plays a crucial role in ensuring the optimal performance and longevity of a geothermal heat pump. By incorporating recommended maintenance tasks into your schedule, you can keep your system running smoothly year-round. In this section, we will discuss the essential maintenance practices to keep in mind.
Recommended maintenance tasks and schedule
To ensure the efficiency and reliability of your geothermal heat pump, it is important to follow a regular maintenance schedule. By adhering to the recommended tasks, you can address potential issues and prevent costly repairs down the line. Here is a breakdown of the suggested maintenance tasks:
| Task | Schedule |
|---|---|
| Inspecting and cleaning air filters | Every 1 to 3 months |
| Inspecting and cleaning ground loops | Annually |
| Inspecting electrical connections | Annually |
| Checking refrigerant levels | Annually |
| Testing and calibrating thermostat | Annually |
| Checking water flow rates | Annually |
| Verifying pump performance | Annually |
By following this maintenance schedule, you can catch any potential issues early on and take the necessary steps to address them in a timely manner. This proactive approach will help maintain the optimal performance of your geothermal heat pump.
Cleaning and replacing air filters
One important maintenance task for a geothermal heat pump is regularly cleaning and replacing air filters. Over time, these filters can accumulate dust, debris, and allergens, which can hinder the system’s efficiency and affect the quality of indoor air. Here are the steps to clean and replace the air filters:
- Turn off the geothermal heat pump.
- Locate the air filter panel or access door on the unit.
- Remove the panel or open the access door to expose the air filters.
- Inspect the filters for any dirt, dust, or debris.
- If the filters are reusable, clean them by gently vacuuming or rinsing them with water. Allow them to dry completely before reinstalling.
- If the filters are disposable, replace them with new ones according to the manufacturer’s instructions.
- Ensure the filters are properly seated and secure the panel or close the access door.
- Turn on the geothermal heat pump and check for proper airflow.
By regularly cleaning or replacing the air filters, you can maintain good indoor air quality and improve the overall efficiency of your geothermal heat pump.
Inspecting and cleaning the ground loops
The ground loops are a critical component of your geothermal heat pump system. These closed-loop systems circulate the heat transfer fluid through the underground pipes to absorb or release heat. Over time, the ground loops may accumulate dirt, sediment, or debris, affecting their efficiency. Follow these steps to inspect and clean the ground loops:
- Turn off the geothermal heat pump.
- Locate the ground loop access point or valve box.
- Open the access point or valve box to expose the connections and pipes.
- Inspect the pipes for any signs of damage, leaks, or blockages.
- If necessary, remove any debris or sediment using a garden hose with low-pressure water.
- Ensure the connections are secure and free from leaks.
- Close the access point or valve box.
- Turn on the geothermal heat pump and monitor its performance.
Regularly inspecting and cleaning the ground loops will help maintain the efficiency and proper functioning of your geothermal heat pump system.
Troubleshooting Common Issues
Installing a geothermal heat pump system can provide an efficient and environmentally friendly way to heat and cool your home. However, like any other mechanical system, problems can arise. In this section, we will discuss some common issues that you may encounter with your geothermal heat pump system and provide troubleshooting steps to help you resolve them.
Identifying Common Problems with Geothermal Heat Pump Systems
Before we delve into troubleshooting steps, it’s important to be able to identify common problems with your geothermal heat pump system. By recognizing these issues early on, you can prevent further damage and potentially save on costly repairs. Here are some typical problems you may encounter:
| Issue | Description |
|---|---|
| Low Efficiency | If your geothermal heat pump system is not providing the expected level of heating or cooling, it might be operating at low efficiency. This could be due to issues such as inadequate insulation, dirty air filters, or a malfunctioning thermostat. |
| Inadequate Heating/Cooling | If your geothermal heat pump system is not adequately heating or cooling your home, it could be caused by factors like insufficient refrigerant levels, leaks in the ductwork, or a faulty compressor. |
Troubleshooting Steps for Issues like Low Efficiency or Inadequate Heating/Cooling
Now that you are aware of the common problems, let’s explore some troubleshooting steps you can take to address issues related to low efficiency or inadequate heating/cooling:
- Check the Air Filters: Clogged or dirty air filters can restrict airflow and reduce the efficiency of your geothermal heat pump system. Regularly inspect and clean or replace the filters to ensure optimal performance.
- Inspect the Insulation: Inadequate insulation can cause heat loss or gain, negatively impacting the efficiency of your geothermal system. Check for gaps or inadequate insulation in walls, windows, doors, and other areas where air might escape. Properly insulating these areas can help improve the efficiency of your system.
- Verify Refrigerant Levels: Insufficient refrigerant levels can lead to poor heating or cooling performance. If you suspect this to be the issue, it’s best to contact a professional HVAC technician to accurately measure and adjust the refrigerant levels.
- Address Ductwork Leaks: Leaky ducts can significantly diminish the effectiveness of your geothermal heat pump system. Inspect the ductwork for any leaks or gaps and seal them properly. This will ensure that the heated or cooled air reaches its intended destination.
- Check the Thermostat: A malfunctioning thermostat can cause temperature inconsistencies. Make sure your thermostat is set correctly and accurately reflects the desired temperature. If you suspect a problem with the thermostat, consider replacing it or consulting an HVAC professional.
When to Seek Professional Assistance
While many troubleshooting steps can be taken by homeowners, some issues may require the expertise of a professional. You should consider seeking professional assistance in the following situations:
- Complex Repairs: If the problem with your geothermal heat pump system requires extensive repairs or involves complex components, it is best to call a professional to ensure the issue is properly addressed.
- Lack of Experience: If you do not have experience working with HVAC systems or are unsure about the troubleshooting steps, consulting a professional can help avoid any potential mistakes.
- Warranty Coverage: If your geothermal heat pump system is still under warranty, it is advisable to contact the manufacturer or a certified technician to perform any necessary repairs. This will help preserve your warranty coverage.
By being proactive and addressing common issues with your geothermal heat pump system, you can maintain its efficiency and enjoy reliable heating and cooling for years to come.
Extending The Lifespan Of Your System
Installing a geothermal heat pump is a significant investment that promises long-term energy savings and enhanced comfort. However, like any other mechanical system, it requires proper care and maintenance to ensure its longevity. By following a few key tips, you can maximize the lifespan of your geothermal heat pump and enjoy efficient heating and cooling for years to come.
Tips for maximizing the lifespan of the geothermal heat pump
1. Regularly schedule professional maintenance:
- Annual maintenance by a qualified technician is crucial for the optimal performance of your geothermal heat pump.
- During these regular service visits, the technician will thoroughly inspect the system, clean the components, and identify any potential issues.
- Maintaining proper refrigerant levels and ensuring the system is running at peak efficiency can significantly extend its lifespan.
2. Keep the filters clean:
- Clean or replace the filters according to the manufacturer’s recommendations, which is typically every 1-3 months.
- Dirty filters restrict airflow, forcing the system to work harder and potentially causing premature wear and tear.
3. Protect the system from damage and wear:
- Inspect the area around the geothermal heat pump regularly and remove any debris, vegetation, or obstructions that could impede airflow.
- Consider installing a protective fence or cover to shield the system from physical damage.
- Ensure proper drainage to prevent water accumulation that may lead to corrosion or electrical issues.
Protecting the system from damage and wear
A key aspect of extending the lifespan of your geothermal heat pump is protecting it from potential damage and wear. Implementing the following measures can help in this regard:
1. Insulate the underground piping:
- Properly insulating the underground pipes minimizes heat loss, improves system efficiency, and reduces the strain on the geothermal heat pump.
2. Use a desuperheater:
- A desuperheater is an optional component that uses excess heat from the geothermal system to provide hot water.
- By utilizing this heat, you can reduce the workload on your primary water heater, which ultimately prolongs the lifespan of the geothermal heat pump.
Upgrading and improving the system over time
To ensure your geothermal heat pump continues operating at peak efficiency, consider upgrading and improving the system over time. Here are a few ways to achieve this:
1. Upgrade your thermostats and controls:
- Newer programmable thermostats and advanced controls offer more precise temperature management, resulting in improved energy efficiency and greater comfort.
2. Enhance your insulation:
- Adding additional insulation to your home minimizes the amount of heat transfer, reducing the workload on your geothermal heat pump.
3. Explore advanced system features:
- Consider additional features such as variable-speed compressors, smart zoning systems, or geothermal loop upgrades to optimize your system’s performance and extend its lifespan.
By following these tips and implementing the necessary measures, you can maximize the lifespan of your geothermal heat pump while enjoying long-term energy savings, increased comfort, and a smaller environmental footprint. Remember, proper maintenance and care are the keys to getting the most out of your geothermal investment.
Frequently Asked Questions For How To Install Geothermal Heat Pump
Can I Install My Own Geothermal Heat Pump?
Yes, you can install your own geothermal heat pump, but it’s recommended to hire a professional to ensure proper installation and avoid potential mistakes.
What Is The Average Cost To Install A Geothermal Heat Pump?
The average cost for installing a geothermal heat pump varies based on factors such as property size and location. However, installation costs typically range from $10,000 to $30,000. It’s best to consult with a professional to get an accurate estimate for your specific needs.
What Is Involved In Installing A Geothermal Heat Pump?
Installing a geothermal heat pump involves digging trenches or wells, placing pipes underground, and connecting them to the heat pump unit. The system uses the earth’s constant temperature to heat and cool your home efficiently and environmentally friendly.
Can I Install A Ground Source Heat Pump Myself?
Installing a ground source heat pump should be done by a professional. It requires specialized knowledge and expertise. Hiring a professional ensures that the installation is done correctly and safely, maximizing energy efficiency and system performance.
Conclusion
Installing a geothermal heat pump can be a beneficial and eco-friendly solution for your heating and cooling needs. By harnessing the Earth’s natural energy, you can reduce your carbon footprint while enjoying cost savings on energy bills. Remember to hire a professional to ensure proper installation and maintenance.
Experience the comfort and efficiency of geothermal heating and cooling systems today!