To install a central vacuum system, follow these steps: mount the power unit, connect the tubing, install inlet valves, and connect the system to electrical power. A central vacuum system is a convenient and efficient way to clean your home.
Instead of lugging a heavy vacuum cleaner around, you can simply plug in a lightweight hose into inlet valves installed throughout your home. The power unit, usually mounted in a garage or utility room, provides powerful suction to remove dirt and debris from every corner of your house.
With proper installation, a central vacuum system can enhance your cleaning routine and make it easier to maintain a clean and healthy living environment.
Understanding The Benefits Of A Central Vacuum System
A central vacuum system offers many advantages that make it an attractive option for homeowners. From improved indoor air quality to increased home value, this innovative cleaning solution provides convenience, ease of use, and a range of benefits that go beyond traditional vacuum cleaners. Let’s explore the key advantages in more detail:
Improved Indoor Air Quality
One of the primary benefits of a central vacuum system is the significant improvement it brings to indoor air quality. Unlike traditional vacuums that recirculate dust particles, allergens, and pet dander into the air, a central vacuum system effectively eliminates these contaminants.
How does it work? A central vacuum cleaner is typically installed in a dedicated area of the house, such as a basement or garage. Connected through a network of concealed pipes, the central unit draws dirt, debris, and allergens from each room into a separate container or bag, located away from the living areas. As a result, the extracted air is efficiently removed from the home, which greatly reduces the amount of dust and allergens present indoors.
By improving indoor air quality, central vacuum systems benefit households with individuals who suffer from allergies, asthma, or respiratory sensitivities. The system ensures cleaner, fresher air, creating a healthier environment for your family.
Convenience and Ease of Use
A central vacuum system provides unparalleled convenience and ease of use compared to traditional vacuums. With a central unit that remains stationary, there is no more lugging heavy vacuum cleaners up and down stairs or from room to room. Instead, all you need is a lightweight hose and attachments to effortlessly clean any part of your home.
Furthermore, central vacuum systems generally have a greater cleaning radius. This allows you to eliminate the need for multiple power outlets and reduce the time spent plugging and unplugging the vacuum as you move from room to room. Simply connect the hose to a conveniently located inlet and start cleaning.
Increased Home Value
Investing in a central vacuum system can also boost your home’s value. When selling your house, having a central vacuum system is seen as a desirable feature that sets it apart from others on the market. Potential buyers appreciate the added convenience, improved air quality, and the long-term cost savings associated with these systems. It can be a deciding factor that helps to attract buyers and potentially increase the selling price of your home.
Moreover, installing a central vacuum system during the construction or renovation phase of your house is wise. It allows for the installation of the necessary piping and wiring before the walls are closed, making the process easier and more cost-effective. However, retrofitting an existing home with a central vacuum system is also possible and brings many of the same benefits.
In conclusion, a central vacuum system offers numerous benefits that make it an excellent investment for any homeowner. From the significant improvement in indoor air quality to the convenience and ease of use it provides, as well as the potential increase in home value, this advanced cleaning solution is unquestionably worth considering.
Assessing Your Home’S Suitability For A Central Vacuum System
Before diving into the installation process of a central vacuum system, it is crucial to assess your home’s suitability for this convenient cleaning solution. By evaluating the layout and floorplan, determining the required system size and power, and identifying potential installation challenges, you can ensure a smooth and successful installation.
Evaluating the Layout and Floorplan
When it comes to assessing the suitability of your home for a central vacuum system, evaluating the layout and floorplan is the first step. Start by taking a closer look at the size of your home and the number of levels it has. This will help you determine the number of outlets and the length of the tubing needed for the system.
Additionally, consider the location of the power unit. Ideally, it should be placed in a central area that provides easy access to all parts of your home. Locate a space that is well-ventilated and free from obstructions to ensure optimal performance.
Determining the Required System Size and Power
Once you have assessed the layout and floorplan, the next step is to determine the required system size and power. This depends on factors such as the square footage of your home and the number of rooms. A larger home with multiple levels will require a more powerful system to ensure efficient cleaning throughout the entire space.
Consider the types of surfaces in your home as well. If you have a lot of carpets or heavy-duty cleaning needs, you may need a system with higher suction power. On the other hand, if your home has mostly hard floors, a system with adjustable suction settings may be more suitable.
Identifying Potential Installation Challenges
While central vacuum systems offer numerous benefits, it is essential to identify potential installation challenges before getting started. This step will help you anticipate any obstacles and ensure a seamless installation process.
Certain architectural features or construction materials can pose challenges during installation. For example, homes with concrete or brick walls may require special tools or techniques to install the tubing. Similarly, tight spaces or narrow hallways might require creative solutions to ensure efficient airflow.
To avoid any surprises, it is recommended to consult a professional installer who can assess your home’s unique characteristics and provide expert guidance on overcoming any potential challenges.
By carefully evaluating the layout and floorplan, determining the required system size and power, and identifying potential installation challenges, you can confidently move forward with the installation process of a central vacuum system. Soon enough, you’ll be enjoying the convenience and efficiency that this modern cleaning solution brings to your home.
Gathering The Necessary Tools And Equipment
Before you begin the installation process of a central vacuum system, it is crucial to gather all the necessary tools and equipment. Having everything you need at hand will streamline the installation process and ensure a smooth and efficient workflow. In this section, we will discuss the key tools and equipment you will need for installing a central vacuum system, including vacuum unit and accessories, power unit and piping, inlet valves and wall plates, tubing and fittings, and mounting brackets and screws.
Vacuum Unit and Accessories
The vacuum unit and accessories comprise the core components of your central vacuum system. The vacuum unit is the main unit responsible for suction and filtration, while the accessories complement the system by allowing you to clean different surfaces effectively. To gather these tools and equipment, ensure you have the following:
- Central vacuum unit
- Vacuum hoses
- Crevice tool
- Dusting brush
- Upholstery tool
Power Unit and Piping
The power unit and piping are essential components that transport the dirt and debris from your home to the central vacuum unit. To gather these tools and equipment, ensure you have the following:
- Power unit with mounting hardware
- PVC pipes
- Pipe fittings and connectors
- Glue and primer for pipe installation
Inlet Valves and Wall Plates
Inlet valves and wall plates are the entry points for connecting your vacuum hoses to the central vacuum system. To gather these tools and equipment, ensure you have the following:
- Inlet valves
- Wall plates
- Low-voltage wire for valve connectivity
Tubing and Fittings
Tubing and fittings are crucial for connecting the various components of your central vacuum system. To gather these tools and equipment, ensure you have the following:
- Tubing
- Fittings and connectors
- Tubing clamps
Mounting Brackets and Screws
The mounting brackets and screws are necessary for securely installing the central vacuum system components. To gather these tools and equipment, ensure you have the following:
- Mounting brackets
- Screws
- Wall anchors (if required)
Gathering the necessary tools and equipment is an important first step in the installation process of a central vacuum system. By ensuring you have all the required components at hand, you can proceed with confidence and efficiency. The next section will guide you through the installation process step-by-step to help you achieve optimal results.
Credit: m.youtube.com
Planning The System Layout And Design
Choosing a Central Location for the Power Unit
One of the first steps in planning your central vacuum system installation is to choose a central location for the power unit. This location will serve as the hub of your system, where the main suction motor and dirt collection canister will be housed. It’s important to select a location that is easily accessible and convenient for everyday use.
Consider spaces such as a basement, garage, utility room, or even a closet. Look for an area that has enough room for the power unit and sufficient ventilation to prevent overheating. It’s also a good idea to choose a spot that is centrally located in your home, allowing for efficient suction and coverage throughout all areas.
Mapping Out the Route for Piping and Tubing
Once you have identified the central location for the power unit, the next step is to map out the route for the piping and tubing. This involves determining the best path for the pipes to reach each room or area where you plan to install an inlet valve.
Start by creating a rough sketch or floor plan of your home, marking the locations of each room and any potential obstacles such as walls or furniture. Take note of any existing openings or access points that can be utilized for the installation. This will help you visualize the layout and plan the most efficient route for the piping.
Consider factors such as minimizing the number of bends or turns in the pipes to maintain optimal suction power. Aim for the shortest and most direct path possible, avoiding areas where the pipes may need to pass through tight spaces or around obstacles that could impede the airflow.
Determining the Placement of Inlet Valves and Wall Plates
With the route for the piping and tubing mapped out, it’s time to determine the placement of the inlet valves and wall plates. These components will be strategically installed in various areas of your home to allow easy access for vacuuming.
Begin by identifying the high-traffic areas or rooms that will require frequent cleaning. This can include living rooms, bedrooms, hallways, and kitchens. Install inlet valves in these locations to provide convenient access to the central vacuum system.
It’s also a good idea to consider areas that accumulate more dirt or require specific cleaning needs, such as workshops or pet areas. By strategically placing inlet valves in these areas, you can ensure thorough cleaning without the need for portable vacuum cleaners.
Considering Additional Accessories and Features
In addition to the main components of the central vacuum system, there are additional accessories and features to consider during the planning process. These can enhance the functionality and convenience of your system, providing an even better cleaning experience.
Think about accessories such as power brushes for deep cleaning carpets or special attachments for cleaning upholstery, blinds, or ceiling fans. Consider the option of adding a retractable hose or a hose management system, which allows for easy storage and accessibility.
Furthermore, you may want to explore additional features such as central vacuum system control panels or smart home integration. These features can offer seamless control and monitoring of your system, enhancing its usability and efficiency.
Take the time to research and evaluate the various options available to choose the accessories and features that best suit your cleaning needs and lifestyle.
Installing The Power Unit
Installing the power unit is an essential step when setting up a central vacuum system in your home. This is the heart of the system, responsible for providing the suction power needed to keep your home clean and free of dust and debris. In this section, we will guide you through the process of locating and preparing the installation space, mounting the power unit, connecting it to the electrical supply, and ensuring its stability.
Locating and Preparing the Installation Space
To begin, you need to find a suitable location for your central vacuum system’s power unit. The power unit should be placed in a centrally accessible area with proper ventilation. It is advised to select a location away from living spaces to minimize noise disturbance. Additionally, ensure that there is enough clearance around the unit for maintenance purposes.
Once you have chosen the location, clear the area of any obstructions. Remove any objects or debris that might interfere with the installation process or impede the airflow. This will ensure optimal performance and efficiency of your central vacuum system.
Mounting the Power Unit on a Wall or Floor
Mounting the power unit securely is vital to the overall stability and functionality of your central vacuum system. If your power unit comes with wall-mount brackets, follow the manufacturer’s instructions to attach these brackets firmly to the wall.
If you prefer to mount the power unit on the floor, make sure the surface is level and sturdy. To ensure stability, you may consider using a mounting plate or anchoring the unit to the floor using appropriate hardware. Make certain to follow the manufacturer’s guidelines for installing the power unit on the floor to avoid any issues.
Connecting the Power Unit to the Electrical Supply
Now that the power unit is securely mounted, it’s time to connect it to the electrical supply. Locate a nearby electrical outlet or consider hiring a professional electrician to ensure safe and proper electrical connections. It is crucial to follow local electrical codes and guidelines to prevent any mishaps.
When connecting the power unit, make sure to use the recommended wire gauge specified by the manufacturer. This will ensure that the power unit receives the appropriate voltage and electrical current without any risk of overheating or electrical failures.
Securing the Power Unit and Checking for Stability
After connecting the power unit to the electrical supply and ensuring everything is correctly wired, it’s time to secure the unit and check for stability. Double-check that all mounting brackets or anchors are securely fastened.
You can conduct a stability check by gently shaking the power unit. If there are any noticeable movements or instability, revisit the mounting process and make necessary adjustments. A stable power unit is crucial for the smooth operation of your central vacuum system.
Once you have confirmed the stability of the power unit, perform a final visual inspection to ensure all connections are secure, and there are no loose wires or components. This will help prevent any potential issues or malfunctions in the future.
With the power unit properly installed, you’re now one step closer to enjoying the convenience and efficiency of your central vacuum system!
Routing And Installing The Piping And Tubing
The routing and installation of piping and tubing is a crucial step in setting up a central vacuum system. This process ensures proper airflow and efficient performance throughout your home. In this section, we will guide you through each step, from planning the path for piping and tubing to securing them using clamps or straps. Let’s get started!
Planning the Path for Piping and Tubing
Before you begin routing the piping and tubing, it’s essential to plan the path they will take. This step helps you determine the most efficient route and ensure that the system reaches all areas of your home.
Here’s how to plan the path:
- Start by creating a rough sketch of your home’s floor plan, including all the rooms, hallways, and other spaces that need coverage.
- Identify the main power unit location and the inlet valve locations. The power unit is typically installed in a basement or garage, while the inlet valves are strategically placed in each room.
- Consider factors such as distance, corners, and obstacles when deciding on the piping and tubing routes. Opt for the shortest and most direct paths whenever possible.
- Plan for a separate line for each floor to ensure optimum suction power. Remember to include stairwells and other vertical paths in your plan.
Cutting and Measuring Pipes and Tubing
Once you have the path planned out, it’s time to cut and measure the pipes and tubing accordingly. Precise measurements and clean cuts are essential for a proper fit and a leak-free system.
Here’s how to cut and measure pipes and tubing:
- Using a tape measure, measure the distance between the power unit and the inlet valve in each room. Add a few extra feet to ensure you have enough length for adjustments.
- Transfer the measurements onto the pipes and tubing, using a marker or pencil.
- Using a pipe cutter or tubing cutter, make clean and straight cuts along the marked lines.
- Repeat this process for each pipe and tube section, ensuring that they are all cut to the correct length.
Attaching Pipes to the Power Unit and Inlet Valves
With the pipes and tubes cut to size, it’s time to connect them to the power unit and inlet valves. Secure connections are crucial for proper suction and uninterrupted airflow.
Here’s how to attach pipes to the power unit and inlet valves:
- Start by attaching the pipes to the power unit. Ensure a snug fit by inserting the pipe into the appropriate opening and twisting it clockwise until it locks into place.
- Move to each room and attach the pipes to the inlet valves in the same manner. Ensure that the pipes are securely connected and aligned with the valves.
- Double-check all connections to make sure they are tight and leak-free.
Securing Pipes and Tubing using Clamps or Straps
To ensure the stability and longevity of your central vacuum system, it’s important to secure the pipes and tubing in place. Clamps or straps provide the necessary support and prevent accidental disconnects.
Here’s how to secure pipes and tubing using clamps or straps:
- Select the appropriate clamps or straps for securing the pipes and tubing. Make sure they are of the correct size and compatible with the material.
- Position the clamps or straps at regular intervals along the length of the pipes and tubing, ensuring they are not too tight to restrict airflow.
- Fasten the clamps or straps securely, using the specified fastening method provided by the manufacturer.
- Inspect all secured pipes and tubing to ensure they are well-supported and free from any tension or strain.
Congratulations! You have successfully routed and installed the piping and tubing for your central vacuum system. With these steps completed, you can move on to connecting the power unit to electricity and testing the system for optimal performance. Your home will soon be equipped with a powerful and convenient cleaning solution.
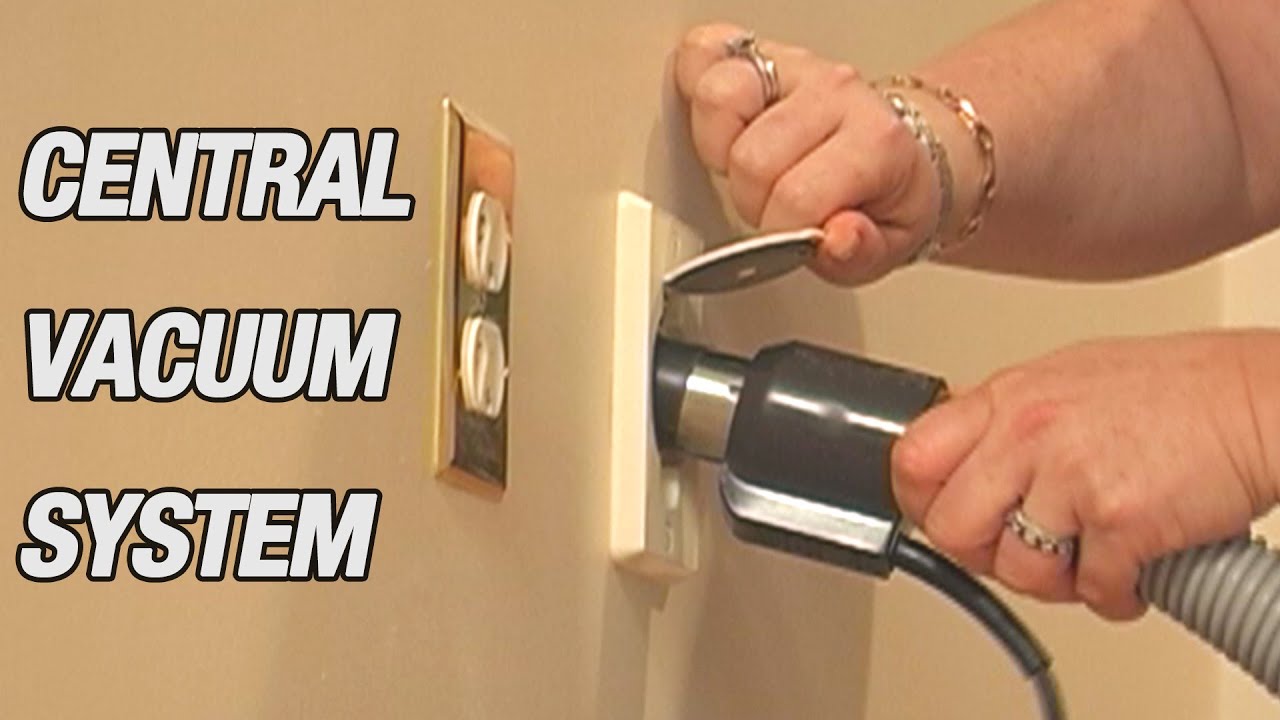
Installing The Inlet Valves And Wall Plates
Once you have planned the layout for your central vacuum system and completed the necessary prep work, it’s time to move on to the next step: installing the inlet valves and wall plates. These components are essential for a functioning central vacuum system as they provide convenient access points for attaching the hose and other cleaning attachments.
Positioning and Marking the Locations for Inlet Valves
The first task is to determine the best locations for your inlet valves. These valves should be strategically placed throughout your home to ensure easy access and maximum coverage. A good rule of thumb is to install one inlet valve on each level of your home and place them in high-traffic areas or central locations, such as hallways.
To position the inlet valves, start by measuring the height from the floor. Ideally, the inlet valve should be installed at a height of around 18 to 24 inches from the floor. Use a measuring tape and mark the desired height on the wall using a pencil.
In addition to the height, consider other factors such as obstructions (e.g., electrical outlets, furniture) and convenience. You want to make sure the inlet valve is easily accessible and not hidden behind any obstacles.
Cutting Openings in Walls for Wall Plates
Once you have marked the locations for the inlet valves, it’s time to cut openings in the walls for the wall plates. These plates serve as the faceplates for the inlet valves, providing a neat and clean appearance while allowing the hose to connect.
Begin by carefully measuring the dimensions of the wall plate, taking into account its height and width. Use these measurements to mark the outline of the opening on the wall, making sure it aligns with the previously marked location for the inlet valve.
With the outline marked, use a utility knife or drywall saw to cut along the lines. Take your time and make precise cuts to ensure a clean and accurate opening. Remove any excess drywall or debris, creating a smooth and even surface for the wall plate.
Attaching the Inlet Valves and Wall Plates securely
Now that you have cut the openings in the walls, it’s time to secure the inlet valves and wall plates in place. Begin by inserting the inlet valve into the opening, making sure it fits snugly and aligns properly with the wall. Use screws or nails to attach the inlet valve to the wall, ensuring a secure and stable connection.
Next, position the wall plate over the inlet valve and align it with the opening. Again, use screws or nails to secure the wall plate to the wall, ensuring it sits flush and level. Take care not to overtighten the screws or nails, as this could damage the wall or interfere with the functionality of the inlet valve.
Checking for Proper Fit and Functionality
Once the inlet valves and wall plates are securely attached, it’s important to check for proper fit and functionality. Test each inlet valve by connecting the hose and other cleaning attachments to ensure a tight and secure connection. Ensure that the wall plates sit flush with the wall and there are no gaps or unevenness.
Verify that the inlet valves open easily when the hose is inserted and close tightly when not in use. This will help prevent any loss of suction and ensure efficient operation. Make any necessary adjustments or fine-tuning to ensure each inlet valve and wall plate functions as intended.
Congratulations! With the inlet valves and wall plates properly installed, you are one step closer to enjoying the convenience and efficiency of a central vacuum system in your home.
Connecting The Tubing To The Inlet Valves And Wall Plates
Once you have completed the installation of the central vacuum power unit and laid out the tubing network, the next step is to connect the tubing to the inlet valves and wall plates. This crucial step ensures that the vacuum system functions optimally and efficiently throughout your home. In this section, we will guide you through the process of cutting and measuring tubing for each inlet valve, attaching the tubing to the inlet valves and wall plates, securing the tubing using clamps or fittings, and finally testing the vacuum system for airflow and suction.
Cutting and Measuring Tubing for Each Inlet Valve
Before attaching the tubing to the inlet valves and wall plates, it’s important to cut and measure the tubing accurately. This step ensures a proper fit and seamless connection. To do this, follow these simple steps:
- Identify the location of each inlet valve in your home.
- Measure the distance from the power unit to each inlet valve, accounting for any corners or bends along the way.
- Using a tubing cutter, trim the tubing to the measured length, ensuring clean and precise cuts.
Attaching Tubing to the Inlet Valves and Wall Plates
Once you have cut the tubing to the correct length, it’s time to attach it to the inlet valves and wall plates. Follow these steps:
- Start by inserting the tubing into the inlet valve or port at the power unit end. Push it in until it fits securely.
- Move to the other end of the tubing and insert it into the corresponding hole in the wall plate, ensuring a snug fit.
- Repeat this process for each inlet valve and wall plate in your home, paying attention to proper alignment and positioning.
Securing Tubing using Clamps or Fittings
To prevent any potential leaks or disconnections, it’s essential to secure the tubing using clamps or fittings. Here’s what you need to do:
- Once the tubing is attached to the inlet valves and wall plates, check for any loose ends or excess tubing.
- Using appropriate clamps or fittings, secure the tubing to the valves and wall plates, ensuring a tight and secure connection.
- Double-check that all connections are secure and leak-free before moving on to the next step.
Testing the Vacuum System for Airflow and Suction
With the tubing attached and secured, it’s time to test the vacuum system for airflow and suction. This step ensures that the system is functioning correctly and efficiently. To test the system, follow these steps:
- Turn on the central vacuum power unit and ensure it is running smoothly.
- Go to each inlet valve and wall plate and place your hand over the opening.
- Feel for strong suction indicating that the system is working properly.
- Repeat this process for every inlet valve and wall plate in your home.
Congratulations! You have successfully connected the tubing to the inlet valves and wall plates of your central vacuum system. This step brings you one step closer to enjoying the convenience and cleanliness of a central vacuum system throughout your home.
Completing The Central Vacuum System Installation
Now that you’ve successfully installed your central vacuum system, it’s time to complete the installation by taking a few important steps. This will ensure that your system is functioning optimally and will provide you with years of reliable service. In this section, we will cover how to inspect the entire system for any leaks or loose connections, make necessary adjustments or repairs, clean up the installation space and remove debris, and educate yourself on proper maintenance and care of the system.
Inspecting the Entire System for any Leaks or Loose Connections
Before you begin using your central vacuum system, it’s important to inspect the entire system for any leaks or loose connections. Leaks can lead to decreased suction power and reduce the efficiency of your system. In order to inspect for leaks, you can follow these steps:
- Start by visually inspecting all the connections and fittings, looking for any signs of leakage such as water stains or moisture.
- Check the seals and gaskets to ensure they are properly installed and in good condition.
- Turn on the central vacuum system and listen for any unusual sounds or air leaks.
Making Necessary Adjustments or Repairs
If you notice any leaks or loose connections during the inspection process, it’s important to make the necessary adjustments or repairs. This will prevent any future issues and ensure that your central vacuum system operates at its best. Some possible adjustments or repairs you may need to make include:
- Tightening loose fittings or connections using appropriate tools.
- Replacing damaged seals or gaskets.
- Sealing any visible leaks with epoxy or other suitable sealants.
Cleaning up the Installation Space and Removing Debris
Now that your central vacuum system is properly installed and any necessary repairs have been made, it’s time to clean up the installation space and remove any debris. This will help maintain a clean and organized area around your system and prevent potential obstructions or hazards. Consider the following steps:
- Remove any construction debris or packaging materials that were left behind during the installation process.
- Vacuum the area around the central vacuum unit to remove any loose dirt or dust that may have accumulated during installation.
- Store any unused accessories or tools in a designated area to keep them readily accessible when needed.
Educating Yourself on Proper Maintenance and Care of the System
Lastly, to ensure the longevity and efficiency of your central vacuum system, take the time to educate yourself on proper maintenance and care. This will empower you to be proactive in preventing potential issues and extending the lifespan of your system. Some points to keep in mind:
- Read the manufacturer’s manual and familiarize yourself with the specific maintenance recommendations for your central vacuum system.
- Regularly clean or replace the filter as recommended.
- Inspect and clean the central vacuum unit’s canister or dust bin to ensure efficient airflow.
- Check the power unit’s motor and brushes periodically, and have them serviced or replaced if necessary.
By following these steps and taking the time to properly inspect, adjust, clean, and maintain your central vacuum system, you can ensure that it continues to provide exceptional performance and extends its lifespan for many years to come.
Troubleshooting Common Central Vacuum System Installation Issues
Installing a central vacuum system can greatly improve the cleanliness and convenience of your home. However, like any other home appliance, you may encounter some common issues during the installation process. In this section, we will discuss the most frequent problems that can arise when installing a central vacuum system and provide troubleshooting tips to help you overcome them.
Lack of Suction or Poor Airflow
One of the most common issues homeowners face when installing a central vacuum system is a lack of suction or poor airflow. This can be frustrating, as it can prevent the system from effectively cleaning your home. Luckily, there are several potential causes for this problem and simple troubleshooting steps you can take to resolve it.
If you are experiencing a lack of suction or poor airflow, here are a few things to check:
- Ensure that all connections between the power unit and the inlet valves are properly secured. Loose connections can result in air leaks, reducing the overall suction power. Tighten all connections as necessary.
- Inspect the tubing or piping for any blockages or obstructions. Over time, dirt, debris, or even small objects may get stuck and restrict the airflow. To clear any blockages, gently insert a long, flexible tool such as a plumbing snake into the tubing to dislodge any obstructions.
- Check the filter in the power unit. A clogged or dirty filter can significantly reduce suction power. Clean or replace the filter according to the manufacturer’s instructions.
- Ensure that there are no leaks in the tubing or piping. Even small leaks can lead to a decrease in suction. Apply a small amount of soapy water along the connections and observe for any bubbling. If you notice any bubbling, tighten or replace the affected connection.
- If the above steps do not resolve the issue, there may be a problem with the power unit itself. In this case, it is best to consult a professional for further assistance.
Leaks or Blockages in the Piping or Tubing
Another common issue that homeowners may encounter during the central vacuum system installation is leaks or blockages in the piping or tubing. These issues can affect the overall performance and efficiency of your system. To identify and resolve leaks or blockages, follow these troubleshooting steps:
- Inspect all tubing or piping connections for any signs of leaks. Look for visible cracks or gaps in the connections, as these can result in air leaks. Seal any leaks with appropriate adhesive or replace the affected section of tubing.
- If you suspect a blockage, start by visually inspecting the tubing for any visible obstructions. Additionally, use a plumbing snake or a long, flexible brush to clean out any debris or clogs that may be causing the blockage.
- If the blockage persists, consider using a specialized vacuum system cleaning kit. These kits typically contain tools designed to remove stubborn clogs from the piping or tubing.
- Regular maintenance and periodic cleaning of the central vacuum system can help prevent future leaks or blockages. Follow the manufacturer’s recommendations for maintenance and cleaning to keep your system running smoothly.
Inlet Valve or Wall Plate Malfunctions
Inlet valves and wall plates allow you to connect your vacuum hose to the central vacuum system. If you encounter any malfunctions with these components during installation, follow these troubleshooting steps:
- Ensure that the inlet valves are securely fastened to the wall and properly connected to the tubing. Loose or misaligned valves can result in air leaks, affecting the system’s performance. Adjust or tighten the valves as needed.
- If you experience difficulty inserting the vacuum hose into the wall plate, check for any obstructions or debris that may be blocking the entrance. Clean out any visible debris, and if necessary, use a long, flexible tool to clear any blockages.
- If the wall plate malfunctions persist, consider replacing the affected wall plate with a new one. Follow the manufacturer’s instructions to complete the replacement process.
Electrical Problems with the Power Unit
While installing the central vacuum system, you might encounter electrical problems with the power unit. These issues can prevent the unit from functioning correctly. To troubleshoot electrical problems:
- Ensure that the power unit is properly connected to a reliable power source. Check that the power cord is securely plugged into a functioning outlet and that the circuit breaker or fuse is not tripped or blown.
- Inspect the power switch on the unit itself. Ensure that it is in the “on” position and functioning properly. If the switch appears to be faulty, consult a professional for advice on how to replace it.
- If you are experiencing intermittent power or other electrical issues, it is best to consult a licensed electrician or the system manufacturer for further assistance. Electrical problems should be addressed by a qualified professional to ensure safety and avoid damage to the system.
By troubleshooting these common central vacuum system installation issues, you can optimize the performance and functionality of your system. Remember to refer to the manufacturer’s instructions and consult a professional if necessary for proper resolution. With a well-installed and properly functioning central vacuum system, you’ll enjoy a cleaner and more comfortable living environment!
Maintenance Tips For Longevity And Performance
Proper maintenance is key to ensuring the longevity and optimum performance of your central vacuum system. By implementing a regular cleaning and maintenance routine, you can improve the suction power, reduce the risk of clogs, and extend the lifespan of your system. In this section, we will discuss the essential maintenance tips that will keep your central vacuum system running smoothly.
1. Regularly Emptying and Cleaning the Vacuum Canister
The vacuum canister is where all the dirt, dust, and debris are collected during the cleaning process. Regularly emptying and cleaning the canister is crucial to maintain the efficiency and suction power of your central vacuum system. Here are a few steps to follow:
- Step 1: Turn off the central vacuum system and unplug it from the power source.
- Step 2: Locate the vacuum canister, which is usually situated in the basement or utility room. Consult the manufacturer’s manual if you’re unsure.
- Step 3: Remove the canister by detaching it from the mounting bracket or releasing the latches, depending on the model.
- Step 4: Empty the contents of the canister into a trash bag or container.
- Step 5: Clean the interior of the canister using a damp cloth or mild detergent solution, carefully removing any built-up debris or residue.
- Step 6: Rinse the canister thoroughly with water and allow it to dry completely before reassembling.
2. Checking and Replacing Filters as Needed
Filters play a vital role in maintaining the air quality in your home and preventing the accumulation of dust particles in your central vacuum system. Over time, filters can become clogged or worn out, diminishing the efficiency of the system. Here’s how to check and replace your filters:
- Step 1: Locate the filter(s) in your central vacuum system. Consult the manufacturer’s manual if necessary.
- Step 2: Remove the filter(s) from their designated compartments or housings.
- Step 3: Examine the filter(s) for excessive dirt or damage. If the filters are disposable, replace them with new ones. If they are reusable, clean them according to the manufacturer’s instructions.
- Step 4: Ensure the filters are properly inserted back into their respective compartments or housings.
3. Inspecting and Cleaning the Inlet Valves and Wall Plates
The inlet valves and wall plates are essential components of your central vacuum system that allow you to connect the hose or attachments for cleaning. It’s essential to inspect and clean these parts regularly to prevent blockages and maintain optimal suction power. Follow these steps:
- Step 1: Turn off the central vacuum system and unplug it from the power source.
- Step 2: Inspect each inlet valve and wall plate for any obstructions or debris. Use a flashlight if needed.
- Step 3: If you notice any blockages, use a soft bristle brush or a vacuum attachment to remove the debris.
- Step 4: Clean the inlet valves and wall plates with a mild cleaning solution and a cloth, ensuring they are free from dust and dirt.
4. Scheduling Professional Maintenance and Servicing
While regular DIY maintenance is essential, scheduling professional maintenance and servicing is equally important to keep your central vacuum system in optimal condition. Professional technicians have the expertise to identify and address any underlying issues that may affect the performance of your system. Consider scheduling professional maintenance every 12 to 18 months to ensure your system is operating at its best.
By following these maintenance tips, you can maximize the longevity and performance of your central vacuum system and enjoy cleaner air and more efficient cleaning sessions.
Frequently Asked Questions Of How To Install Central Vacuum System
Can You Install A Central Vacuum System Yourself?
Yes, it is possible to install a central vacuum system yourself. However, it requires careful consideration of the instructions, proper tools, and knowledge of electrical and plumbing systems. It is advised to consult professionals for best results.
How Much Does It Cost To Install A Central Vacuum System?
The cost of installing a central vacuum system can vary depending on various factors such as the size of the property and the specific requirements. However, on average, you can expect to pay between $1,500 and $3,500 for the installation.
How Long Does It Take To Install A Central Vacuum System?
The installation time for a central vacuum system varies, depending on factors like the size of the property and any existing infrastructure. Generally, it takes around 1 to 2 days for professional installers to set up a central vacuum system properly.
However, this timeframe can be influenced by specific requirements or complexities unique to each installation.
Does A Central Vacuum Need To Be On Its Own Circuit?
Yes, a central vacuum should have its own circuit.
Conclusion
Installing a central vacuum system is a great way to make your cleaning routine more efficient and convenient. By following the step-by-step instructions provided in this guide, you can easily set up your own central vacuum system. From choosing the right location to connecting the necessary components, this blog post has provided you with all the information you need.
So, why wait? Start enjoying the benefits of a central vacuum system today!