To install a well pump and pressure tank, ensure you have all the necessary tools and equipment. First, disconnect the power supply and drain any water from the tank.
Next, remove the old pump and pressure tank, making sure to disconnect all the necessary connections. Install the new pump and pressure tank, connecting the pipes and electrical wiring properly. Finally, turn on the power supply, fill the tank with water, and check for any leaks or malfunctions.
Installing a well pump and pressure tank is essential for maintaining a steady water supply in residential or commercial properties. Whether you’re replacing an old unit or installing a new one, it’s important to follow the correct procedure. In this guide, we will provide a step-by-step explanation of how to install a well pump and pressure tank, ensuring a reliable water system. By adhering to safety precautions and properly connecting all the components, you can ensure efficient water pressure and uninterrupted supply. So, let’s dive into the process and get your well pump and pressure tank installed correctly for optimal performance.
Factors To Consider When Selecting A Well Pump
Installing a well pump and pressure tank is an important step in ensuring a reliable and efficient water supply for your home. However, choosing the right well pump can be a challenging task. There are several key factors that you need to consider before making your selection. In this article, we will discuss these factors to help you make an informed decision.
Pumping Capacity
The pumping capacity of a well pump refers to the amount of water it can deliver per minute. This is an important factor to consider as it directly relates to the water pressure you will experience in your home. The size of your household and the number of plumbing fixtures will determine the pumping capacity you need. For larger households with high water demands, a pump with a higher pumping capacity is recommended to ensure an adequate supply of water.
Well Depth
The depth of your well is another crucial factor when selecting a well pump. The depth will determine the amount of head pressure the pump needs to overcome to deliver water to your home. It is important to accurately measure the depth of your well to ensure you choose a pump with the appropriate lifting capacity. A pump with insufficient lifting capacity may struggle to deliver water from a deep well, leading to low water pressure or even pump failure.
Water Demand
Understanding your household’s water demand is essential for selecting the right well pump. Consider the number of people living in your home, their daily activities, and the peak water usage periods. This will help you determine the necessary pumping capacity and the size of the pressure tank required. Oversizing the pump can result in higher energy consumption, while undersizing it may lead to inadequate water supply during peak periods.
Voltage Requirements
Lastly, it is crucial to consider the voltage requirements of the well pump. Different pumps have different voltage requirements, and it is important to ensure that your electrical system can support the chosen pump. Installing a pump with the wrong voltage can result in inefficient operation or even damage to the pump and electrical system.
By carefully considering these factors – pumping capacity, well depth, water demand, and voltage requirements – you can select a well pump that meets your specific needs and ensures a reliable water supply for your home.
Types Of Well Pumps
When it comes to installing a well pump and pressure tank, choosing the right type of well pump is essential for efficient water supply. There are three common types of well pumps to consider: submersible pump, jet pump, and convertible pump. Each type has its own pros and cons, and understanding the differences between them will help you make an informed decision for your well system.
<h3>Submersible pump</h3>
A submersible pump is a popular choice for deep wells because it is designed to be completely submerged in water. This type of pump is typically placed at the bottom of the well and is capable of pushing water up to the surface. Submersible pumps are known for their reliability and efficiency, providing consistent water pressure even at greater depths. They are often used for larger water supply needs and are less prone to noise and maintenance issues compared to other pump types.
<h3>Jet pump</h3>
A jet pump, on the other hand, is installed above the ground and uses suction and pressure to draw water from the well. This type of pump is suitable for shallow wells and is often used in residential settings. Jet pumps come in two configurations: shallow well jet pump and deep well jet pump. The shallow well jet pump is placed aboveground and can draw water from wells up to 25 feet deep, while the deep well jet pump is designed for wells with depths ranging from 25 to 110 feet. Jet pumps are relatively affordable and easy to maintain, but they may be noisier compared to submersible pumps.
<h3>Convertible pump</h3>
A convertible pump offers the flexibility to switch between operating as a submersible pump or a jet pump depending on the well depth. This type of pump is ideal for wells with varying water levels or if you are uncertain about the well’s depth. Convertible pumps can be adjusted to meet changing water supply demands and are suitable for both shallow and deep wells. However, it is important to note that convertible pumps may not offer the same efficiency as dedicated submersible or jet pumps, and regular maintenance is required to ensure optimal performance.
In conclusion, understanding the different types of well pumps is crucial when installing a well pump and pressure tank. The submersible pump is ideal for deep wells, providing reliable and efficient water supply. The jet pump is a cost-effective option for shallow wells, while the convertible pump offers flexibility for wells with varying depths. Consider the specific needs of your well system and consult with a professional to determine the best type of well pump for your situation.
Determining The Appropriate Pressure Tank Size
Water Usage Calculation
Determining the appropriate pressure tank size for your well pump system is crucial to ensure efficient water flow and optimal performance. One of the key factors to consider is calculating your water usage. The amount of water your household consumes on a daily basis will help determine the size of the pressure tank needed. When calculating water usage, consider all the appliances and fixtures that use water, such as showers, toilets, faucets, washing machines, and dishwashers. Take note of how often each is used and estimate the amount of water they consume per minute or per use. By adding up these values, you can get an idea of your total water consumption per day.Pump Cycle Rate
Another important aspect to consider when determining the appropriate pressure tank size is the pump cycle rate. The pump cycle rate refers to how often the well pump turns on and off to maintain water pressure in your household. It is important to minimize the pump’s cycling frequency as it can lead to increased wear and tear on the pump motor and reduced efficiency. To calculate the pump cycle rate, you need to know the flow rate of your well pump, which can be found in the manufacturer’s specifications. The flow rate is typically measured in gallons per minute (GPM). Next, determine the desired pressure range for your system. The pressure switch settings, controlled by the pressure switch, determine the range within which the pump operates.Pressure Switch Settings
The pressure switch settings play a crucial role in maintaining the appropriate pressure in your well pump system. The pressure switch is responsible for turning the pump on when the pressure drops below a certain level and turning it off when the pressure reaches the upper limit. To ensure the pressure switch is properly set, you need to consider the desired pressure range for your system. This range is determined by the household’s water demands and the capacity of the well pump. Adjusting the pressure switch settings too high can cause the pump to cycle frequently, leading to unnecessary wear and tear. Conversely, setting it too low may result in inadequate water pressure. Consider consulting the manufacturer’s instructions or seeking professional advice to properly set the pressure switch settings. A professional can help determine the ideal pressure range based on your water usage needs. Determining the appropriate pressure tank size involves careful consideration of water usage, pump cycle rate, and pressure switch settings. By understanding these factors and ensuring the system is properly set, you can optimize the performance of your well pump and pressure tank, providing a reliable and efficient water supply for your household. Remember, it is always recommended to consult a professional or well pump specialist for accurate sizing and installation guidance based on your specific needs.Gathering The Necessary Tools And Materials
Gathering the necessary tools and materials is the first step in installing a well pump and pressure tank. Having the right equipment on hand ensures a smooth and efficient installation process. Here are some essential tools and materials you will need:
<h3>Tools and Equipment</h3>
<h3>Pipe Wrench</h3>
A pipe wrench is a crucial tool for tightening and loosening pipes. It helps you securely connect the pipes, ensuring a leak-free installation. Make sure to use an adjustable pipe wrench that can accommodate different pipe sizes. This versatile tool will be invaluable throughout the installation process.
<h3>Teflon Tape</h3>
Teflon tape, also known as plumber’s tape, is essential for creating watertight seals between threaded connections. Applying a few wraps of Teflon tape on the male threads of your fittings helps prevent leaks by effectively sealing the connection. This inexpensive but highly effective tool is a must-have for any well pump and pressure tank installation.
<h3>Pressure Gauge</h3>
A pressure gauge allows you to measure and monitor the pressure of your well water system. It helps you ensure that the pressure remains within the optimal range for efficient and reliable operation. When selecting a pressure gauge, look for one that is compatible with the pressure range of your specific well pump and pressure tank system.
<h3>Pressure Switch</h3>
The pressure switch is a key component that controls the operation of your well pump. It turns the pump on when the water pressure drops below a certain level and shuts it off when the desired pressure is reached. Make sure to choose a pressure switch that matches the voltage and pressure range requirements of your well pump system. Proper installation and setup of the pressure switch are critical for the efficient functioning of your well pump and pressure tank system.
Locating The Well Pump And Pressure Tank
Considering space requirements
Before you begin the installation process of your well pump and pressure tank, it’s important to carefully consider the space requirements. Proper spacing ensures easy access for maintenance and repairs, as well as allows for optimal performance of the system.
Here are some key factors to keep in mind when determining the space requirements:
- Well Pump: The well pump should be positioned close to the well itself to minimize the length of the pipe and reduce water loss. It’s also essential to leave ample space around the pump for easy access and servicing.
- Pressure Tank: The pressure tank, which stores the water and maintains system pressure, should be located in a dry, well-ventilated area. It’s advisable to choose a spot that is protected from extreme temperatures or direct sunlight to prevent damage or condensation build-up.
- Vertical Clearance: Make sure to allow sufficient vertical clearance above the pump and pressure tank for easy installation and maintenance. This typically includes space for removing and replacing the pressure tank’s air valve cap and properly connecting the piping.
By considering these space requirements, you can ensure a well-organized and efficient installation of your well pump and pressure tank. Taking the time to plan and allocate space appropriately will save you headaches in the future and ensure smooth operation of your system.
Proper ventilation
Proper ventilation is crucial when locating your well pump and pressure tank. Adequate airflow helps prevent the build-up of moisture and condensation, prolonging the lifespan of your equipment. Here are some important considerations:
- Adequate Air Circulation: Ensure that there is enough space around the pump and pressure tank for proper air circulation. This will prevent heat build-up and help maintain the equipment’s optimal performance and efficiency.
- Avoid Enclosed Spaces: It’s important to avoid placing the well pump and pressure tank in enclosed spaces or small closets without adequate ventilation. Lack of proper airflow can lead to overheating, decreased efficiency, and potential damage to the equipment.
- Protect from Moisture: Keep the pump and pressure tank away from areas prone to moisture, such as basements or crawl spaces. Moisture can cause corrosion and electrical issues, compromising the functionality of your system.
By prioritizing proper ventilation, you can ensure the longevity and reliability of your well pump and pressure tank. Adequate airflow will help prevent potential issues and maintain the efficiency of your system.
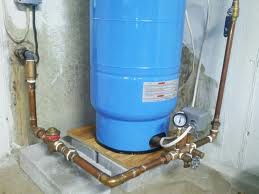
Credit: wardwater.com
Shutting Off The Power And Water Supply
Before you begin the process of installing a well pump and pressure tank, it is crucial to shut off the power and water supply. Taking this precautionary step ensures your safety and prevents any accidental damage to the system. In this section, we will guide you on how to shut off the power using the circuit breaker and close the main water valve.
Turning off the circuit breaker
The first step in shutting off the power is to locate the circuit breaker that corresponds to your well pump. This circuit breaker is usually labeled and can typically be found in your electrical panel. Here’s how you can turn it off:
- Open your electrical panel.
- Look for the circuit breaker labeled “well pump” or something similar. If you’re unsure, refer to your well pump’s manual or seek professional assistance.
- Flip the switch associated with the well pump to the off position. This completely cuts off power supply to the pump and ensures a safe working environment.
Remember, safety is paramount. Always exercise caution when working with electricity and do not hesitate to seek professional help if needed.
Closing the main water valve
After turning off the power, the next step is to close the main water valve. This valve is responsible for controlling the water flow into your home. Here’s how you can accomplish this:
- Locate the main water valve. It is typically located near the point where the water supply enters your property.
- Turn the valve clockwise to shut off the water supply. This prevents any unintended water flow during the installation process.
By following these steps, you have successfully shut off the power and water supply, ensuring a safe and controlled environment for the installation of your well pump and pressure tank.
Draining The Pressure Tank
Opening Faucets to Release Pressure
Before you can start draining the pressure tank, you need to open the faucets in your house to release the pressure. This step is crucial to avoid any mishaps during the draining process. Here’s how you can do it:
- Turn off the power: Begin by switching off the power supply to your well pump to ensure your safety throughout the process.
- Locate all the faucets: Make sure you know where all the faucets are in your house, including outdoor spigots, bathrooms, and kitchen sinks.
- Open the faucets: Start by opening all the faucets to the maximum capacity. This allows the pressure inside the system to dissipate, making it easier to drain the pressure tank.
Disposing of the Drained Water Properly
Proper disposal of the drained water is essential to prevent any contamination or damage to the environment. Here are some methods to ensure proper water disposal:
- Consider reusing the water: If the drained water is relatively clean and doesn’t contain any harmful substances, you can reuse it for tasks such as watering plants or cleaning outdoor areas. This is an eco-friendly option that reduces water wastage.
- Redirect the water to a drain: If the drained water cannot be reused, redirect it to a drain or a suitable discharge point. Make sure the water won’t cause any flooding or damage to nearby structures.
- Keep the well-being of your surroundings in mind: Avoid releasing the water near sensitive areas such as bodies of water, wetlands, or areas with vulnerable ecosystems. Ensuring the well-being of your surroundings should be a top priority.
- Follow local regulations: In some areas, there might be specific rules and regulations regarding water disposal. Familiarize yourself with these regulations and adhere to them accordingly.
By following these steps and adhering to proper water disposal methods, you can safely drain the pressure tank and do your part in protecting the environment.
Installing The Well Pump
Installing the well pump is a crucial step in setting up your water system. It requires careful attention to ensure proper functionality and reliability. In this section, we will guide you through the process of installing your well pump step by step. Follow these instructions to successfully complete this task.
Removing the Old Pump, if Applicable
If you are replacing an old pump, the first step is to remove it. Start by shutting off the power to the pump at the main electrical panel. It is vital to take safety precautions when dealing with electrical equipment. Next, disconnect the wires connecting the pump to the electrical source. Once you have ensured that the power is off and the wires are safely disconnected, you can proceed with removing the old pump.
Attaching the Pump to the Drop Pipe
With the old pump removed, it’s time to install the new one. Begin by positioning the pump over the well casing, aligning it with the drop pipe. Carefully lower the pump into the casing, ensuring that it is properly centered. Gradually lower the pump further until it securely rests on the well’s platform. Make sure to double-check the alignment and positioning before proceeding.
Connecting the Electrical Wires
Once the pump is securely in place, it’s time to connect the electrical wires. Attach the wires to the appropriate terminals, following the manufacturer’s instructions. Ensure that the wires are securely fastened to prevent any accidents or malfunctions. Afterward, safely route the wires along the well casing, keeping them clear from any moving parts or potential hazards.
Remember to exercise caution when dealing with electrical connections and always follow the safety guidelines. If you are uncertain about any step of the installation process, it is advisable to seek professional assistance.
Mounting The Pressure Tank
Determining the Right Location
Before you proceed with mounting the pressure tank, it’s crucial to determine the right location for it. Choosing the appropriate spot ensures optimal functionality and easy access for maintenance purposes.
Consider the following factors when determining the ideal location for your pressure tank:
- The pressure tank should be located close to the well pump to minimize the distance the water must travel. This helps to maximize efficiency and reduce the risk of pressure loss.
- Ensure there is adequate clearance around the tank for installation, maintenance, and future repairs. A minimum of one-foot clearance on all sides is recommended.
- Place the pressure tank on a level surface to prevent any instability or potential damage. This will help maintain the durability and longevity of the tank.
- Position the tank indoors or in a protected area to shield it from extreme weather conditions, such as freezing temperatures or excessive heat.
Attaching the Tank to a Stable Surface
Securing the pressure tank to a stable surface is essential to prevent any movement or potential damage. Here’s a step-by-step guide to help you attach the pressure tank securely:
- Identify a suitable surface, such as a concrete pad or a wooden platform, to mount the pressure tank. Ensure the surface is level and capable of withstanding the weight of the tank when filled with water.
- If you’re using a concrete pad, use anchor bolts to secure the tank. Drill holes into the pad based on the tank’s mounting hole pattern and insert the anchor bolts. Tighten the bolts until they’re securely in place.
- For a wooden platform, use lag screws or bolts to fasten the tank. Drill holes into the platform, aligning them with the tank’s mounting hole pattern. Insert the lag screws or bolts and tighten them snugly to secure the tank.
Remember to consult the manufacturer’s instructions for any specific requirements or recommendations regarding mounting the pressure tank.
By following these guidelines and properly attaching the pressure tank to a stable surface, you can ensure the tank functions efficiently and remains secure throughout its lifespan.
Connecting The Plumbing
Once you have chosen the right well pump and pressure tank for your needs and have prepared the installation site, it’s time to connect the plumbing. This is a crucial step that ensures a proper flow of water from the well to your home. In this section, we will discuss how to attach pipes and fittings and the importance of applying Teflon tape to prevent leaks.
Attaching Pipes and Fittings
Attaching pipes and fittings is the backbone of any well pump and pressure tank installation. It is important to use the right materials and techniques to ensure a secure and leak-free connection. Follow these steps:
- Measure and cut the pipes: Start by measuring the distance between the well pump and the pressure tank. Use a pipe cutter or hacksaw to cut the pipes to the appropriate length. Remember to allow for fittings and connections.
- Prepare the pipes: Before attaching the pipes, make sure to remove any burrs or rough edges. You can use a file or sandpaper to smooth out the ends.
- Apply primer and glue: Apply PVC primer to the outside of the pipe and the inside of the fitting. Then, apply PVC glue to both the pipe and the fitting.
- Connect the pipes and fittings: Insert the pipe into the fitting and twist it a quarter turn to ensure a tight connection. Hold the joint in place for a few seconds to allow the glue to set. Repeat this process for all the pipes and fittings in your plumbing system.
Applying Teflon Tape to Prevent Leaks
To further guarantee a leak-free plumbing system, it is essential to apply Teflon tape to the threaded connections. Teflon tape, also known as plumber’s tape, creates a watertight seal and helps prevent leaks. Follow these steps:
- Clean the threads: Before applying Teflon tape, make sure the threads are clean and free from debris.
- Wrap the tape: Start by wrapping the Teflon tape around the threads in a clockwise direction. Ensure that the tape overlaps itself as you go.
- Apply tension: As you wrap the tape, apply slight tension to help it conform to the threads. This will ensure a tight seal.
- Finish the wrapping: Continue wrapping until you reach the end of the threads. Tear off the tape and press the end down firmly to secure it in place.
- Assemble the connections: Once the Teflon tape is applied, screw the threaded connections together. Tighten them with an adjustable wrench, being careful not to overtighten.
By following these steps, you will connect the plumbing for your well pump and pressure tank correctly. Remember to double-check all connections and ensure they are secure. Taking the time to properly attach pipes and fittings and applying Teflon tape will help prevent leaks and ensure a smooth and efficient water flow throughout your system.
Priming The Well Pump
Priming the well pump is a crucial step in the installation process to ensure the proper functioning of your water system. Without proper priming, the pump may struggle to draw water from the well, leading to inefficiency and potential damage. In this section, we will discuss the essential steps involved in priming your well pump, including filling the pump with water and running the pump to remove air.
Filling the pump with water
Before priming the well pump, it is essential to have a source of water nearby, such as a hose or bucket. To fill the pump with water, follow these steps:
- Locate the priming plug or priming port on the well pump. This plug or port is designed to allow easy access for filling the pump with water.
- Remove the priming plug or open the priming port to expose the well pump’s cavity.
- Using the hose or bucket, pour water into the pump cavity until it is completely filled. Ensure the water covers the intake or foot valve to create a seal between the pump and the water source.
- Once the pump cavity is filled with water, replace the priming plug or close the priming port tightly to prevent any water leakage.
Running the pump to remove air
After filling the pump with water, the next step is to run the pump to remove any air trapped within the system. Here’s how to do it:
- Switch on the power supply to the well pump. This will activate the pump and start the water flow.
- Allow the pump to run for a few minutes or until you notice a steady stream of water coming out of the faucets or hose connected to the system. This process helps to remove any trapped air from the pipes and ensures a continuous water supply.
- If you notice any sputtering or inconsistent water flow, it may indicate the presence of air in the system. Repeat the priming process and run the pump again until the water flow stabilizes.
- Monitor the pressure tank’s pressure gauge to ensure it reaches the desired pressure range for your system. Adjust the pressure switch accordingly if necessary.
Properly priming the well pump is essential to ensure its efficient operation and prevent any potential issues with water supply. By following the steps outlined above, you can confidently prime your well pump and pressure tank, allowing for a reliable source of water for your home or property.
Adjusting The Pressure Switch Settings
Adjusting the Pressure Switch Settings Adjusting the pressure switch settings is an important step in installing a well pump and pressure tank. The pressure switch controls when the pump turns on and off based on the water pressure in the tank. By ensuring that the pressure switch is set correctly, you can ensure that your system operates efficiently and effectively. In this section, we will cover two key aspects of adjusting the pressure switch settings: ensuring proper cut-in and cut-out pressure, and adjusting the pressure switch controls.Ensuring proper cut-in and cut-out pressure
The cut-in pressure is the point at which the pump starts running to build up pressure in the tank. The cut-out pressure, on the other hand, is the point at which the pump stops running because the desired pressure has been reached. To properly adjust these settings, follow these steps:- Identify the recommended cut-in and cut-out pressure settings for your specific well pump and pressure tank system. You can find this information in the manufacturer’s manual or by contacting the manufacturer directly.
- Locate the pressure switch on your system. It is usually located near the pressure tank or on the pump itself.
- Using a wrench, adjust the nut on the pressure switch clockwise to increase the cut-in pressure or counterclockwise to decrease it. Make sure to refer to the recommended settings identified in step 1.
- Next, locate the differential adjustment screw on the pressure switch. This screw controls the difference between the cut-in and cut-out pressure. Adjust it according to the manufacturer’s recommendations, usually by turning it clockwise to increase the difference or counterclockwise to decrease it.
Adjusting the pressure switch controls
In addition to setting the cut-in and cut-out pressure, you may need to adjust other controls on the pressure switch. These controls allow you to fine-tune the performance of your well pump and pressure tank system. Here are some important aspects to consider:- Pressure switch range: Some pressure switches allow you to set a specific pressure range within which the pump should operate. This can be useful for preventing the pump from running continuously or excessively cycling. Refer to the manufacturer’s instructions to adjust this setting.
- Pressure switch sensitivity: The sensitivity of the pressure switch determines how quickly it responds to changes in pressure. Adjusting this setting can help optimize the performance of your system. Again, consult the manufacturer’s guidelines for the recommended sensitivity range.
- Diagnostics: Some pressure switches have built-in diagnostic features that can help troubleshoot issues. Familiarize yourself with these features and consult the manufacturer’s manual for guidance on interpreting any error codes or indicators.
Testing The System
Now that you have successfully installed your well pump and pressure tank, it’s time to test the system to ensure it is functioning correctly. This crucial step will help you identify any potential issues and make necessary adjustments. In this section, we will cover two important aspects of testing the system: turning on the power and water supply, and checking for leaks and proper water pressure.Turning on the Power and Water Supply
To start the testing process, you need to turn on the power and water supply to the well pump and pressure tank. Follow these steps to do it correctly:- Locate the electrical disconnect switch near your pump or pressure tank.
- Make sure the switch is in the “off” position before proceeding.
- Flip the switch to the “on” position to provide power to your well pump.
- Next, locate the main water supply valve that controls the flow to the pressure tank.
- Turn the valve counterclockwise to open it fully and allow water to enter the system.
Checking for Leaks and Proper Water Pressure
Once the power and water supply are turned on, it’s time to check for leaks and ensure the system is maintaining proper water pressure. Follow these steps:- Inspect all the connections and fittings in the system, starting from the well pump to the pressure tank.
- Look for any signs of leakage, such as dripping or pooling water.
- Tighten any loose connections or fittings if necessary.
- Next, let the system run for a few minutes to build up pressure.
- Check the pressure gauge on your pressure tank to ensure it is within the recommended range for your system.
- If the pressure exceeds the desired range, adjust it by turning the pressure switch nut clockwise to increase or counterclockwise to decrease.
- Additionally, check any faucets or fixtures connected to the system to make sure water is flowing properly without any sputtering.
Low Water Pressure
Checking for clogged filters or screens
One common cause of low water pressure in a well pump and pressure tank system is clogged filters or screens. Over time, sediment, dirt, or other debris can accumulate and restrict the flow of water, resulting in decreased water pressure. To check for clogged filters or screens, follow these steps:
- Locate the filters or screens: Depending on your well pump system setup, the filters or screens may be located inside the pressure tank, at the entry point of the well pump, or both.
- Turn off the power: Before you begin inspecting the filters or screens, make sure to turn off the power to the well pump. This will prevent any accidents or injuries during the process.
- Remove the filters or screens: Use a wrench or pliers to carefully remove the filters or screens from their housing.
- Inspect and clean: Examine the filters or screens for any signs of clogging or blockage. If you notice a buildup of debris, rinse them thoroughly with clean water or use a soft brush to gently remove the obstructions.
- Reinstall the filters or screens: Once the filters or screens are clean, securely reinstall them in their original positions.
- Test the water pressure: Turn on the power to the well pump and check if the water pressure has improved. If not, proceed to the next step.
Adjusting the pressure switch settings
If clogged filters or screens aren’t the cause of low water pressure, it may be necessary to adjust the pressure switch settings. The pressure switch acts as a control device that turns the well pump on and off based on the desired water pressure. Follow these guidelines to adjust the pressure switch settings:
- Locate the pressure switch: The pressure switch is typically found near the pressure tank or within the well pump control box.
- Familiarize yourself with the switch settings: Take note of the existing pressure settings indicated on the pressure switch. This includes the cut-in pressure (the minimum pressure at which the pump starts) and the cut-out pressure (the maximum pressure at which the pump stops).
- Access the adjustment nut or screw: Depending on the type of pressure switch, you will need to loosen or tighten the adjustment nut or screw to modify the pressure settings.
- Increase or decrease the pressure settings: To increase water pressure, turn the adjustment nut or screw in a clockwise direction. To decrease water pressure, turn it counterclockwise.
- Make gradual adjustments: It is crucial to make small, incremental changes to the pressure settings and test the water pressure after each adjustment. This will help you achieve the optimal pressure without causing any damage to the system.
- Test the water pressure: After making the necessary adjustments, turn on the well pump and check if the water pressure has improved. If not, further adjustments may be required or it may be necessary to consult a professional.
Frequent Pump Cycling
If you have noticed that your well pump is continuously cycling on and off more frequently than usual, there could be a few reasons causing this issue. Frequent pump cycling is not only annoying but can also lead to increased wear and tear on your pump system, potentially decreasing its lifespan. In this section, we will discuss two important steps you can take to address the problem of frequent pump cycling:
Inspecting for water leaks
A common cause of frequent pump cycling is water leaks in your plumbing system. When there is a leak, water continuously seeps out, causing the pressure tank to lose pressure and triggering the well pump to turn on repeatedly to compensate for the lost water. To identify and fix any leaks, follow these simple steps:
- Turn off all faucets, showers, and appliances that use water in your home.
- Observe the pressure gauge on your pressure tank. If the pressure drops rapidly or continuously, it indicates a possible leak.
- Check your plumbing fixtures, pipes, and connections for any signs of water seepage or pooling.
- If you notice any leaks, promptly repair or replace the affected components.
- Recheck the pressure gauge to ensure the pressure remains steady.
By diligently inspecting your plumbing system and promptly addressing any leaks, you can eliminate one of the primary causes of frequent pump cycling and improve the efficiency of your well pump.
Adjusting the pressure tank air pressure
Another potential reason for frequent pump cycling is an incorrectly set air pressure in the pressure tank. The pressure tank plays a crucial role in regulating the pressure in your water system and reducing the frequency of pump cycling. Follow these steps to ensure the pressure tank air pressure is properly adjusted:
- Shut off the power to your well pump system to avoid any accidents during the adjustment.
- Find the air valve located on top of the pressure tank.
- Using a pressure gauge, check the current air pressure of the tank. It should be about 2 PSI below the “cut-in” pressure, the pressure at which the pump turns on.
- If the air pressure is too low, use an air compressor to add air through the air valve until it reaches the desired level. If the air pressure is too high, release excess air through the air valve.
- Turn the power back on and observe the pump cycling. If the frequency has reduced, you have successfully adjusted the pressure tank air pressure.
By ensuring the pressure tank air pressure is correctly set, you can minimize the strain on your well pump and significantly reduce frequent pump cycling.
By inspecting for water leaks and adjusting the pressure tank air pressure, you can troubleshoot and address the issue of frequent pump cycling effectively. Following these steps will help enhance the longevity of your well pump and pressure tank, resulting in a more reliable and efficient water system for your home.
Noisy Operation
Checking for loose fittings or pipes
If your well pump and pressure tank are producing a significant amount of noise during operation, it could be due to loose fittings or pipes. These loose components can cause vibrations that amplify the noise. To address this issue, you should:
- Inspect all fittings and pipes connected to the well pump and pressure tank.
- Tighten any loose fittings using a wrench to ensure a secure connection.
- Check for any damaged or worn-out parts that may need replacement.
By checking and tightening loose fittings or pipes, you can help minimize unnecessary noise and ensure that your well system operates smoothly.
Insulating pipes to reduce noise
Another effective method to reduce the noise produced by your well pump and pressure tank is to insulate the pipes. This insulation helps to dampen the vibrations and absorbs sound, resulting in a quieter operation. Follow these steps to insulate your pipes:
- Firstly, measure the length of the pipes that require insulation.
- Next, select an appropriate insulation material, such as foam or rubber pipe insulation.
- Wrap the insulation around the pipes, ensuring a snug fit.
- Secure the insulation in place using tape or zip ties.
Insulating the pipes is a simple yet effective way to reduce noise. It not only provides noise reduction but also helps to prevent heat loss, making it a worthwhile investment for your well system.
Regular Inspection And Cleaning
Regular inspection and cleaning are essential for ensuring the efficient operation of your well pump and pressure tank. By regularly checking for signs of wear or damage and keeping the pressure tank clean, you can prevent costly repairs and maintain a steady water supply. In this section, we will guide you through the process of inspecting and cleaning your well pump and pressure tank.
Checking for signs of wear or damage
It is important to regularly check your well pump and pressure tank for any signs of wear or damage. Catching potential issues early on can save you both time and money. Here are some steps to follow when inspecting your equipment:
- Inspect the motor and electrical connections for any loose wires or corrosion.
- Check the pressure switch to ensure it is functioning properly.
- Examine the pressure gauge for any signs of damage or inaccurate readings.
- Inspect the pipes and fittings for any leaks or cracks.
- Pay attention to any unusual noises or vibrations coming from the pump.
- Ensure that the well cap or seal is secure and intact.
- Inspect the pressure tank for any signs of rust or corrosion.
By regularly checking for these signs of wear or damage, you can identify any issues that may arise and take appropriate action to prevent further damage.
Cleaning the pressure tank
The pressure tank plays a crucial role in maintaining consistent water pressure. Over time, sediment and minerals can accumulate in the tank, affecting its performance. Regular cleaning of the pressure tank is necessary to ensure optimal functioning. Here are the steps to follow:
- Turn off the power to the pump and close the valve leading to the pressure tank.
- Drain the tank by attaching a hose to the drain valve and opening it.
- Flush out any sediment or debris by running water through the tank.
- If necessary, use a brush or sponge to scrub the interior of the tank to remove stubborn buildup.
- Rinse the tank thoroughly to remove any remaining residue.
- Once the tank is clean, close the drain valve and turn on the power to the pump.
- Monitor the pressure gauge to ensure that the tank is refilling properly.
Regularly cleaning the pressure tank not only ensures a reliable water supply but also extends the lifespan of the pump and tank. Make this practice a part of your regular maintenance routine to avoid any disruptions in your water system.
Professional Maintenance
Scheduling regular well pump servicing
Regular maintenance is essential for keeping your well pump and pressure tank running smoothly and efficiently. Scheduling regular servicing by a professional can help prevent costly repairs down the line and ensure that your well system continues to provide you with clean, reliable water.
During a routine maintenance visit, a professional will inspect and test your well pump and pressure tank to make sure they are operating at their optimal levels. They will also check for any signs of wear and tear, leaks, or other issues that could affect the performance of your system.
The frequency of these maintenance visits may vary depending on factors such as the age of your well system, the quality of your water, and the manufacturer’s recommendations. However, as a general guideline, it is recommended to have your well pump and pressure tank serviced at least once a year.
Scheduling regular well pump servicing has several benefits:
- Preventing breakdowns: Regular maintenance can help identify potential issues before they become major problems. By catching these issues early on, you can avoid sudden breakdowns and the inconvenience and expense that comes with them.
- Extending the lifespan of your equipment: Well pumps and pressure tanks that are properly maintained have a longer lifespan. Regular servicing can help ensure that your equipment continues to operate efficiently for years to come.
- Improving water quality: A professional can test the water from your well during a maintenance visit to check for any contaminants or bacteria. If any issues are detected, they can recommend appropriate treatment options to improve the water quality.
Hiring a professional for major repairs
While regular maintenance can help prevent major issues, there may still be times when your well pump or pressure tank requires more extensive repairs. In such cases, it is crucial to hire a professional who specializes in well systems to ensure the job is done correctly and safely.
Major repairs may include replacing a faulty well pump, repairing a pressure tank, or addressing any issues with the electrical connections or plumbing. These types of repairs can be complex and should only be handled by experienced professionals.
Hiring a professional for major repairs offers several advantages:
- Expertise and experience: Professionals who specialize in well systems have the knowledge and expertise to diagnose and fix complex issues. They are familiar with the latest industry standards and can ensure that repairs are done according to code.
- Proper tools and equipment: Well pump and pressure tank repairs often require specialized tools and equipment that professionals have access to. These tools are necessary for completing repairs accurately and efficiently.
- Warranty considerations: If your well pump or pressure tank is still under warranty, attempting to perform repairs yourself or hiring an inexperienced individual can void the warranty. Hiring a professional ensures that the warranty remains valid.
In summary, while regular maintenance is vital to keep your well pump and pressure tank functioning optimally, hiring a professional for major repairs is equally important. Investing in professional maintenance can save you time, money, and potential headaches in the long run.
Emergency Preparedness
When it comes to maintaining your well pump and pressure tank, it’s important to not only know the installation process but also be prepared for unexpected emergencies. Being equipped with the right knowledge and resources can make all the difference when trouble strikes. In this section, we’ll discuss two essential aspects of emergency preparedness:
Knowing how to shut off the power and water supply
In the event of a malfunction or emergency with your well pump and pressure tank, it is crucial to know how to quickly shut off the power and water supply. This can prevent further damage and potential hazards. Follow these steps to safely shut off the power and water:
- Turn off the power: Locate the electrical panel in your home or property and find the circuit breaker labeled for the well pump. It is typically marked as “well” or “pump.” Switch the breaker to the “off” position to cut off the electricity supply to the pump. This action will ensure no accidental electrical shocks occur during maintenance or repairs.
- Turn off the water supply: Find the main water valve, usually located near the pressure tank. Rotate the valve clockwise until it is tightly closed. This will stop the flow of water and prevent any leaks or damage while you work on the well pump and pressure tank.
Keeping contact information for well pump technicians
While it’s valuable to have some basic troubleshooting skills, certain issues with well pumps and pressure tanks require professional expertise. Maintaining a list of reliable well pump technicians’ contact information ensures that you can reach out for assistance whenever needed. Follow these tips to create your contact list:
- Research reputable technicians: Take the time to research and identify well pump technicians who have a good reputation and positive customer reviews. Look for professionals with experience in well pump installation and repair.
- Save contact details: Once you’ve found reliable technicians, jot down their names, phone numbers, and any additional contact information. Store this list in a convenient and easily accessible location, such as your phone or a physical notebook.
- Regularly update the list: As circumstances change or new technicians emerge, it’s essential to keep your contact list up to date. Remove any outdated or unreliable entries and add new information as necessary. This ensures that you always have the most current and reliable options on hand.
By knowing how to safely shut off the power and water supply and keeping contact information for well pump technicians, you’ll be well-prepared to handle any emergencies or unexpected issues that may arise with your well pump and pressure tank. Taking these proactive measures can help minimize downtime and protect your well system from further damage.
Frequently Asked Questions Of How To Install A Well Pump And Pressure Tank
How Much Does It Cost To Replace A Well Pump And Pressure Tank?
The cost of replacing a well pump and pressure tank can vary, but generally ranges from $1,500 to $3,000. Factors such as the complexity of the installation and any additional repairs needed can affect the final cost. It is recommended to get a quote from a professional to determine the exact cost for your specific situation.
Do You Need A Well Pump With A Pressure Tank?
Yes, you need a well pump with a pressure tank. The well pump brings water to the tank, which uses pressure to provide a steady water supply to your home or property. It ensures consistent water flow and maintains a balanced pressure throughout the system.
Do I Need A Check Valve Between Well Pump And Pressure Tank?
Yes, a check valve is necessary between the well pump and pressure tank. It prevents water from flowing back into the well and maintains pressure in the tank, ensuring consistent water supply and efficient pump operation.
How Does A Well Pump And A Pressure Tank Work Together?
A well pump and a pressure tank work together by drawing water from a well and storing it in the tank. The pump pushes water into the tank, creating pressure that allows water to flow through the pipes when a tap is turned on.
Conclusion
Installing a well pump and pressure tank doesn’t have to be a daunting task. By following these step-by-step instructions, you can ensure a successful installation and enjoy a reliable water supply. From finding the right location to connecting the necessary pipes and wiring, each stage plays a vital role in the process.
Remember to test the system and make any necessary adjustments before finishing the installation. With a little patience and the right knowledge, you can have a well-functioning system that meets your water needs for years to come.