To install a water spigot outside, first, locate a suitable spot and mark the area for excavation. Then, dig a hole deep enough to accommodate the spigot and its pipe.
Finally, connect the spigot to the water line and secure it in place using appropriate fittings and clamps. Installing a water spigot outside your home can be a convenient addition, providing easy access to water for gardening, washing cars, or other outdoor activities.
Whether you’re a seasoned DIY enthusiast or a beginner, this guide will walk you through the simple steps to install a water spigot outside. By following these instructions, you’ll have a functional spigot in no time, allowing you to enjoy the benefits of outdoor water usage. So, let’s get started with the process of installing a water spigot and make your outdoor chores a breeze.
Credit: www.youtube.com
Gathering The Necessary Tools And Materials
Before installing a water spigot outside, it’s essential to gather all the necessary tools and materials required for a successful installation. By having everything prepared, you can streamline the process and minimize any potential delays or disruptions. In this section, we will explore the materials needed for the installation, the types of water spigots available, common outdoor plumbing materials, tools required for the installation, essential tools for the job, and safety precautions to consider.
Materials Needed for the Installation
When installing a water spigot outside, certain materials are vital to ensure a stable and leak-free connection. Here are some essential materials to gather for the installation:
- Pipe fittings
- Thread seal tape or plumber’s tape
- Waterproof compound or sealant
- Outdoor-rated water spigot
- Pipe sleeves or insulation
- Pipe brackets or clamps
- Flex pipe or PEX tubing
- Waterproof caulk or silicone
Types of Water Spigots Available
Water spigots come in various types, each catering to different needs and preferences. Some popular options include:
| Type | Description |
|---|---|
| Traditional faucet spigot | A classic design with a lever or knob for water flow control. |
| Frost-free spigot | Ideal for regions with freezing temperatures as the valve is placed inside the house, preventing freezing and damage. |
| Wall-mounted spigot | Installed directly onto an exterior wall, providing convenience and space-saving benefits. |
| Garden hose spigot | Specifically designed to accommodate garden hoses and attachments, facilitating watering tasks. |
| Timed spigot | Incorporates a timer for automated water flow control, making it convenient for irrigation systems. |
Common Outdoor Plumbing Materials
When installing an outdoor water spigot, certain common plumbing materials are widely used. These materials ensure durability and reliability in outdoor settings. Some common outdoor plumbing materials include:
- Copper pipes
- PVC pipes
- PEX pipes
- Brass fittings
- Galvanized steel pipes
- PVC cement or adhesive
Tools Required for the Installation
Having the proper tools is crucial for a smooth and efficient installation process. Here are the essential tools you will need:
- Pipe wrench
- Adjustable wrench
- Hacksaw or pipe cutter
- Teflon tape or pipe thread sealant
- Plumbers’ putty or sealant
- Screwdriver
- Drill
- Hole saw or spade bit
Safety Precautions to Consider
When installing a water spigot outside, safety should always be a top priority. It’s crucial to take the following precautions:
- Wear protective gloves and eyewear.
- Avoid direct contact with any power lines or cables.
- Shut off the main water supply before beginning the installation.
- Ensure proper ventilation when using sealants or adhesives.
- Follow electrical safety guidelines if any wiring is involved.
- Check local building codes and regulations to ensure compliance.
By gathering the necessary tools and materials, you are well-equipped to install a water spigot outside. Remember to exercise caution, follow safety precautions, and refer to any manufacturer instructions specific to your chosen spigot type. With proper planning and attention to detail, you can enjoy the convenience and functionality of an outdoor water spigot.
Preparing For The Water Spigot Installation
Before diving into the installation process of a water spigot outside, it is crucial to properly prepare for the project. This involves considering several factors such as locating the ideal installation site, ensuring easy access to water supply lines, checking local regulations and codes, and understanding the legal requirements and permits. By taking these steps, you can ensure a successful installation that complies with building codes and regulations.
Locating the ideal installation site
Choosing the right location for your water spigot outside is essential to ensure convenience and functionality. Here are a few factors to consider when selecting the ideal installation site:
- The proximity to the area where you need water access the most, such as your garden, backyard, or driveway.
- The distance from the main water supply line to avoid unnecessary digging and potential complications during the installation.
- Accessibility for future maintenance and repairs.
- The suitability of the ground for digging and installation.
Ensuring easy access to water supply lines
When installing a water spigot outside, it is vital to ensure easy access to the water supply lines. Here are a few steps to take:
- Locate the main water supply line in your home.
- Determine the best route to extend the water line to the selected installation site.
- Consider the elevation and potential obstacles that may affect the water flow.
- Measure the required length of the water line extension to reach the desired location.
- Gather the necessary tools and materials, such as PVC pipes, connectors, and pipe cutters, to connect the water supply lines.
Checking local regulations and codes
Prior to installing a water spigot outside, it is important to familiarize yourself with local regulations and codes. This step ensures that you comply with any requirements or restrictions set by your local authorities. Here are a few points to consider:
- Contact your local municipality or building department to inquire about any specific regulations or permits required for outdoor water spigot installations.
- Understand the limitations regarding the types of materials, installation methods, and connections allowed in your area.
- Take note of any setback requirements or restrictions on installing water spigots near property lines, utilities, or public sidewalks.
Understanding legal requirements and permits
Installing a water spigot outside may require specific legal requirements and permits. To ensure compliance, follow these steps:
- Research the legal requirements and permits needed for outdoor water installations in your area.
- Verify if hiring a licensed plumber is required for the project.
- Consider the potential fees associated with obtaining the necessary permits.
By understanding and adhering to the legal requirements and permits, you can avoid any potential legal issues or complications during and after the installation process.
In conclusion, preparing for the water spigot installation is a crucial step to ensure a successful and compliant project. By considering the ideal installation site, ensuring easy access to water supply lines, checking local regulations and codes, and understanding the legal requirements and permits, you are setting yourself up for a smooth installation process that complies with all necessary building codes and regulations.
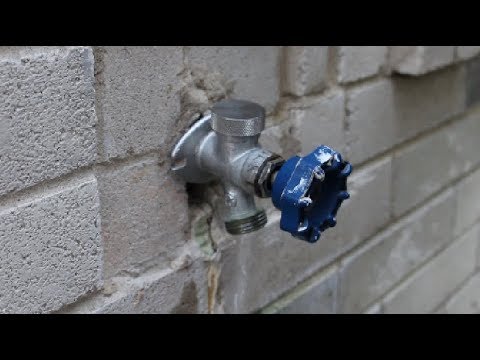
Installing The Water Spigot
If you’re planning to have easy access to water for your outdoor activities, installing a water spigot outside is a great idea. With a water spigot in place, you can simply connect hoses, water your plants, or wash your car without any hassle.
<h3>Shutting off the main water supply</h3>
Before you start the installation process, you need to shut off the main water supply to ensure a safe and smooth installation. This step is crucial to prevent any potential accidents and water leakage.
<h3>Locating the main water shut-off valve</h3>
Locating the main water shut-off valve is the next important step. It is typically located near the water meter or inside the house. Check your basement, crawlspace, or utility room for a knob or lever that can be turned to shut off the water supply.
<h3>Turning off the water supply safely</h3>
Once you’ve located the main water shut-off valve, turn it off by carefully rotating the knob or lever in a clockwise direction. This will stop the water flow throughout your entire house, allowing you to work on the installation process without any risk of water damage.
<h3>Connecting the water spigot to the water supply line</h3>
Now that the main water supply is turned off, it’s time to connect the water spigot to the water supply line. This can be done by attaching a pipe or hose to the spigot using the appropriate fittings.
<h3>Selecting the appropriate connection method</h3>
When it comes to connecting the water spigot to the water supply line, you have a few different options to consider. Choose the method that suits your specific needs and ensure that the fittings are compatible with both the spigot and the water supply line. Common options include soldering, compression fittings, or using push-fit connectors.
<h3>Properly sealing and securing the connection</h3>
Once you’ve connected the water spigot to the water supply line using your chosen method, it’s crucial to properly seal and secure the connection. This will prevent any leaks and ensure a watertight fit. Apply plumber’s tape or use thread compound to seal threaded connections, and tighten the fittings using the appropriate tools.
With the installation process complete and the connection securely in place, you can now turn on the main water supply and test the functionality of your newly installed water spigot. Enjoy the convenience and ease of access to water for all your outdoor needs!
Testing And Adjusting The Water Spigot
Once you have successfully installed a water spigot outside your home, the next important step is to test and adjust it properly to ensure its optimal performance. Testing and adjusting the water spigot involves turning on the water supply, checking for any leaks or irregularities, and adjusting the water flow and pressure as per your requirements.
Turning on the water supply
Before you start testing the water spigot, it is essential to turn on the water supply. Locate the main water valve in your home, usually located in the basement or utility room, and slowly turn it on to allow water to flow into the spigot.
Slowly turning on the main water valve
To avoid any sudden surge of water and potential damage to the spigot or pipes, it is crucial to slowly turn on the main water valve. Gradually opening the valve will help you regulate the flow and ensure a smooth start of the water supply.
Checking for any leaks or irregularities
Once the water supply is turned on, carefully inspect the water spigot and its surrounding area for any leaks or irregularities. Look out for dripping water, loose connections, or any signs of damage. If you notice any leaks or irregularities, take the necessary steps to fix them promptly to prevent water wastage and potential water damage.
Adjusting the water flow and pressure
After ensuring there are no leaks or irregularities, it’s time to adjust the water flow and pressure according to your needs. Some spigots come with a flow control knob that allows you to regulate the water flow by turning it clockwise or counterclockwise. Experiment with different settings until you achieve the desired flow and pressure.
Understanding the water flow control mechanism
To adjust the water flow accurately, it is essential to understand the water flow control mechanism of your specific spigot. Refer to the manufacturer’s instructions or online resources to gain a better understanding of how the spigot controls the water flow. This knowledge will help you make informed adjustments and optimize the performance of the water spigot.
Making necessary adjustments for optimal performance
Once you understand the water flow control mechanism, make the necessary adjustments to achieve optimal performance. Keep in mind that the ideal flow and pressure may vary depending on the intended use of the spigot, such as watering the garden, washing the car, or filling a bucket. Continually monitor and fine-tune the settings to ensure the water spigot performs at its best.
Remember: Regular maintenance and periodic checks will help you detect any issues with the water spigot early on and prevent potential problems in the future. By testing and adjusting the water spigot properly, you can enjoy a reliable and efficient water supply for all your outdoor needs.
Maintenance And Troubleshooting Tips
Proper maintenance and troubleshooting techniques can help ensure your outdoor water spigot performs optimally for years to come. By following regular maintenance practices, cleaning and inspecting the water spigot, preventing rust and corrosion, and addressing common issues, you can keep your water supply flowing smoothly. This section will provide you with practical tips for maintaining and troubleshooting your outdoor water spigot.
Regular maintenance practices
To keep your outdoor water spigot in good working condition, it’s important to follow some regular maintenance practices. Here are a few key steps:
- Turn off the water supply – Always remember to turn off the water supply before performing any maintenance tasks on your water spigot. This will prevent accidental leaks or water damage.
- Inspect for leaks – Regularly inspect your water spigot for leaks. Look for water dripping from the spout or pooling around the base. Even small leaks can lead to significant water wastage and increased utility bills.
- Check for proper water pressure – Ensure that the water pressure from the spigot is adequate. Low water pressure can be a sign of clogs or other issues further down the line.
- Remove debris – Clean out any debris, dirt, or leaves that may have accumulated around the spigot. This will help prevent clogs and ensure smooth water flow.
- Protect during freezing temperatures – During winter months, it’s crucial to protect your outdoor water spigot from freezing temperatures. Consider installing a freeze-proof faucet or using insulation materials to prevent damage.
Cleaning and inspecting the water spigot
Cleaning and inspecting your outdoor water spigot regularly will help maintain its performance and prevent potential issues. Here’s what you should do:
- Remove the hose – Before cleaning, disconnect any attached hoses from the spigot.
- Wipe down the spigot – Use a damp cloth to clean the spigot and remove any dirt or grime. For stubborn stains, you can use a mild detergent or vinegar solution.
- Inspect for damage – Check the spigot for any signs of damage, such as cracks, leaks, or loose fittings. If you notice any issues, address them promptly to prevent further damage.
- Lubricate moving parts – Apply a small amount of plumber’s grease or silicone lubricant to the spindle and other moving parts of the spigot. This will ensure smooth operation and prevent rusting.
Preventing rust and corrosion
Rust and corrosion can significantly impact the performance and lifespan of your water spigot. Here are some preventive measures you can take:
- Apply a rust-resistant coating – Consider using a rust-resistant spray or paint to coat your outdoor water spigot. This protective layer can help prevent rust formation.
- Replace worn-out components – Check for any signs of rust or corrosion on the spigot components. If you spot any, it’s crucial to replace them promptly to prevent further damage and potential leaks.
- Use waterproof tape – Apply waterproof tape to the threaded areas of the spigot to create a reliable seal and prevent water from seeping through.
- Keep the area around the spigot dry – Avoid leaving the spigot wet for extended periods. Ensure the surrounding area is well-drained to minimize the chances of rust and corrosion.
Common issues and troubleshooting
Despite regular maintenance, your outdoor water spigot can sometimes encounter common issues. Here are a few problems you may face and some troubleshooting tips:
Identifying leaks and addressing them
Leaky water spigots can waste a significant amount of water and lead to costly utility bills. If you notice a leak, follow these steps:
- Check for loose connections – Tighten any loose connections between the spigot and the water supply pipe using an adjustable wrench.
- Replace faulty washers or O-rings – If the leak persists, it might be due to worn-out washers or O-rings. Turn off the water supply, disassemble the spigot, and replace these components.
- Inspect the spigot for cracks – Examine the spigot carefully for any cracks or damage. If you find any, it may be necessary to replace the entire spigot.
Fixing low water pressure issues
If you’re experiencing low water pressure from your outdoor water spigot, try these troubleshooting techniques:
- Check for clogs – Remove the aerator or nozzle from the spigot and clean out any debris or mineral deposits that may be causing the low water pressure.
- Inspect the water supply line – Inspect the water supply line for kinks or obstructions. Straighten any kinks and remove any blockages to improve water flow.
- Check for shut-off valve issues – Ensure the shut-off valve supplying water to the spigot is fully open. If it’s partially closed, it can restrict water flow.
By following these maintenance and troubleshooting tips, you can keep your outdoor water spigot in excellent condition and enjoy a reliable water supply for various outdoor activities.
Frequently Asked Questions On How To Install A Water Spigot Outside
How Much Does It Cost To Install An Outdoor Water Spigot?
The cost of installing an outdoor water spigot depends on various factors such as location, complexity, and materials used. On average, it can range from $150 to $500, including labor and materials. Prices may vary, so it’s best to get a quote from a professional plumber.
How Much Does Labor Cost To Install An Outdoor Spigot?
The labor cost to install an outdoor spigot can vary, but typically ranges from $100 to $300. The price may vary depending on factors such as the complexity of the installation and the location of the spigot. It is best to contact a local plumber for an accurate quote.
What Is The Best Pipe For An Outdoor Spigot?
The best pipe for an outdoor spigot is a durable and weather-resistant material like PVC or copper. PVC pipes are affordable and easy to install, while copper pipes offer better longevity and resistance to corrosion. Choose a pipe based on your budget and the specific needs of your outdoor spigot.
How High Should A Spigot Be Off The Ground?
The spigot should be around knee height, typically around 12-18 inches off the ground for easy access and use.
Conclusion
Installing a water spigot outside can provide convenient access to water for various outdoor tasks. By following the step-by-step process outlined in this blog post, you can successfully install a water spigot yourself. Remember to gather all the necessary tools and materials before beginning, and take your time to ensure a proper installation.
With a little effort, you can enjoy the benefits of an easily accessible water source right outside your home.