To install a vessel sink faucet, follow these steps: remove the old faucet and drain assembly, clean the sink and area, apply plumber’s putty to the base of the new faucet, place the faucet on the sink, secure it with mounting nuts, connect the water supply lines, and turn on the water to check for leaks. Installing a vessel sink faucet requires a few simple steps that can be completed with basic tools and plumbing knowledge.
By following these instructions, you can easily update your bathroom’s style and functionality.
Understanding The Basics Of Vessel Sink Faucets
When it comes to installing a vessel sink faucet, understanding the basics is essential. A vessel sink faucet is a stylish and practical addition to any bathroom. Unlike traditional faucets, which are mounted on the countertop or the wall, vessel sink faucets are specifically designed for vessel sinks, which sit on top of the countertop. This unique design requires a different type of faucet installation, making it important to understand the basics before you begin. In this section, we will delve into why choosing a vessel sink faucet is a smart choice, explore the different types available, and highlight key considerations you need to keep in mind before starting the installation process.
Why Choose a Vessel Sink Faucet?
A vessel sink faucet offers several advantages, making it a popular choice among homeowners and interior designers. Here are a few reasons why you should consider installing a vessel sink faucet in your bathroom:
- Aesthetics: Vessel sink faucets are visually appealing, adding a touch of elegance and sophistication to your bathroom decor. Their taller spouts and unique designs make them stand out.
- Functionality: Vessel sink faucets are designed to accommodate the height of vessel sinks, ensuring sufficient space for you to wash your hands comfortably. The elevated position of the faucet also reduces the strain on your back.
- Versatility: Vessel sink faucets come in a wide range of styles, finishes, and materials, allowing you to find the perfect match for your bathroom design. Whether you prefer a modern, minimalist look or a vintage-inspired aesthetic, there is a vessel sink faucet that suits your taste.
- Easy Installation: While vessel sinks may require professional installation, the faucets themselves can be relatively simple to install. With the right tools and instructions, you can easily tackle the installation process on your own.
Different Types of Vessel Sink Faucets
When it comes to vessel sink faucets, you have plenty of options to choose from. Here are a few of the most common types:
| Type | Description |
|---|---|
| Single-Hole Faucets | These faucets require only one hole in the countertop or sink for installation. They have a single handle or lever to control both the temperature and water flow. |
| Widespread Faucets | Widespread faucets feature separate components for hot and cold water, along with a separate spout. They require three holes in the countertop or sink. |
| Vessel Filler Faucets | Vessel filler faucets are tall and have a long spout, providing ample clearance for vessel sinks. They usually have a single handle for water control. |
Key Considerations Before Installation
Before you start the installation process, here are some factors you should consider:
- Height: Ensure that the height of the vessel sink faucet is appropriate for your vessel sink. You want to make sure that there is enough clearance between the faucet and the sink.
- Compatibility: Check if the faucet you choose is compatible with your sink’s pre-drilled holes or if you need to make any modifications.
- Quality: Invest in a high-quality vessel sink faucet to ensure durability and smooth operation. Consider factors such as material, construction, and brand reputation.
- Installation Requirements: Familiarize yourself with the installation instructions provided by the manufacturer. Make sure you have the necessary tools and plumbing knowledge for the job.
By understanding the basics of vessel sink faucets, you can confidently choose the right faucet for your bathroom and successfully install it with ease. With their aesthetic appeal and functional design, vessel sink faucets can elevate the look and feel of any bathroom. So, let’s dive into the installation process in the next section!
Tools And Materials You’Ll Need
When it comes to upgrading your bathroom, installing a vessel sink faucet can add a touch of modern elegance. However, before you can enjoy the benefits of a new faucet, you’ll need to gather the necessary tools and materials. In this section, we’ll break down everything you need to successfully install your vessel sink faucet.
Gathering the Necessary Tools
Before you get started, make sure you have the right tools on hand. Having these tools ready will ensure a smooth installation process.
| Tools |
|---|
| Screwdriver |
| Adjustable wrench |
| Tape measure |
| Plumber’s putty |
| Bucket |
| Rag |
| Teflon tape |
With these tools handy, you’ll be well-equipped to handle each step of the installation process.
Selecting the Right Materials
In addition to the necessary tools, you’ll also need to gather the right materials for a successful installation. Here’s what you’ll need:
1. Vessel sink faucet
Choosing the right vessel sink faucet is crucial to ensure compatibility with your sink and plumbing system. Consider the style, finish, and features that best suit your preferences and bathroom decor.
2. Vessel sink
Select a vessel sink that complements your faucet and bathroom design. Keep in mind the dimensions and installation requirements of your chosen sink.
3. Water supply lines
Ensure you have the appropriate water supply lines that are compatible with your faucet and plumbing system. Measure the distance from the faucet to the shut-off valves to determine the required length.
4. Drain assembly
Don’t forget to purchase a suitable drain assembly that fits your sink and faucet. Consider the style and finish that aligns with your overall design aesthetic.
By gathering these materials ahead of time, you can avoid any unnecessary delays or last-minute trips to the hardware store.
Now that you’re equipped with the necessary tools and materials, you’re well on your way to installing a stunning vessel sink faucet that will elevate the look and functionality of your bathroom.
Step 1: Preparing For Installation
Before you can begin installing a vessel sink faucet, it’s essential to take the necessary steps to prepare for the installation process. This involves shutting off the water supply, clearing the work area, and preparing the sink. By following this guide, you’ll ensure a smooth and efficient installation of your new faucet.
Shutting Off the Water Supply
The first step in preparing for the installation of a vessel sink faucet is to shut off the water supply. This is an important step to prevent any mishaps or water damage during the installation process. Follow these simple steps to shut off the water:
- Locate the main water shut-off valve, usually found near the sink or in the basement.
- Turn the valve clockwise to shut off the water supply.
- Once the water supply is shut off, open the faucet to relieve any remaining pressure.
By shutting off the water supply, you’re ensuring a safe and dry environment to work in, allowing you to focus solely on the installation process. Remember that safety should always be your top priority.
Clearing the Work Area and Preparing the Sink
With the water supply shut off, it’s now time to clear the work area and prepare the sink for installation. This step is crucial to ensure a clean and organized workspace. Follow these steps to efficiently clear the area:
- Remove any items or belongings from around the sink area to create ample space.
- Place a protective covering, such as a towel or drop cloth, over the countertop to protect it from any potential scratches or damage.
- Check the sink for any debris or dirt and clean it thoroughly using a mild cleaner or soap.
- If needed, apply a silicone sealant around the mounting hole to ensure a secure and watertight seal for the faucet installation.
Taking the time to clear the work area and prepare the sink will result in a more efficient installation process. It will also help prevent any accidental damage to your belongings or countertops.
With these initial preparations complete, you’re now ready to move on to the next step of installing your vessel sink faucet. Stay tuned for our next guide where we’ll cover the steps required for attaching the faucet to the sink.
Credit: www.bathroomvesselsinks.com
Step 2: Removing The Old Faucet
Removing the old faucet is an essential step in the installation of a vessel sink faucet. This process involves disconnecting the water supply lines, detaching the drain and pop-up assembly, and finally, removing the existing faucet. By following these steps, you can ensure a smooth and successful installation of your new vessel sink faucet.Disconnecting the Water Supply Lines
To begin the removal process, you’ll first need to disconnect the water supply lines. These are the pipes that provide hot and cold water to your faucet. Here’s how you can do it: 1. Start by turning off the water supply valves under the sink. Rotate them clockwise until they are fully closed. This will prevent any water from flowing while you remove the faucet. 2. Once the water supply valves are closed, use a wrench to loosen the nut connecting the water supply lines to the faucet. Turn the nut counterclockwise until it is loose enough to remove by hand. 3. Gently pull the water supply lines away from the faucet. Be cautious of any water that may still be trapped in the lines. You can use a towel or bucket to catch any residual water.Detaching the Drain and Pop-Up Assembly
After disconnecting the water supply lines, the next step is to detach the drain and pop-up assembly. This will allow you to remove the old faucet completely. Follow these steps to complete this task: 1. Locate the drain pipe connected to the bottom of the sink. It is usually secured with a nut or clamp. Use a wrench to loosen the nut or remove the clamp, depending on your sink’s configuration. 2. Once the nut or clamp is loosened, carefully pull the drain pipe away from the sink. Be cautious of any residual water or debris that may be present. 3. With the drain pipe removed, you can now detach the pop-up assembly. This is the mechanism that controls the sink’s drain stopper. Look for a small rod connected to the back of the faucet. Use a pair of pliers to loosen the nut or clip holding the rod in place. 4. Once the nut or clip is loosened, pull the rod out from the back of the faucet. The pop-up assembly should now be detached from the sink.Removing the Existing Faucet
Now that you have disconnected the water supply lines and detached the drain and pop-up assembly, it’s time to remove the existing faucet. Here’s how you can do it: 1. Look for mounting nuts or screws securing the faucet to the sink. These are typically located underneath the sink. Use a wrench or screwdriver to loosen and remove these nuts or screws. 2. With the mounting nuts or screws removed, you can now lift the old faucet up and off the sink. Be gentle during this process to avoid damaging the sink or surrounding area. 3. Once the faucet is removed, inspect the sink surface for any mineral deposits or residue. Clean the area thoroughly before proceeding with the installation of your new vessel sink faucet. By following these steps, you have successfully removed the old faucet, making way for the installation of your new vessel sink faucet. With the old faucet out of the way, you can now move on to the next step in the installation process and enjoy the benefits of your updated bathroom fixture.Step 3: Installing The New Faucet
When it comes to selecting a new faucet for your vessel sink, you want to ensure it not only complements your bathroom decor but also functions properly. Now that you have the necessary tools and the sink is prepared, it’s time to install the new faucet. In this step-by-step guide, we will walk you through the process of attaching the mounting hardware, connecting the water supply lines, and securing the faucet to the sink. Let’s get started!Attaching the Mounting Hardware
The first step in installing your new vessel sink faucet is attaching the mounting hardware. This hardware serves as the base for your faucet, holding it securely in place on the sink. To do this, follow these simple steps:- Start by placing the rubber gasket onto the bottom of the faucet.
- Insert the mounting bolts into the holes on the sink, ensuring they align with the corresponding holes on the faucet.
- Secure the mounting bolts using the provided nuts, tightening them by hand until they are snug.
- Using a wrench, give each nut a quarter turn to ensure the faucet is securely attached.
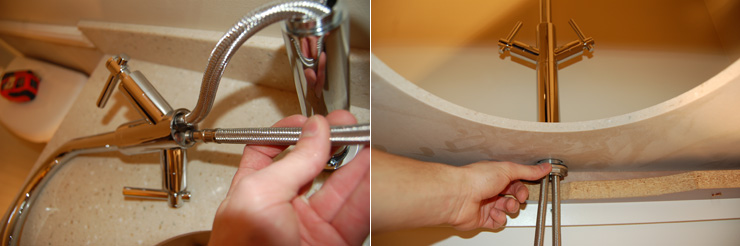
Connecting the Water Supply Lines
With the mounting hardware in place, the next step is to connect the water supply lines. These lines will allow water to flow from the pipes to the faucet, providing you with a steady stream of water. To connect the water supply lines, follow these steps:- Attach one end of the supply lines to the hot and cold water valves under your sink. Make sure to tighten them using an adjustable wrench.
- Connect the other ends of the supply lines to the corresponding inlets on the faucet, again using an adjustable wrench to ensure a tight fit.
- Once both supply lines are securely connected, turn on the water valves and check for any leaks. If any leaks are present, tighten the connections further or consider using plumber’s tape for a better seal.
Securing the Faucet to the Sink
The final step in installing your vessel sink faucet is securing it to the sink. This step ensures the faucet remains stable and does not move around during use. Here’s how to secure the faucet to the sink:- Using a screwdriver, tighten the mounting bolts underneath the sink, ensuring the faucet is held firmly in place.
- Check the faucet for any wobbling or movement. If needed, tighten the mounting bolts further until the faucet is stable and secure.
Step 4: Installing The Drain And Pop-Up Assembly
Now that you have successfully installed your vessel sink faucet, it’s time to move on to the next crucial step – installing the drain and pop-up assembly. This step is vital for ensuring proper drainage and functionality of your vessel sink. In this section, we will walk you through the process, from applying plumber’s putty to assembling the pop-up mechanism.
Applying Plumber’s Putty
The first step in installing the drain and pop-up assembly is to apply plumber’s putty. This pliable substance acts as a sealant, preventing any water leakage around the drain flange. Here’s how you can apply plumber’s putty:
- Take a small amount of plumber’s putty and roll it into a thin rope.
- Place the putty rope around the bottom edge of the drain flange.
- Press the drain flange firmly into the sink’s drain hole, ensuring a tight seal.
Once the plumber’s putty is applied, you can move on to the next step.
Installing the Drain Flange
Now that you have applied plumber’s putty, it’s time to install the drain flange. The drain flange serves as the base for the drain and pop-up assembly. Follow these steps to install the drain flange:
- Take the drain flange and align it with the drain hole.
- Insert the drain flange into the drain hole, ensuring it sits flat against the sink’s surface.
- Tighten the locknut underneath the sink to secure the drain flange in place.
After you’ve installed the drain flange, you’re ready to move on to the final step of this process.
Assembling the Pop-Up Mechanism
The last step in installing the drain and pop-up assembly is assembling the pop-up mechanism. This mechanism allows you to control the sink’s drain stopper. Follow these steps to assemble the pop-up mechanism:
- Take the pop-up mechanism and insert it into the drain flange.
- Attach the lift rod to the pop-up mechanism, ensuring it is securely connected.
- Connect the lift rod to the sink’s faucet using the provided hardware.
With the pop-up mechanism properly assembled, your vessel sink is now ready for use!
Congratulations! You have successfully completed the installation of your vessel sink faucet and drain and pop-up assembly. Now, you can enjoy the benefits of a stylish and functional vessel sink in your bathroom.
Step 5: Testing And Finishing Up
Once you have successfully installed your vessel sink faucet, it’s time to test it and put the finishing touches on your installation. This final step is crucial to ensure everything is working properly and to prevent any potential leaks or issues in the future.
Checking for Leaks
After the installation, it’s important to check for any leaks to avoid any water damage. Follow these steps to check for leaks:
- Turn on the water supply valves.
- Inspect the connections between the faucet and the water supply lines for any signs of dripping or leaking.
- If you notice any leaks, tighten the connections with an adjustable wrench. Be careful not to overtighten, as this could damage the fittings.
- Once you’ve tightened any loose connections, turn on the faucet and let the water run for a few minutes while checking for any additional leaks.
- If you still notice any leaks, it may be necessary to disassemble the faucet and inspect the O-rings or seals for any damage. Replace any faulty components as needed.
Testing the Faucet’s Functionality
Before considering the installation complete, you’ll want to make sure your faucet is functioning as expected. Follow these steps to test its functionality:
- Turn on the hot and cold water supplies to ensure a steady flow of water from the faucet.
- Check the water temperature and adjust the handles accordingly.
- Test the water pressure by running the faucet at full flow. Ensure the water pressure is consistent.
- Check all handles and knobs for smooth operation. They should turn easily without any stiffness or resistance.
Cleaning up and Finalizing the Installation
With the testing complete and no leaks or functional issues present, it’s time to clean up and finalize the installation. Follow these steps to properly finish the installation:
- Wipe down the faucet and the surrounding area to remove any dirt, debris, or fingerprints.
- Use a mild cleaning solution and a soft cloth to clean the faucet, ensuring it stays looking its best.
- Inspect the sink and countertop for any excess caulking or adhesive. If necessary, carefully remove it with a utility knife or scraper.
- Once everything is clean and dry, take a step back and admire your newly installed vessel sink faucet!
By following these steps for testing and finishing up your vessel sink faucet installation, you can ensure a successful and hassle-free experience. Remember to check for leaks, test the functionality of the faucet, and complete the installation with a thorough cleaning. With everything in order, you can now enjoy your beautiful and functional vessel sink faucet!
Frequently Asked Questions For How To Install A Vessel Sink Faucet
How Do You Install A Vessel Sink And Faucet?
To install a vessel sink and faucet: 1. Start by assembling the faucet according to the manufacturer’s instructions. 2. Position the sink on top of the bathroom vanity and trace its outline. 3. Cut a hole in the vanity for the drain flange.
4. Apply a bead of silicone around the edge of the sink and place it on the vanity. 5. Connect the faucet and drain to the sink, then secure them tightly. Test for leaks.
Where Do You Put A Faucet For A Vessel Sink?
Place the faucet for a vessel sink on the countertop or wall, aligned with the center of the sink bowl. Make sure it allows easy access and clearance for the sink’s height and design.
Do You Need A Special Faucet For A Vessel Sink?
Yes, you need a special faucet for a vessel sink. The faucet needs to be taller to accommodate the height of the sink.
Are Vessel Sinks Easier To Install?
Yes, vessel sinks are easier to install due to their above-counter design and simple installation process. They typically require less plumbing work and can be easily placed on top of a vanity or countertop.
Conclusion
Installing a vessel sink faucet can seem like a daunting task, but with the right tools and instructions, it can be accomplished with ease. By following the step-by-step guide provided in this blog post, you can successfully upgrade your bathroom and add a touch of modernity to your space.
Remember to take your time, double-check your work, and seek professional help if needed. Happy plumbing!