To install a sponge filter, attach an air pump to the filter and submerge it in the aquarium. Gently press down to secure it in place.
Installing a sponge filter in your aquarium is an important step to maintain a healthy aquatic environment. Sponge filters are efficient in providing mechanical and biological filtration. They are also cost-effective and easy to maintain, making them a popular choice among aquarium enthusiasts.
We will guide you through the simple steps of installing a sponge filter in your aquarium. By following these steps, you can ensure the well-being of your aquatic pets and maintain the water quality in your tank. So let’s dive in and learn how to install a sponge filter in your aquarium.
Understanding The Benefits Of A Sponge Filter
Understanding the Benefits of a Sponge Filter When it comes to maintaining a healthy aquarium, one of the key components is the filtration system. A sponge filter is a popular choice among aquarium enthusiasts due to its numerous advantages. In this section, we will delve into the benefits of using a sponge filter in your aquarium, as well as gain a better understanding of how it works to maintain water quality. Advantages of using a sponge filter in your aquarium 1. Efficient biological filtration: A sponge filter provides excellent biological filtration, which is crucial for a thriving aquarium ecosystem. The sponge acts as a breeding ground for beneficial bacteria that helps break down harmful ammonia and nitrites into less toxic nitrates. These nitrates can then be removed through regular water changes, ensuring a safe and healthy environment for your fish. 2. Gentle water circulation: Unlike other types of filters that create strong currents in the aquarium, a sponge filter offers gentle water circulation. This is especially beneficial for delicate fish species, as it minimizes stress and provides a more natural swimming environment. Moreover, the gentle water flow helps distribute oxygen evenly throughout the tank, ensuring optimal oxygenation for your aquatic inhabitants. 3. Safe for fry and small fish: Sponge filters are particularly suitable for breeding tanks or aquariums housing fry and small fish. The sponge acts as a barrier, preventing newborn fish from being sucked into the filter and ensuring their safety. The porous nature of the sponge also offers a suitable surface for the growth of infusoria, tiny organisms that serve as the first food source for newly hatched fry. How a sponge filter works to maintain water quality A sponge filter operates on a simple yet effective principle. It consists of a sponge, an air tube or pump, and an airstone or a diffuser. The sponge serves as the filtration media and is connected to the air tube. As air is pumped through the tube and released through the airstone into the sponge, it creates a suction effect. This draws water into the sponge, where beneficial bacteria colonize its surfaces. The sponge’s porous structure allows for mechanical and biological filtration to occur simultaneously. As water passes through the sponge, debris, uneaten food, and solid waste are mechanically trapped within its pores. Simultaneously, beneficial bacteria residing in the sponge break down harmful toxins, ensuring water quality remains optimal. Installing a sponge filter in your aquarium is a straightforward process. Simply attach the airline tubing to the air pump, place the airstone or diffuser at the bottom of the sponge, and submerge the sponge filter into the aquarium. Adjust the air pump’s airflow to achieve the desired water flow rate, keeping in mind the specific needs of your fish species. In conclusion, the benefits of using a sponge filter in your aquarium are numerous. It provides efficient biological filtration, gentle water circulation, and a safe environment for fry and small fish. Understanding how a sponge filter works to maintain water quality allows you to create a thriving aquatic habitat for your fish. So why wait? Consider incorporating a sponge filter into your aquarium setup and reap the rewards of a healthy and vibrant aquatic ecosystem.Preparing For Installation
Preparing for Installation
Choosing the right size and type of sponge filter for your aquarium
Before installing a sponge filter in your aquarium, it’s important to choose the right size and type of filter that suits your tank and its inhabitants. Different aquarium setups require different sizes and types of sponge filters to ensure optimal filtration and overall health of your aquatic ecosystem.
Consider the size of your aquarium and the number and size of fish you have. For smaller tanks with fewer occupants, a smaller sponge filter will suffice. On the other hand, larger tanks with more fish will require a larger filter with higher flow capacity. It’s crucial to select the appropriate size to maintain a clean and healthy environment for your aquatic pets.
Here’s how you can choose the right size and type of sponge filter:
- Measure the size of your aquarium in gallons or liters.
- Research different types of sponge filters available in the market.
- Consider the recommended gallon capacity of each sponge filter.
- Refer to the manufacturer’s guidelines for selecting the filter based on the number and size of your fish.
- Take into account the maintenance requirements and ease of cleaning for each type of sponge filter.
- Make an informed decision and choose the most suitable filter for your aquarium.
Gathering the necessary tools and materials
Before proceeding with the installation of your sponge filter, it’s essential to gather all the necessary tools and materials required for a smooth setup. Having everything ready in advance will save you time and frustration during the installation process.
| Tools | Materials |
|---|---|
| Screwdriver or pliers | Sponge filter |
| Bucket or container | Aquarium-safe silicone glue (if required) |
| Scissors | Aquarium water conditioner |
| Siphon or gravel vacuum | Fishnet |
| Water testing kit | Aquarium heater (if necessary) |
Cleaning the sponge filter before installation
Prior to installing the sponge filter in your aquarium, it’s crucial to ensure that it is clean and free from any debris or contaminants. Cleaning the filter will improve its performance and longevity, allowing it to effectively filter out impurities from the water.
Here are the steps to clean your sponge filter:
- Remove the sponge filter from its packaging.
- Rinse the sponge filter under tap water to remove any loose particles.
- Fill a bucket or container with water taken from the aquarium.
- Submerge the sponge filter in the bucket and squeeze it gently to dislodge any trapped debris.
- Repeat this process a few times until the water runs clear and the sponge filter looks clean.
- Allow the sponge filter to air dry or pat it gently with a clean cloth.
By following these steps, you’ll ensure that your sponge filter is clean and ready for installation, providing optimal filtration for your aquarium and promoting the well-being of your aquatic friends.
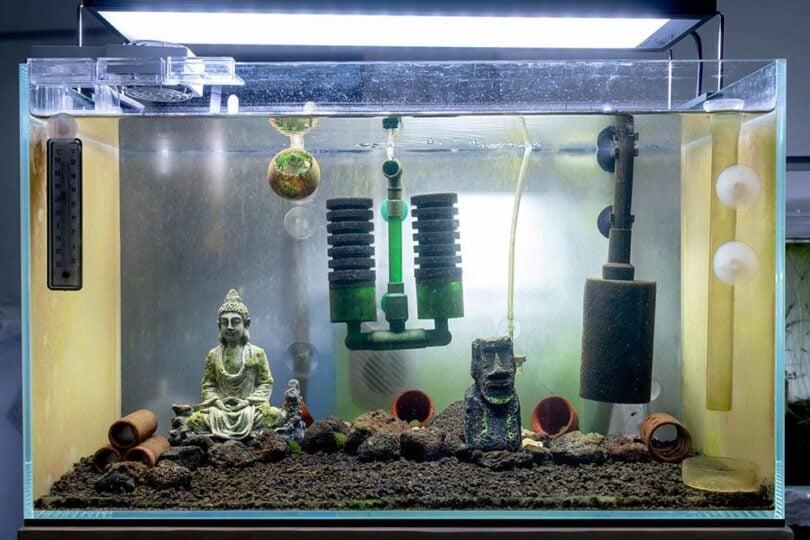
Step 1: Positioning The Sponge Filter
When it comes to setting up a sponge filter in your aquarium, the proper positioning plays a crucial role in ensuring efficient filtration. The location of the filter will determine its effectiveness in keeping your tank clean and maintaining a healthy aquatic environment for your fish and other inhabitants.
Finding the optimal location in your aquarium for the sponge filter
Before installing the sponge filter, you need to find the optimal location in your aquarium. Keep the following factors in mind:
- Adequate water flow: Place the sponge filter where there is proper water circulation. This will help in distributing the filtered water evenly throughout the tank and prevent the formation of stagnant pockets.
- Avoid strong currents: While water flow is essential, it is important to avoid placing the sponge filter in an area with strong currents. Excessive water movement can put stress on your fish and disturb delicate plants or decorative items in the tank.
- Consider tank size: Depending on the size of your aquarium, you may need to use multiple sponge filters. This ensures sufficient filtration for the entire tank and prevents any dead spots where debris can accumulate.
- Accessibility: Choose a location that allows easy access to the sponge filter for maintenance and cleaning purposes. This will make routine tasks much simpler and convenient.
Ensuring proper placement for efficient filtration
Once you have identified the ideal location, it’s time to place the sponge filter. Follow these steps for proper placement:
- Rinse the sponge: Before installation, rinse the sponge filter with water from the same aquarium. This eliminates any potential residue or particles that may harm your fish.
- Attach an airline tube: Connect an airline tube to the sponge filter, ensuring a secure fit. The airline tube should reach the air pump outside the aquarium.
- Position the sponge filter: Carefully lower the sponge filter into the chosen location, ensuring it is completely submerged in the water. Make sure the airline tube is positioned correctly and does not kink or obstruct the water flow.
- Secure the sponge filter: Use suction cups or other appropriate methods to secure the sponge filter in place. This prevents any accidental movement or displacement.
With the sponge filter properly positioned and secured in your aquarium, you can now proceed to the next step of the installation process. Remember to regularly clean and maintain the filter to optimize its performance and ensure a healthy aquarium environment for your aquatic companions.
Step 2: Attaching Airline Tubing
Connecting the airline tubing to the sponge filter and air pump
After successfully assembling the sponge filter, the next crucial step is attaching the airline tubing to ensure proper functioning. Connecting the airline tubing to both the sponge filter and air pump requires attention to detail and precision. This step is essential for creating a reliable and efficient filtration system for your aquarium.Securing the tubing to prevent leaks and maintain consistent water flow
To prevent leaks and ensure consistent water flow, it is crucial to secure the airline tubing properly. This will not only maintain the integrity of the filtration system but also prevent any water damage or disruption to the aquarium’s ecosystem. Taking the time to secure the tubing correctly will significantly contribute to the overall longevity and effectiveness of the sponge filter. Here’s a step-by-step guide on how to connect the airline tubing to the sponge filter and air pump:- Start by cutting a suitable length of airline tubing, keeping in mind the distance between the sponge filter and air pump.
- Attach one end of the airline tubing firmly onto the nozzle provided on the sponge filter. Ensure it fits securely to avoid any air or water leaks.
- Next, connect the other end of the airline tubing to the air pump’s outlet port. Use a secure fitting, such as a plastic connector or adapter, for a tight seal.
- Double-check the connections to ensure a snug fit. Gently tug on the tubing to confirm that it is secured tightly to both the sponge filter and air pump.
- To further enhance the connection’s security, consider using adjustable hose clamps or zip ties. These can be placed around the tubing and tightened to reinforce the connection points.
- Inspect the entire length of the tubing for any kinks or bends that may hinder the water flow. Straighten out any kinks gently to ensure a consistent flow rate.
- Finally, position the tubing in a way that avoids any excessive tension or strain, both on the connections and the tubing itself. This will help maintain a steady flow of air and water throughout the system.
Step 3: Installing Check Valve And Air Pump
Now that you have the sponge filter ready, it’s time to move on to the next crucial steps of the installation process. Step 3 involves attaching the check valve and air pump to the airline tubing. These components play a significant role in ensuring the efficient operation of your sponge filter.
Understanding the Importance of a Check Valve
A check valve, also known as a one-way valve, is an essential part of any sponge filter setup. It prevents water from flowing back into the air pump, which can cause damage to the pump or even lead to electrical shorts. Additionally, the check valve helps maintain a consistent water flow and ensures the air pump operates at its optimum capacity. Installing a check valve is a crucial step to protect your equipment and maintain the longevity of your sponge filter.
Attaching the Check Valve and Air Pump
Now that you understand the importance of a check valve, let’s move on to attaching it and the air pump to the airline tubing. Follow these simple steps:
- First, ensure your air pump is unplugged to prevent any accidents.
- Take one end of the airline tubing and attach it to the outlet or nozzle of your air pump.
- Slide the other end of the airline tubing onto the inlet or suction tube of the check valve.
- Next, connect another piece of airline tubing to the outlet or discharge tube of the check valve.
- The other end of this second airline tubing should be inserted into the opening of the sponge filter.
To ensure a secure connection, it’s a good practice to use hose clamps or zip ties at each connection point. This prevents any accidental disconnections and maintains a tight seal.
Once everything is securely connected, you can plug in your air pump, and it will start generating the required airflow for your sponge filter to function effectively. Make sure to check for any leaks or loose connections, as these can compromise the efficiency of the filter.
By properly attaching the check valve and air pump, you can ensure a reliable and efficient operation of your sponge filter. With these components installed, the next step will be to place the sponge filter in your aquarium, which we will cover in the next step of our guide.
Step 4: Submerging The Sponge Filter
Lowering the sponge filter into the aquarium
Once you have prepared the sponge filter by attaching the air hose and securing it in place, it’s time to lower it into the aquarium. This step is crucial as the proper submersion of the sponge filter will directly impact its performance in your aquarium.
Before you start, make sure to turn off any air pumps or filters that are currently running in your aquarium. This will prevent any disturbances to the water column and allow for a smooth installation process.
Ensuring proper submersion depth for optimal performance
One of the key factors to consider when submerging your sponge filter is the depth at which it should be placed in the aquarium. The optimal depth will depend on the specific needs of your aquarium and the type of fish you have.
Generally, it is recommended to place the sponge filter closer to the bottom of the aquarium. This helps to maximize the filtration capacity by effectively removing debris and waste that may accumulate on the substrate.
However, it is important to ensure that the sponge filter is not fully buried in the substrate, as this can restrict water flow and hinder its performance. A good rule of thumb is to leave a small gap between the bottom of the sponge filter and the substrate, allowing for adequate water circulation.
If you have a heavily planted aquarium or delicate aquatic plants, you may need to adjust the submersion depth to prevent any disturbance to the plant roots. In such cases, you can position the sponge filter slightly above the substrate, ensuring that it is still submerged enough to effectively filter the water.
Remember to check the specific requirements of the sponge filter model you are using, as some may have different recommendations for submersion depth. The manufacturer’s instructions or product manual should provide you with the necessary details.
Overall, finding the perfect submersion depth for your sponge filter may require some trial and error. Observe the water flow and monitor the overall performance of the filter to ensure that it is effectively filtering the water in your aquarium.
Now that you have successfully submerged the sponge filter in your aquarium, it’s time to move on to the final step – connecting the air pump and starting the filtration process.
Step 5: Adjusting Airflow And Testing Efficiency
Now that you have successfully installed your sponge filter, it’s time to ensure that it is operating at an optimal level. In this step, we will discuss how to regulate the airflow to achieve the desired filtration rate and conduct a water test to confirm the effectiveness of the sponge filter.
Regulating the airflow to achieve the desired filtration rate
Regulating the airflow of your sponge filter is crucial for achieving the desired filtration rate. By adjusting the airflow, you can control the amount of water passing through the sponge and optimize its efficiency. To regulate the airflow, follow these steps:
- Locate the air control valve on your sponge filter. It is usually situated at the top of the filter or on the airline tubing connected to the filter.
- Start by closing the valve completely.
- Gradually open the valve until you achieve the desired flow rate.
- Observe the sponge filter in action and make adjustments as necessary.
Remember that the ideal airflow will vary depending on factors such as the size of your tank, the number of fish, and the level of waste produced. It may take some time and experimentation to find the optimal airflow for your specific setup.
Conducting a water test to confirm the effectiveness of the sponge filter
Once you have adjusted the airflow, it is essential to conduct a water test to ensure that the sponge filter is effectively removing impurities from the aquarium. To perform a water test, follow these steps:
- Fill a clean container with water from your aquarium.
- Place the container on a flat surface and let it sit undisturbed for a few minutes.
- Observe the water carefully and look for any signs of debris, cloudiness, or discoloration.
- If the water looks clear and pristine, your sponge filter is functioning correctly. However, if you notice any impurities, you may need to adjust the airflow or consider cleaning the sponge filter.
Regularly monitoring the water quality and performing necessary adjustments will ensure that your sponge filter continues to provide efficient and effective filtration for your aquarium.
Maintenance And Troubleshooting Tips
Once you have successfully installed your sponge filter, it is important to understand the maintenance aspects and troubleshoot any issues that may arise. Proper cleaning and regular maintenance will prolong the lifespan of your sponge filter and ensure it continues to operate efficiently. In this section, we will discuss essential tips for cleaning and maintaining your sponge filter, as well as troubleshooting common issues.
Cleaning and maintaining the sponge filter
Cleaning and maintaining your sponge filter is crucial to ensure optimal performance and prevent clogging. Regular cleaning will keep the filter operating at its best and preserve water quality in your aquarium. Here are some key steps to follow:
- Remove the sponge: Start by disconnecting the air pump and carefully removing the sponge filter from the aquarium. Make sure to place the sponge in a clean container filled with aquarium water to avoid killing beneficial bacteria.
- Rinse the sponge: Gently squeeze the sponge in the container of aquarium water to remove any debris or waste. Avoid using tap water or any cleaning agents, as they can harm the beneficial bacteria residing in the sponge.
- Retain beneficial bacteria: To maintain the beneficial bacteria colonies, it is recommended to only clean a portion of the sponge during each maintenance session. This way, some bacteria will always be present to quickly reestablish the biological filtration.
- Reassemble the sponge filter: After rinsing the sponge, reassemble the filter by reconnecting the components and securing it firmly back in the aquarium.
- Monitor water parameters: Keep an eye on water parameters such as ammonia and nitrite levels. If you notice any unusual or unfavorable changes, consider cleaning the sponge more frequently.
Troubleshooting common issues with sponge filters
While sponge filters are generally reliable, occasional issues may arise. Identifying and resolving these issues promptly will help maintain a healthy and thriving aquarium environment. Here are some common problems you may encounter when using a sponge filter:
| Issue | Possible Cause | Solution |
|---|---|---|
| The filter is not producing enough bubbles | Air pump failure or insufficient airflow | Check the air pump for proper operation and ensure there are no obstructions in the airline tubing. Adjust the air valve to increase airflow if necessary. |
| Reduced water flow through the filter | Clogged sponge or impeller blockage | Inspect the sponge for accumulated debris or waste. Clean the sponge as outlined in the previous section. Additionally, ensure the impeller is clean and free from any obstructions. |
| Unpleasant odors | Excessive organic matter buildup | Perform regular sponge cleanings and consider adding beneficial bacteria supplements to maintain a healthy balance in the aquarium. |
| Sponge deterioration | Extended use or rough handling | Replace the sponge periodically to maintain optimum filtration efficiency. It is recommended to have spare sponges readily available for quick replacement. |
By following these maintenance and troubleshooting tips, you can ensure your sponge filter operates efficiently and provides an optimal environment for your aquarium inhabitants.
Credit: www.hepper.com
Frequently Asked Questions On How To Install A Sponge Filter
Do Sponge Filters Need An Air Pump?
Sponge filters require an air pump to work effectively. This pump creates air bubbles that draw water through the sponge, providing mechanical and biological filtration for your aquarium.
What Is The Best Placement For A Sponge Filter?
The best placement for a sponge filter is in the corner of the aquarium, near the water surface. This allows for maximum oxygen exchange and efficient filtration.
Does Sponge Filter Placement Matter?
Yes, sponge filter placement does matter. Proper placement ensures efficient filtration and oxygenation throughout the aquarium. It should be positioned in an area with good water flow, allowing the sponge to trap debris and provide a healthy environment for the fish.
Do I Need A Check Valve For Sponge Filter?
Yes, a check valve is recommended for a sponge filter. It helps prevent water from flowing back into the aquarium when the power is off, ensuring the filter retains its beneficial bacteria and helping maintain water quality.
Conclusion
Installing a sponge filter is a simple and effective way to maintain the cleanliness of your aquarium. By following the step-by-step instructions provided in this blog post, you can ensure that your filter is properly installed and functioning efficiently. With its ability to provide mechanical and biological filtration, a sponge filter is a valuable addition to any aquarium setup.
Keep your fish happy and healthy by embracing this easy-to-use filtration system.