To install a jet pump, start by selecting a suitable location and securing it firmly to a stable surface. Connect the water pipes, making sure they are properly aligned and sealed.
Finally, prime the pump and connect it to a power source to complete the installation process. Installing a jet pump requires careful consideration of location, secure fixing, proper alignment of water pipes, and priming before connecting it to a power source.
Taking these steps will ensure a successful installation and optimal performance of the jet pump. Now, let’s delve into the details of each step to help you install your jet pump accurately.
Credit: www.homedepot.com
Understanding Jet Pumps: An Overview
Below is the HTML code that represents an engaging section of a blog post about how to install a jet pump. “`htmlUnderstanding Jet Pumps: An Overview
What is a jet pump?
A jet pump can be defined as a versatile device that utilizes the kinetic energy created by the flow of a fluid to move another fluid. It is commonly used in households and industries for various applications such as well water pumping, irrigation systems, and boosting water pressure.
Different types of jet pumps
There are two main types of jet pumps:
- Shallow well jet pumps: These pumps are designed for applications where the water source is located less than 25 feet from the pump. They are typically installed above ground and consist of a single pipe system.
- Deep well jet pumps: These pumps are used when the water source is located more than 25 feet below the pump. They operate through a two-pipe system that involves a jet assembly located inside the well.
Applications and benefits of jet pumps
Jet pumps offer numerous applications and benefits:
| Applications | Benefits |
|---|---|
| Well water pumping | Reliable water supply for households and farms |
| Irrigation systems | Efficient watering for gardens and agricultural fields |
| Boosting water pressure | Improved water pressure for enhanced performance of showers and faucets |
Jet pumps are highly versatile devices that provide reliable water supply, efficient irrigation, and improved water pressure. Their ease of installation, operational flexibility, and affordability make them an ideal choice for both residential and commercial applications.
“` Remember to paste this HTML code into your WordPress editor to preserve the formatting and functionality.Evaluating Your Water System
Before installing a jet pump, it is crucial to evaluate your water system to ensure a proper and efficient installation. Assessing your water needs, determining the water source and well depth, and performing a water flow rate calculation are essential steps in this evaluation process. Let’s dive into each of these aspects in detail.
Assessing Your Water Needs
To determine the right jet pump for your water system, it’s essential to assess your water needs accurately. Consider factors such as the number of faucets, showers, toilets, and appliances that will rely on the jet pump for water supply. A larger household with multiple bathrooms and kitchen appliances will likely require a higher-capacity pump. On the other hand, a smaller household with fewer water demands can opt for a lower-capacity pump.
Determining the Water Source and Well Depth
Identifying the water source and well depth is crucial before installing a jet pump. Firstly, determine if your water source is from a well or a municipal supply. If you have a well, you’ll need to know the well depth, which can impact the pump’s performance. Measure the depth from the top of the well to the water level to determine the total dynamic head (TDH), an essential parameter for selecting the right pump.
Performing a Water Flow Rate Calculation
Calculating the water flow rate is vital for choosing the appropriate jet pump. Measure the time it takes to fill a known volume container, such as a bucket, with water from an indoor faucet. Divide the volume by the time taken to fill the container, and you’ll have the flow rate in gallons per minute (GPM). This flow rate will help you select a suitable jet pump that can meet your household’s water demands.
By properly evaluating your water system, assessing your water needs, determining the water source and well depth, and performing a water flow rate calculation, you can ensure the installation of a jet pump that will provide reliable and consistent water supply for your household.
Selecting The Right Jet Pump
Installing a jet pump can be a great solution for your water supply needs, whether it’s for domestic use or irrigation purposes. However, the success of your installation depends greatly on selecting the right jet pump for your specific requirements. In this comprehensive guide, we will take you through the key factors to consider when choosing the perfect jet pump for your needs.
Understanding pump capacity and horsepower
Two vital considerations when selecting a jet pump are pump capacity and horsepower. The pump capacity refers to the amount of water the pump can deliver per minute, typically measured in gallons per minute (GPM). Determining the required pump capacity depends on factors such as household size, water usage patterns, and the number of fixtures you plan to supply. A higher pump capacity will ensure a steady flow of water to meet your needs.
Horsepower, on the other hand, represents the power of the motor that drives the pump. The horsepower rating affects the pump’s ability to lift water vertically or horizontally over a certain distance. It plays a crucial role in determining the pump’s efficiency and performance. A higher horsepower will allow the pump to work effectively in delivering water to greater heights or distances.
Considering the pump’s materials and construction
Another significant factor to consider is the pump’s materials and construction as it directly impacts its durability and longevity. Jet pumps are typically made from either cast iron or stainless steel. Cast iron pumps are more affordable and suitable for most residential applications. However, if you live in an area with corrosive water or plan to use the pump in a commercial setting, it’s advisable to invest in a stainless steel pump, known for its corrosion resistance.
Additionally, pay attention to the construction of the pump. Look for features like reinforced impellers and diffusers, as these components are essential for maintaining consistent pump performance over time. A well-constructed pump will be able to withstand the demands of continuous operation without encountering premature failure or performance deterioration.
Choosing between shallow well and deep well jet pumps
When selecting a jet pump, you will need to decide between shallow well and deep well jet pumps based on your water source. Shallow well jet pumps are designed to draw water from sources with a depth of up to 25 feet. They are commonly used in residential settings where water tables are relatively close to the surface. Deep well jet pumps, on the other hand, are capable of drawing water from depths exceeding 25 feet. Such pumps are suitable for locations where the water table is deeper and require a foot valve and injector assembly for optimal performance.
Consider the depth of the water source carefully to determine whether a shallow well or deep well jet pump is appropriate for your situation. Ensure that you have accurate measurements before finalizing your decision to ensure efficient and reliable water supply for your needs.
Remember, selecting the right jet pump is crucial for a successful installation and long-term satisfaction. By understanding pump capacity and horsepower, considering the pump’s materials and construction, and choosing the appropriate type of jet pump, you can ensure optimal performance, reliability, and durability. Now that you have gained a good understanding of the factors involved, you can confidently proceed with the next step in your jet pump installation journey.
Gathering The Necessary Tools And Materials
Before you start installing a jet pump, it is important to gather all the necessary tools and materials. Having everything ready will save you time and frustration during the installation process. Here is a breakdown of what you will need:
List of tools required for installation
- Adjustable wrench
- Screwdriver set
- Drill with appropriate drill bits
- Tape measure
- Pipe cutter
- Plumber’s tape
Required plumbing fittings and materials
In addition to the tools, you will need a variety of plumbing fittings and materials to properly install the jet pump. These include:
- PVC pipes
- PVC connectors and elbows
- Threaded fittings
- Pipe sealant
- Pump mounting brackets
- Electrical wires and connectors
Safety equipment and precautions
Maintaining safety during the installation process is crucial. To ensure your well-being, make sure you have the following safety equipment on hand:
- Safety goggles
- Gloves
- Dust mask
- Ear protection
Remember to wear appropriate safety gear and take the necessary precautions while working with power tools and plumbing materials.
By gathering all the required tools, fittings, materials, and safety equipment beforehand, you will be well-prepared to install your jet pump efficiently and safely.
Preparing The Installation Site
Before installing a jet pump, it’s crucial to prepare the installation site properly. This ensures efficient operation and saves you potential headaches down the line. In this section, we will discuss three essential factors to consider while preparing the installation site: choosing an appropriate location for the pump, ensuring proper ventilation and accessibility, and preparing a suitable base for the pump.
Choosing an Appropriate Location for the Pump
When selecting a location for your jet pump, it’s important to consider a few key factors. First, ensure the pump is placed on a firm, level surface that can handle its weight. The surface should be free from moisture or any potential hazards.
In addition to the base, choose an area that is close to the water source and electrical outlets. This reduces any potential strain on the pump and minimizes the chances of tripping hazards caused by long cables.
Moreover, consider installing the pump in a space that offers protection from extreme temperatures. Avoid exposing the pump to direct sunlight or freezing conditions, as this can affect its performance and lifespan.
Ensuring Proper Ventilation and Accessibility
Ventilation is crucial to prevent the pump from overheating. The enclosure or room where the pump is installed should have adequate airflow to dissipate heat effectively. Proper ventilation not only enhances the pump’s performance but also extends its lifespan.
Accessibility is another key consideration. Make sure there is enough space around the pump for easy maintenance and repairs when required. Having ample space also allows for proper air circulation and prevents any obstructions that could hinder the pump’s functionality.
Preparing a Suitable Base for the Pump
Creating a stable base is vital to maintain the pump’s stability and prevent unnecessary vibrations. A solid concrete pad is recommended as it provides a sturdy foundation for the pump. Alternatively, you can use a thick wooden platform or rubber pad to absorb vibrations and reduce noise.
Whether using concrete, wood, or rubber, ensure the base is level and flush with the ground. This eliminates any potential wobbling or tilting that could affect the pump’s operation.
| Key Points: |
|---|
| Choose a firm, level surface for the pump installation. |
| Consider proximity to water source and electrical outlets. |
| Protect the pump from extreme temperatures. |
| Ensure adequate ventilation to prevent overheating. |
| Create sufficient space around the pump for maintenance. |
| Use a stable base to prevent vibrations and noise. |
By adhering to these guidelines, you can establish a suitable installation site for your jet pump, ensuring optimal performance and longevity. Taking the time to prepare the site correctly will lead to a hassle-free installation process and peace of mind.
Installing The Jet Pump
Installing a jet pump is an essential step in ensuring a reliable water supply for residential or commercial use. A jet pump is commonly used to draw water from a well or remove water from a basement. If you’re wondering how to install a jet pump, we’ve got you covered. In this guide, we will walk you through the process step by step, starting from connecting the pump to the water source, securing the pump in place, and finally, installing the pressure tank and pressure switch.
Connecting the pump to the water source
Before you start connecting the pump to the water source, make sure that the pump and all necessary components are properly grounded for safety reasons. To connect the pump to the water source:
- Position the pump near the water source, ensuring it is stable and level.
- Connect the suction pipe to the inlet of the pump, ensuring a tight and secure fit.
- Attach a foot valve to the suction pipe to prevent water from flowing back into the well when the pump is off.
- If required, install a check valve on the discharge pipe to prevent water from flowing back into the pump once it is turned off.
Securing the pump in place
Securing the pump in place is crucial to prevent any movement or noise during operation. To secure the pump in place:
- Use mounting brackets or straps to attach the pump to a solid surface, such as a concrete pad or wall.
- Tighten the mounting bolts or straps securely to ensure the pump remains stable and doesn’t vibrate excessively.
- Check for any loose connections or components and make necessary adjustments.
Installing the pressure tank and pressure switch
Installing the pressure tank and pressure switch is the final step in setting up your jet pump system. These components help maintain a steady water pressure throughout your property. Follow these steps:
- Position the pressure tank near the pump, ensuring it is on a sturdy surface and level.
- Connect the tank to the pump using a pipe or flexible tubing, ensuring a tight and secure fit.
- Attach the pressure switch to the pump or pressure tank according to the manufacturer’s instructions.
- Adjust the pressure switch settings to your desired pressure range.
- Test the system by turning on the pump and checking for any leaks or unusual noises.
By following these simple and straightforward steps, you can successfully install a jet pump and enjoy a reliable water supply for your everyday needs. Remember to consult the manufacturer’s instructions for your specific pump model and seek professional help if needed. Happy pumping!
Connecting The Plumbing System
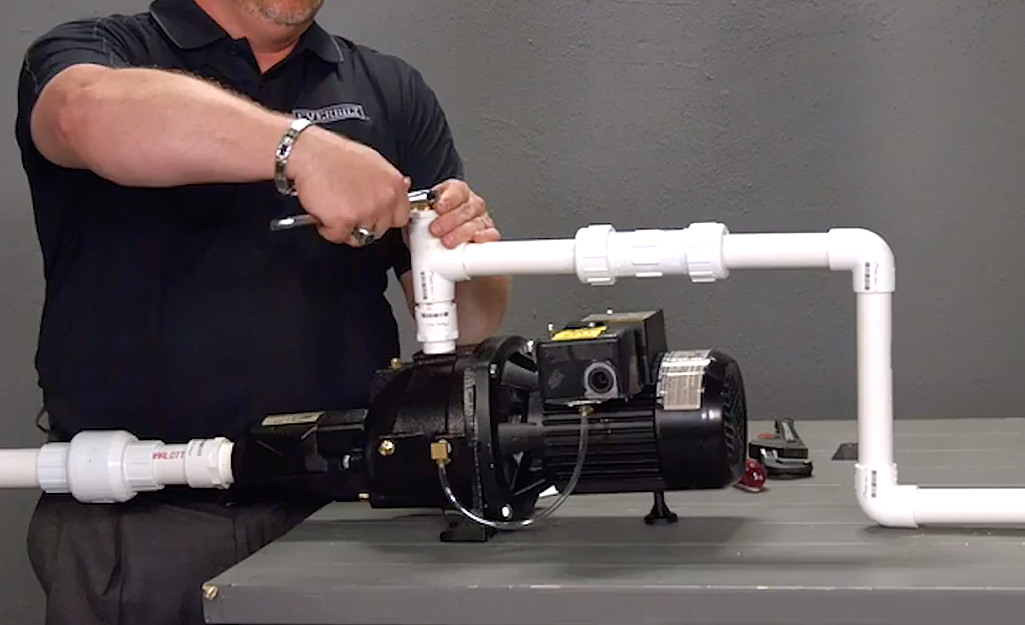
Attaching the plumbing fittings and pipes
Once you have securely mounted your jet pump and primed the system, it is time to connect the plumbing system. This step is crucial as it ensures the proper flow of water and prevents any leaks. Attaching the plumbing fittings and pipes requires careful attention to detail and proper technique. Below, we outline the necessary steps to help you complete this task successfully.
- Prepare the fittings and pipes: Before starting, gather all the necessary materials, including pipe wrenches, Teflon tape, and the required plumbing fittings and pipes. Make sure the fittings and pipes are clean, free from any debris, and in good condition.
- Apply Teflon tape: Start by applying Teflon tape to the threaded ends of the fittings. This helps create a watertight seal and prevents leaks. Wrap the tape clockwise around the threads, making sure to cover the entire threaded area.
- Attach the fittings: Begin by attaching the fittings to the pump outlet and inlet ports. Use a pipe wrench to tighten the fittings securely but be careful not to overtighten and damage the threads. Ensure the fittings are aligned correctly and facing the right direction.
- Connect the pipes: Once the fittings are in place, connect the pipes to the fittings. Apply slight pressure while twisting the pipes into the fittings to ensure a tight fit. Again, avoid overtightening, as this can cause damage.
- Tighten the connections: Use a pipe wrench to tighten the connections between the fittings and pipes. Ensure they are snug but not overly tightened, as this can lead to cracks or leaks. Inspect each connection visually to confirm they are secure.
- Inspect for leaks: Finally, turn on the power to the pump and run water through the system. Inspect all the connections for any signs of leaks. If you notice a leak, turn off the pump immediately and tighten the affected connection or replace the faulty fitting.
Installing a check valve and foot valve
As you connect the plumbing system, including a check valve and foot valve in the setup is essential. These valves help maintain the proper functioning of the jet pump and prevent water backflow. Here’s how you can install them correctly:
- Prepare the valves: Ensure that the check valve and foot valve are clean and free from any sediment or debris. Inspect them to ensure there are no damages or cracks that could hinder their performance.
- Attach the check valve: Begin by attaching the check valve to the outlet port of the pump. Align the arrow on the valve with the direction of the water flow, typically indicated by an arrow on the pump itself. Tighten the check valve securely using a pipe wrench.
- Install the foot valve: Position the foot valve at the bottom of the suction pipe or submerged in the water source. Make sure the valve is securely attached to prevent any movement. Connect the foot valve to the suction pipe and tighten the connection with a pipe wrench.
- Inspect for proper installation: After installing both the check valve and foot valve, visually inspect the connections and ensure they are tight. Once again, turn on the pump and run water through the system to confirm that the valves function correctly and there are no leaks.
Connecting the pressure tank and pressure switch
The final step in connecting the plumbing system is to link the pressure tank and pressure switch to the jet pump. This allows for the regulation of water pressure and automatic operation of the pump. Follow the steps below to complete this important phase:
- Position the pressure tank: Place the pressure tank in a suitable location near the pump, ensuring it is supported and stable. The tank should be placed on a level surface to prevent any imbalance and should be easily accessible for maintenance purposes.
- Attach the pressure switch: Locate the pressure switch and attach it to the water line coming from the pump. Use a pipe wrench to tighten the connection securely, ensuring there are no signs of leakage. Follow the manufacturer’s instructions for wiring the pressure switch correctly.
- Connect the pressure tank: Connect the outlet of the pressure switch to the inlet of the pressure tank using plumbing fittings and pipes. Ensure all connections are tight and secure, using a pipe wrench if necessary. Double-check for any leaks before proceeding.
- Test the system: Turn on the pump and allow it to run until the pressure reaches the specified level. Verify that the pressure switch functions as intended by automatically shutting off the pump when the pressure reaches the desired setting. Conduct a thorough inspection to ensure there are no leaks in the connections or valves.
With the plumbing system properly connected, you are one step closer to enjoying a fully functional jet pump. Take your time during this process, ensuring each connection is secure and leak-free. By following these steps, you can have confidence in your plumbing system and enjoy the benefits of a reliable water supply.
Electrical Connections And Testing
Wiring the pump to the electrical supply
When it comes to installing a jet pump, ensuring correct electrical connections is crucial. Wiring the pump to the electrical supply is a straightforward process that requires attention to detail and following safety guidelines. To begin, gather the necessary tools and materials: wire strippers, wire connectors, a screwdriver, and electrical tape. Ensure the power supply is turned off before starting any electrical work. 1. Start by identifying the two power wires- the black wire (hot) and the white wire (neutral) coming from the electrical panel. It is essential to follow the manufacturer’s instructions and consult the wiring diagram provided with your jet pump for specific wire color codes. 2. Strip the ends of the power wires and the pump’s wiring harness to expose a small section of bare wire. Use the wire strippers to carefully remove the insulation without damaging the wire. 3. Connect the black power wire to the black wire on the pump’s wiring harness using a wire connector. Twist the wires together tightly and secure with an electrical tape for added protection. Repeat the process for the white power wire and white wire on the pump’s wiring harness. 4. Once the wires are securely connected, carefully fit them into an electrical junction box and fasten the box securely with a screwdriver. Ensure that no bare wires are exposed outside the junction box and that all connections are tight. 5. Before powering on the pump, double-check the wiring connections for any loose or exposed wiring. Inspect for any damage or fraying and address it immediately. Safety should always be the top priority when dealing with electrical connections.Testing the pump and checking for leaks
Once the jet pump is correctly wired to the electrical supply, it is crucial to test the pump and check for leaks before considering the installation process complete. This ensures the pump will operate efficiently and provides early detection of any potential issues. Follow these steps to test the pump and check for leaks: 1. Fill the pump’s intake pipe with water to prime the pump. This helps create a vacuum and allows the pump to draw water from its source effectively. Check the manufacturer’s instructions for specific priming requirements. 2. Turn on the pump and observe its performance. Listen for any unusual noises, such as grinding or rattling. If you notice anything unusual, immediately turn off the pump and address the issue before continuing. 3. Once the pump is running smoothly, check all plumbing connections for leaks. Inspect areas such as pipe joints, fittings, and the pump itself. Leaks can lead to inefficiency and potential damage, so it is crucial to identify and fix them promptly. 4. If no leaks are detected and the pump is functioning correctly, allow it to run for a sufficient amount of time to ensure stability and reliability. Monitoring the pump’s performance during this time will provide valuable insights into its functionality.Troubleshooting common installation issues
Some installation issues may arise even after careful wiring and testing. Identifying and troubleshooting these common issues can help avoid further complications and ensure a successful installation. Here are a few common installation issues and possible solutions: 1. No power to the pump: Verify that the power supply is turned on and that the circuit breaker is not tripped. Check all electrical connections and wiring for loose or damaged parts. 2. Low water pressure: Check for obstructions in the intake line, such as debris or blockages. Ensure that the check valve is properly installed and functioning correctly. 3. Pump cycling on and off frequently: This may indicate a low water level in the source or a faulty pressure switch. Verify the water level and check the pressure switch for proper calibration. 4. Excessive noise or vibrations: Inspect the pump’s base for secure mounting and adjust as necessary. Look for loose or damaged components that may cause vibrations and noise. By addressing these common installation issues promptly, you can ensure the jet pump operates optimally and meets your water supply needs effectively. Consult the manufacturer’s instructions or seek professional assistance if needed.Maintaining And Troubleshooting Your Jet Pump
Regular maintenance and timely troubleshooting can go a long way in ensuring your jet pump operates at its optimal performance. By following a few simple routines, you can prevent common pump problems and prolong the life of your jet pump. In this section, we will discuss regular maintenance routines, troubleshooting common pump problems, and when to seek professional assistance.
Regular maintenance routines for optimal performance
To keep your jet pump performing at its best, it’s important to establish a regular maintenance routine. Here are a few simple steps you can take:
- Check the pump and motor for any signs of wear or damage. Pay special attention to the seals, gaskets, and impellers.
- Clean or replace the air filter as necessary to ensure proper ventilation and prevent overheating.
- Inspect the pressure tank for any leaks or damage. A faulty pressure tank can lead to a loss in water pressure.
- Check the pressure switch and adjust it if necessary to maintain the desired water pressure.
- Regularly test the pump’s performance by checking the water flow and pressure.
- Keep the pump and surrounding area clean and free from debris to prevent clogs and blockages.
- Ensure the pump is properly lubricated according to the manufacturer’s guidelines.
By incorporating these simple maintenance routines into your schedule, you can help extend the life of your jet pump and prevent any unexpected issues.
Troubleshooting common pump problems
Even with regular maintenance, it’s possible to encounter some common pump problems. Here are a few troubleshooting tips to help you get your jet pump back up and running:
- No water flow: Check the power supply to ensure the pump is receiving electricity. Inspect the intake and discharge lines for any clogs or obstructions. If the problem persists, you may need to check the impeller for damage or consult a professional.
- Low water pressure: Check the pressure tank to ensure it is properly pressurized. Adjust the pressure switch if necessary. If the problem continues, there may be a leak in the system or a problem with the pump itself.
- Strange noises: If you notice unusual noises coming from your pump, it could indicate a problem with the motor, impeller, or bearings. It’s best to consult a professional to identify and resolve the issue.
- Frequent cycling: If your pump is constantly turning on and off, it may be due to a faulty pressure switch or a leak in the system. Inspect the switch and check for any leaks. If the problem persists, seek professional assistance.
If you encounter any other issues or are unsure about how to resolve a problem with your jet pump, it’s always best to seek professional assistance. They have the expertise and knowledge to diagnose and repair any complex pump problems.
Remember, regular maintenance and troubleshooting are crucial for optimal performance of your jet pump. By following these guidelines and seeking professional help when needed, you can ensure your pump operates efficiently and reliably for years to come.
Frequently Asked Questions For How To Install A Jet Pump
What Is Required When Installing A Deep Well Jet Pump?
To install a deep well jet pump, make sure to follow these guidelines: 1. First, check the depth of your well and ensure the pump is appropriate for that depth. 2. Install a foot valve at the bottom of the well to prevent backflow.
3. Connect the pump to the necessary pipes and fittings, including a pressure tank and pressure switch. 4. Prime the pump by filling it with water before turning it on. 5. Finally, test the pump to ensure it is running smoothly and providing adequate water pressure.
Do You Need A Pressure Tank With A Jet Pump?
Yes, a pressure tank is needed with a jet pump. It helps to maintain a constant water pressure and prevents the pump from short cycling. A pressure tank stores water under pressure, allowing the pump to operate more efficiently and reducing wear and tear.
What Is The Difference Between A Pressure Pump And A Jet Pump?
A pressure pump is used to increase water pressure in a system, while a jet pump is designed to lift water from a well.
How Deep Will A Jet Pump Pump?
A jet pump can pump water from a maximum depth of around 25 feet.
Conclusion
Installing a jet pump may seem daunting at first, but with the right knowledge and guidance, it can be done successfully. By following the step-by-step instructions and safety precautions outlined in this blog post, you can easily set up a jet pump for efficient water supply and irrigation purposes.
Remember to consult the manufacturer’s manual and seek professional assistance if needed. Happy pumping!