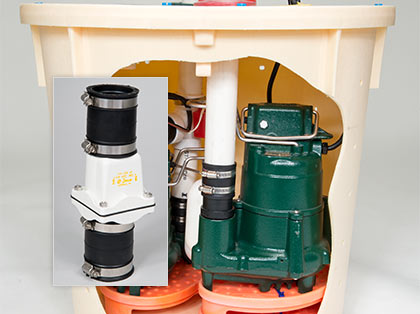
To install a check valve on a sump pump, simply cut the discharge pipe, insert the check valve, and secure with hose clamps. When installing a sump pump, it is crucial to ensure proper functioning to prevent water backflow.
A check valve plays a crucial role in achieving this by allowing water to flow in only one direction and preventing it from returning back into the sump pit. Installing a check valve is a straightforward process that does not require professional help.
In this guide, we will walk you through the steps to install a check valve on a sump pump, ensuring the smooth operation and longevity of your system. By following these steps, you can enhance the efficiency and effectiveness of your sump pump, providing your basement or crawl space with the necessary protection against flooding and water damage.
Understanding The Role Of A Check Valve In A Sump Pump System
When it comes to protecting your basement from flooding, a sump pump plays a crucial role. It efficiently removes excess water from your basement, safeguarding it against potential damage. But did you know that there is an essential component that helps optimize the performance of your sump pump? That’s right, we’re talking about the check valve. In this section, we will take a closer look at what a check valve is, how it works in a sump pump system, and the importance of installing one to prevent backflow.
What is a check valve?
A check valve, also known as a one-way valve or non-return valve, is a mechanical device that allows the flow of fluid in only one direction. It consists of a flap or disc that opens when fluid flows in the desired direction and closes to prevent backflow. In the context of a sump pump system, a check valve is installed between the sump pump discharge pipe and the outgoing pipe, typically leading to a drainage system or an exterior point of discharge.
How does a check valve work in a sump pump system?
The operation of a check valve is quite straightforward. As the sump pump activates and pumps water out of the pit, the water flows through the discharge pipe and towards the check valve. The pressure from the water forces the valve to open, allowing the water to pass through and exit the system. However, when the pump shuts off, the check valve quickly closes due to gravity and the weight of the water, preventing water from flowing back into the sump pit. This prevents the pump from cycling unnecessarily and reduces wear and tear on the pump motor.
Importance of installing a check valve in preventing backflow
Installing a check valve in your sump pump system is vital for preventing backflow, which can lead to numerous problems. Backflow occurs when water that has been pumped out of the sump pit flows back into the basement. This can happen if there is a power outage, a malfunctioning pump, or a significant amount of water flowing backward due to hydrostatic pressure. Without a check valve, the water would easily flow back into the pit, causing potential flooding and damage to your basement.
By installing a check valve, you create a physical barrier that prevents water from flowing in the opposite direction. The check valve’s flap or disc effectively seals the system, ensuring that water only exits the discharge pipe and cannot re-enter the sump pit. This simple but critical component is a reliable safeguard against basement flooding and offers peace of mind, especially during heavy rainfall or snowmelt periods.
Credit: www.basementsystems.com
Types Of Check Valves For Sump Pumps
When it comes to installing a check valve on your sump pump, you have several options to choose from. The type of check valve you select can have a significant impact on the performance and longevity of your sump pump system. In this section, we will explore three common types of check valves: the swing check valve, the piston check valve, and the spring-loaded check valve. Each type has its own pros and cons, so let’s dive in and take a closer look at each one.
Swing Check Valve
The swing check valve is one of the most common types of check valves used in sump pump installations. It consists of a hinged disc that swings open when water flows upward through the valve and closes tightly when the water tries to flow back down. This design allows for efficient flow of water while preventing any backflow.
Here are the pros and cons of using a swing check valve:
| Pros | Cons |
|---|---|
| The swing check valve is relatively inexpensive and easy to install. | In some cases, the swinging motion of the valve may cause water hammer, which can result in noise and potential damage to the pump. |
| It provides a good flow rate and minimal pressure drop. | Regular maintenance is required to ensure the hinge mechanism operates smoothly. |
Piston Check Valve
The piston check valve, also known as a lift check valve, features a piston or disc that moves up and down to control the flow of water. When water flows upward, the piston lifts to allow passage, and when water tries to flow back down, the piston closes to prevent any reverse flow.
Here are the pros and cons of using a piston check valve:
| Pros | Cons |
|---|---|
| The piston check valve offers a tight seal and reliable backflow prevention. | It tends to be more expensive than the swing check valve. |
| It is suitable for high-pressure applications and can handle large flow rates. | Regular maintenance is required to ensure proper functioning of the piston. |
Spring-Loaded Check Valve
The spring-loaded check valve, also known as a poppet valve, utilizes a spring-loaded disc to control water flow. The disc lifts when water flows upward, creating an open pathway, and closes tightly to prevent any backflow when the water reverses direction.
Here are the pros and cons of using a spring-loaded check valve:
| Pros | Cons |
|---|---|
| The spring-loaded check valve provides a tight seal and reliable backflow prevention. | It can be more expensive than the swing check valve. |
| It requires minimal maintenance and is less prone to water hammer compared to the swing check valve. | The spring may wear out over time and require replacement. |
Now that you have a better understanding of the three main types of check valves for sump pumps – the swing check valve, the piston check valve, and the spring-loaded check valve – you can make an informed decision on which one best suits your needs. Consider the pros and cons of each type, weigh them against your specific requirements, and choose the check valve that will help ensure the efficient and reliable operation of your sump pump system.
Factors To Consider When Selecting A Check Valve
When it comes to installing a check valve on your sump pump, it’s important to choose the right one that meets your specific requirements. Several factors need to be considered before making a decision. By taking into account the following aspects, you can ensure that you select the most suitable check valve for your sump pump.
Size and Diameter Requirements
The first factor to consider is the size and diameter requirements of the check valve. It is crucial to choose a valve that matches the size and diameter of your sump pump system. An improperly sized check valve can lead to inefficiencies and even system failures.
When determining the size and diameter, consider the dimensions of the sump pump discharge pipe. Measure the inside diameter, commonly in inches, as this will be the determining factor for the check valve size. Ensure that the check valve you select has the appropriate size and diameter to fit snugly over the discharge pipe.
Material and Durability
The material and durability of the check valve are also important factors to consider. Since the valve will be exposed to water, moisture, and potentially corrosive substances, it’s essential to choose a check valve made from a durable and corrosion-resistant material.
Commonly used materials for check valves include brass, stainless steel, PVC, and thermoplastic. Each material has its advantages and disadvantages, so research and choose the one that suits your needs best. Additionally, ensure that the valve is built to withstand the pressure and flow rates of your sump pump system.
Handling Pressure and Flow Rates
The check valve should be capable of handling the pressure and flow rates of your sump pump system. The pressure rating and maximum flow rate should be clearly specified by the manufacturer. It’s crucial to select a check valve that can handle the maximum pressure and flow rate of your particular sump pump.
If the pressure and flow rates exceed the capacity of the check valve, it can lead to valve failure, reduced efficiency, and potential damage to the sump pump system. Therefore, ensure that the check valve you choose is capable of handling the pressure and flow rates of your sump pump system effortlessly.
Cost and Budget Considerations
Lastly, cost and budget considerations play a significant role in the selection process. During your search for a suitable check valve, compare prices from different manufacturers or suppliers. Consider purchasing a check valve that provides the best value for your money.
Keep in mind that the cheapest option may not always be the most reliable, so balance your budget with the quality and durability of the check valve. It is wise to invest in a reputable brand or a check valve that comes with a warranty, ensuring that you won’t have to replace it frequently.
By considering the size and diameter requirements, material and durability, handling pressure and flow rates, as well as cost and budget considerations, you can make an informed decision when selecting a check valve for your sump pump system.
Essential Tools For Installing A Check Valve
Wrench or Pliers
One of the essential tools you’ll need when installing a check valve on your sump pump is a wrench or a pair of pliers. These tools are necessary for securely tightening the pipe connectors and fittings. A wrench or pliers with a good grip will ensure that the connections are tight enough to prevent any leaks. It’s important to note that the size of your wrench or pliers should match the size of the connectors you’re working with to ensure a proper fit.
PVC Pipe Cutter
Another important tool for installing a check valve on a sump pump is a PVC pipe cutter. This tool allows you to easily and accurately cut through the PVC pipes used in the installation process. A clean and precise cut ensures that the pipe will fit perfectly into the connectors, creating a secure connection. Using a PVC pipe cutter also eliminates the risk of uneven or jagged edges that could potentially lead to leaks or other issues down the line. Remember, safety goggles should be worn when using a PVC pipe cutter to protect your eyes from any flying debris.
Teflon Tape
Teflon tape, also known as plumber’s tape, is an essential tool for creating a watertight seal when installing a check valve on a sump pump. This thin, white tape is applied to the threaded connections of the pipes and fittings before assembly. The Teflon tape acts as a lubricant, making it easier to tighten the connections and provides an additional layer of protection against leaks. Tightly wrapping the Teflon tape around the threads in a clockwise direction ensures that it won’t unravel when you tighten the connections.
Adjustable Wrench
An adjustable wrench is another tool you’ll need to have on hand when installing a check valve. This versatile tool allows you to adjust the jaw size to fit different sizes of nuts and bolts. When installing a check valve on a sump pump, an adjustable wrench comes in handy for tightening the hose clamps and other fittings securely. It provides a firm grip to ensure that the connections are tight enough to prevent any water leakage or air gaps.
Screwdriver
Lastly, you’ll need a screwdriver during the installation process of a check valve on your sump pump. A screwdriver is required for removing or securing the screws that hold the check valve in place. Depending on the type of check valve you have, you may need either a flathead or a Phillips head screwdriver. Make sure you have the correct type and size of screwdriver to easily manipulate the screws without causing damage to the check valve or other components.
Materials Needed For Installing A Check Valve
Check Valve
When installing a check valve on your sump pump, you’ll need a few essential materials to ensure a secure and efficient setup. One of the most important components is the check valve itself. The check valve is a crucial part of your sump pump system, as it helps prevent backflow of water into the sump pit. This can save you from potential flooding and water damage.
PVC pipes and fittings
In addition to a check valve, you’ll need PVC pipes and fittings for the installation process. PVC, or polyvinyl chloride, pipes are commonly used in plumbing systems due to their durability and affordability. These pipes are resistant to corrosion and can withstand high water pressure. You’ll also need various PVC fittings, such as elbows, tees, and couplings, to connect the pipes and ensure a tight and secure installation.
PVC primer and cement
When working with PVC pipes and fittings, it’s essential to have PVC primer and cement on hand. The PVC primer is used to clean and prepare the surfaces of the pipes and fittings for bonding. It helps remove dirt and residue, ensuring a strong bond between the PVC pieces. PVC cement, also known as solvent cement, is used to actually bond the PVC pipes and fittings together. It creates a watertight seal, ensuring no leaks or disconnections occur.
Waterproof sealant
Another important material for installing a check valve on your sump pump is a waterproof sealant. This sealant is used to create a watertight seal around the check valve connections to prevent any water leakage. It’s essential to choose a sealant specifically designed for plumbing applications and that is compatible with the materials being used. Applying a waterproof sealant adds an extra layer of protection against potential leaks or moisture entering your sump pump system.
Pipe hangers
Lastly, you’ll need pipe hangers to support and secure the PVC pipes in place. Pipe hangers are designed to hold the pipes firmly against the wall or ceiling, preventing them from sagging or coming loose. This is important to maintain the integrity of your sump pump system and ensure proper water flow. Make sure to choose pipe hangers that are suitable for your specific pipe size and material. Properly securing the pipes with pipe hangers helps prevent any stress or strain on the connections and ensures a long-lasting installation.
Step 1: Turning Off The Sump Pump And Disconnecting Power
Before you start installing a check valve on your sump pump, it is crucial to follow certain precautions to ensure your safety. The first step is to turn off the sump pump and disconnect its power source. This will prevent any accidents from happening while you work on the installation.
1. Locate the Power Source and Disconnect It
The power source for your sump pump could be located in different areas of your basement or crawl space. It is essential to locate this power source before proceeding. Typically, you will find a dedicated electrical circuit or outlet that powers the sump pump.
Note: Make sure you have a flashlight handy if your basement or crawl space is poorly lit.
Once you have located the power source, you need to disconnect it to ensure your safety. This can be done by unplugging the power cord from the electrical outlet or shutting off the circuit breaker dedicated to the sump pump.
2. Drain any Remaining Water from the Sump Pump Pit
After disconnecting the power, you should proceed to drain any remaining water from the sump pump pit. This will make it easier to work on the installation without any obstructions.
To drain the water, you can use a bucket or a small pump. Start by scooping out any standing water in the pit using a bucket. Once the water level is reduced, you can use a small pump to remove the remaining water.
Note: Make sure to wear protective gloves and eyewear while handling the water to avoid any potential hazards.
Ensure that the sump pump pit is completely dry before moving on to the next step. This will help you achieve a secure and reliable installation for the check valve.
With Step 1 completed, you have successfully turned off the sump pump and disconnected its power source. Additionally, you have drained any remaining water from the sump pump pit. Now, you are ready to move on to the next step in installing a check valve on your sump pump.
Step 2: Removing The Existing Discharge Pipe
Once you have identified the discharge pipe connected to your sump pump, it’s time to remove it. This step is essential for ensuring a smooth installation of the check valve. Follow the instructions below to safely and effectively remove the existing discharge pipe.
Identify the discharge pipe connected to the sump pump
Before you can begin the removal process, you need to locate the discharge pipe that is connected to your sump pump. This pipe is responsible for carrying the water from the sump pump to a designated drainage area. Typically, the discharge pipe can be found coming out of the top or side of the sump pump.
Use a wrench or pliers to remove the connections
Now that you have located the discharge pipe, it’s time to detach it from the sump pump. To do this, you will need a wrench or pliers, depending on the type of connections that are in place. Here’s a step-by-step guide on how to remove the connections:
- Turn off the sump pump: Before you begin any work, it’s crucial to ensure that the sump pump is turned off to prevent any accidents or damage.
- Loosen the hose clamp: If your discharge pipe is secured to the sump pump with a hose clamp, use a screwdriver or pliers to loosen it. Slide the hose clamp down the pipe, away from the connection point.
- Unscrew threaded connections: If your discharge pipe is connected to the pump with threaded connections, use a wrench to carefully unscrew them. Turn the connections counterclockwise until they are fully detached from the pump.
- Remove the pipe: Once the connections are loosened or unscrewed, gently pull the discharge pipe away from the sump pump. Be cautious not to damage any nearby components or disturb the pump’s electrical connections.
Following these steps will allow you to remove the existing discharge pipe from your sump pump, preparing it for the installation of the check valve in the next step of the process. Remember to handle all tools with care and take appropriate safety precautions throughout the procedure. With the discharge pipe removed, you’re one step closer to effectively installing a check valve on your sump pump.
Step 3: Choosing The Location For The Check Valve
Now that you’ve gathered all the necessary materials and have a basic understanding of how to install a check valve on a sump pump, it’s time to move on to the next step: choosing the ideal location for installing the check valve. This step is crucial as the location will determine the effectiveness and efficiency of your sump pump system.
Determine the ideal location for installing the check valve
When determining the ideal location for the check valve, there are a few key factors to consider. Firstly, you want to ensure that the check valve is installed on the discharge pipe, which is the pipe that carries the water away from the sump pump and out of your basement or crawl space.
Locating the check valve on the discharge pipe prevents water from flowing back into the sump pit, allowing the pump to work effectively. It also helps to maintain the water pressure in the discharge line, resulting in a smoother and more efficient pumping process.
Another important factor to consider is the vertical and horizontal positioning of the check valve. It is recommended to install the check valve as close to the sump pump as possible, preferably within a few feet. This ensures that the valve can effectively prevent water from flowing back into the pit, minimizing the risk of pump failure or flooding.
Consider accessibility and space requirements
Aside from the positioning of the check valve, it’s crucial to consider accessibility and space requirements when choosing the location. You want to make sure that the valve is easily accessible for inspection, maintenance, and potential replacement in the future.
If the check valve is hidden behind walls or buried under too many obstacles, it can be difficult to reach and service. This can lead to complications and delays in case of any issues or repairs needed. Therefore, locating the check valve in a visible and easily accessible area will save you time and effort in the long run.
Moreover, it’s important to ensure that there is enough space around the check valve for proper installation and operation. Having sufficient clearance allows for easy connection to the discharge pipe and provides enough room for the valve to function optimally without any obstructions or restrictions.
Remember to take into account any existing plumbing or structural elements in the area when determining the location. This will help you choose a spot that doesn’t interfere with other components and ensures a smooth installation process.
To summarize, when choosing the location for installing the check valve on your sump pump:
- Locate it on the discharge pipe to prevent water from flowing back into the pit
- Position it as close to the sump pump as possible for better efficacy
- Consider accessibility for easy inspection and maintenance
- Ensure sufficient space for proper installation and operation
- Avoid interference with existing plumbing or structural elements
By carefully considering these factors, you’ll be able to select the ideal location for your check valve, optimizing the performance and longevity of your sump pump system.
Step 4: Installing The Check Valve
Once you have positioned the sump pump and connected the discharge pipe, it’s time to install the check valve. The check valve plays a crucial role in preventing backflow, ensuring that water only flows in one direction and doesn’t return to the sump pit. Follow these simple steps to install the check valve securely.Apply Teflon tape to the threads of the check valve
Before connecting the check valve to the discharge pipe, it’s important to ensure a tight and leak-proof connection. To achieve this, start by applying Teflon tape to the threads of the check valve. Teflon tape acts as a sealant, preventing any water from leaking out. Securely wrap the Teflon tape around the threads in a clockwise direction, covering the entire threaded area.Connect the check valve to the discharge pipe using wrench or pliers
Once the Teflon tape is applied, carefully position the check valve onto the end of the discharge pipe. The check valve should have a female thread that fits onto the male thread of the pipe. Hold the check valve firmly in place and use a wrench or pliers to tighten the connection. Ensure that the valve is aligned properly with the pipe and that there are no gaps or misalignments.Ensure a tight and secure connection
To prevent any potential leaks or malfunctions, it’s crucial to ensure a tight and secure connection between the check valve and the discharge pipe. Use the wrench or pliers to tighten the connection, but be cautious not to overtighten and risk damaging the valve or pipe. Confirm that the check valve is attached firmly and that there is no movement or looseness. In conclusion, by following these simple steps, you can easily install a check valve on your sump pump and ensure efficient and reliable operation. Applying Teflon tape to the threads, connecting the valve securely to the discharge pipe, and ensuring a tight connection will help prevent backflow and maintain the effectiveness of your sump pump system. Take the time to install the check valve properly, and you’ll have peace of mind knowing that your basement is protected from potential flooding.Step 5: Connecting The Discharge Pipe To The Check Valve
Now that you have measured and cut the PVC pipe to the required length, it’s time to connect it to the check valve. Follow these simple steps to ensure a secure and efficient connection.
Measure and cut the PVC pipe to the required length
Using a measuring tape, carefully measure the distance between the sump pump and the desired location for the check valve. Make sure to add a few extra inches to accommodate any necessary adjustments. Once you have the accurate measurement, use a hacksaw or PVC pipe cutter to cut the PVC pipe to the required length.
Apply PVC primer and cement to the pipe and fittings
Before joining the pipe and fittings, it’s important to apply PVC primer and cement to ensure a strong and leak-free connection. Start by applying PVC primer to the outside of the pipe and the inside of the fitting. This will remove any dirt or debris and prepare the surfaces for bonding. Allow the primer to dry for a few seconds.
Next, apply PVC cement to both the primed pipe and fitting. Be sure to spread the cement evenly using a brush or applicator. This will create a strong bond and prevent any future leaks. Join the pipe and fitting together firmly, making sure they are aligned properly. Hold them in place for a few seconds to allow the cement to set.
Connect the pipe to the check valve and secure with pipe hangers
Once the pipe and fittings are securely bonded, it’s time to connect the pipe to the check valve. Ensure that the check valve is in the correct position, with the arrow indicating the direction of the water flow. Insert the end of the pipe into the check valve and push it in until it reaches the stop inside the valve.
To secure the pipe in place and prevent it from sagging or moving, use pipe hangers. These hangers are typically attached to the wall or ceiling and provide support for the pipe. Install the hangers at regular intervals along the length of the pipe, ensuring that it remains level and straight.
With the discharge pipe securely connected to the check valve and supported by pipe hangers, your sump pump system is now ready for operation. It’s important to regularly check the connections and ensure that there are no leaks or loose fittings. By following these steps, you can effectively install a check valve on your sump pump and protect your basement from flooding.
Step 6: Testing The Check Valve Installation
Congratulations! You have successfully installed a check valve on your sump pump. Now it’s time to ensure that the installation has been done correctly and that the check valve is functioning properly. In this step, we will go over how to test the check valve to ensure everything is in working order.Reconnect the power to the sump pump
Before testing the check valve, you need to make sure that the power is reconnected to the sump pump. Locate the power source and plug it back in. Check if the sump pump is receiving power by listening for any noise or vibrations coming from the pump. If you are unsure, you can verify by checking the manufacturer’s instructions or consulting a professional.Fill the sump pump pit with water to check for proper functioning of the check valve
Once you have reconnected the power, it’s time to test the check valve by filling the sump pump pit with water. This will simulate a real-life scenario where the sump pump would be pumping water out of the pit.- Start by pouring a significant amount of water into the sump pump pit. Ensure the water level rises above the float switch or the required activation level.
- Observe the sump pump as it starts to work. Pay attention to any unusual noises, leaks, or vibrations that might indicate a problem with the check valve.
- The check valve should prevent water from flowing back into the sump pump pit once it has been pumped out. If the check valve is functioning correctly, no water should be flowing back into the pit.
Regular Inspection And Cleaning Of The Check Valve
Importance of Periodic Maintenance
Regular inspection and cleaning of the check valve on a sump pump is essential to ensure its smooth operation and prevent potential issues that could lead to costly repairs or water damage. By regularly inspecting and cleaning the check valve, you can effectively remove any debris or buildup that may impede the flow of water and compromise the functioning of the sump pump.
Steps to Clean and Remove Debris from the Check Valve
Performing regular maintenance on the check valve of your sump pump is a straightforward process that can be accomplished with a few simple steps. Follow these steps to clean and remove any debris from the check valve:
- Start by disconnecting the power supply to the sump pump to ensure safety during the cleaning process.
- Locate the check valve, which is typically positioned near the exit pipe of the sump pump.
- Using a wrench or pliers, carefully loosen the hose clamps on both sides of the check valve to detach it from the piping system.
- Once the check valve is disconnected, visually inspect it for any visible debris or obstructions. If you notice large debris, carefully remove it using gloved hands or a brush.
- Next, rinse the check valve thoroughly with clean water to flush out any remaining debris.
- If the check valve has stubborn buildup or mineral deposits, you can soak it in a mixture of water and vinegar for a few hours. This will help dissolve the deposits and make it easier to clean.
- After soaking, gently scrub the check valve using a soft brush or toothbrush to remove any remaining deposits.
- Rinse the check valve once again to ensure all debris and cleaning solution are completely removed.
- Before reattaching the check valve, inspect the piping system for any signs of damage or leaks. If necessary, make any repairs before proceeding.
- Carefully reattach the check valve to the piping system, ensuring the hose clamps are securely tightened.
- Finally, reconnect the power supply to the sump pump and test its functionality to verify that the check valve is working properly.
By following these simple steps and incorporating regular inspection and cleaning of the check valve into your sump pump maintenance routine, you can ensure the efficient and reliable operation of your sump pump, providing peace of mind and protection against potential water damage.
Monitoring The Sump Pump System For Malfunctions
Installing a check valve on your sump pump is an essential step in safeguarding your basement from flooding. However, like any mechanical system, check valves can experience malfunctions over time. Regularly monitoring your sump pump system for signs of problems ensures its effectiveness and gives you peace of mind. In this section, we will discuss some common signs of a malfunctioning check valve and the actions you can take to address any issues that arise.
Signs of a Malfunctioning Check Valve
A malfunctioning check valve can lead to a variety of problems that compromise the efficiency of your sump pump system. By identifying the early warning signs, you can proactively address the issue before it escalates. Here are some key signs to watch out for:
- Unusual Noises: Pay attention to any unusual noises coming from your sump pump system. A malfunctioning check valve may cause loud banging or clunking sounds when the pump turns on or off.
- Frequent Cycling: If your sump pump is cycling on and off too frequently, it could be a sign of a faulty check valve. This constant cycling puts unnecessary strain on the pump and may lead to premature wear and tear.
- Backflow or Water Hammer: Experiencing water flowing back into the sump pit or sudden water hammering noises can indicate that the check valve is no longer preventing water from returning into the pit, affecting the pump’s ability to effectively remove water.
- Declining Pump Performance: If you notice a decrease in your sump pump’s overall performance, it may be due to a malfunctioning check valve. Reduced pumping capacity or slower water removal are indicators that the valve may be obstructed or failing.
Actions to Take When Issues Arise
It’s crucial to take prompt action when you notice any signs of a malfunctioning check valve. Ignoring these symptoms can result in basement flooding and significant water damage. Here are some steps you can take to address the issues:
- Inspect the Check Valve: Start by visually inspecting the check valve for any visible signs of damage or blockages. Check for debris or obstructions that may be preventing the valve from operating correctly.
- Clean or Replace the Check Valve: If you notice any debris or blockages, carefully clean the check valve using water and a soft brush. If the valve is damaged or beyond repair, it’s best to replace it with a new one to ensure optimal performance.
- Check the Valve Orientation: Verify that the check valve is installed in the correct orientation. Incorrect installation can cause backflow or inefficient water evacuation. Consult the sump pump system manual for proper installation guidelines if needed.
- Seek Professional Assistance: If the issues persist or you are unsure about troubleshooting steps, it’s advisable to seek the expertise of a professional sump pump technician. They can assess the situation, diagnose any underlying problems, and recommend the most appropriate course of action.
Regularly monitoring and maintaining your sump pump system is essential for its longevity and reliability. By promptly addressing any issues with the check valve, you can ensure your sump pump operates at its best, keeping your basement dry and protected from potential water damage.
Additional Measures For Preventing Sump Pump Failures
When it comes to protecting your basement from potential flooding, installing a check valve on your sump pump is a crucial step. However, there are additional measures you can take to further prevent sump pump failures. By incorporating backup power options, installing an alarm system, and properly managing drainage, you can ensure the optimal performance and reliability of your sump pump system.
Backup Power Options
In the event of a power outage, your sump pump becomes ineffective, leaving your basement vulnerable to flooding. That’s why it’s essential to have a backup power option in place. There are several backup power options available:
- 1. Battery Backup: Installing a battery backup system ensures that your sump pump remains operational even during a power outage. The battery automatically engages when the main power source is interrupted, providing continuous protection.
- 2. Generator: Another option is to have a backup generator that kicks in when the power goes out. This ensures uninterrupted power supply to your sump pump, protecting your basement even during prolonged power outages.
By incorporating a backup power option, you can have peace of mind knowing that your sump pump will continue to function efficiently, regardless of power disruptions.
Installing an Alarm System
An alarm system is an excellent addition to your sump pump setup, as it provides an early warning system in case of pump failure or water accumulation. Below are a few key benefits of installing an alarm system:
- 1. Timely Notifications: An alarm system notifies you immediately if the water level in your sump basin rises above a certain threshold or if there is a malfunction in the pump. This allows for quick action, preventing potential basement flooding.
- 2. Peace of Mind: With an alarm system in place, you can confidently leave your home without worrying about the sump pump failing. The system will alert you even when you are away, ensuring that you can take necessary action promptly.
Installing an alarm system is a simple yet effective measure to enhance the safety and reliability of your sump pump system.
Proper Drainage Management
Managing the drainage around your home is crucial to prevent excess water from seeping into your basement. Here are some important factors to consider:
- 1. Gutters and Downspouts: Ensure that your gutters and downspouts are clear of debris and properly directed away from your foundation. This prevents water from pooling near your basement walls and reduces the workload on your sump pump.
- 2. Grading: Make sure the ground around your home slopes away from the foundation. This directs water away from your basement, minimizing the risk of water intrusion.
By implementing proper drainage management practices, you can reduce the load on your sump pump and minimize the chances of basement flooding.
By following these additional measures, you can take proactive steps to prevent sump pump failures and protect your basement from potential flooding. Incorporate backup power options, install an alarm system, and properly manage drainage to ensure that your sump pump operates effectively, providing you with the peace of mind you deserve.
Frequently Asked Questions For How To Install A Check Valve On A Sump Pump
Where Should A Check Valve Be Installed On A Sump Pump?
Install the check valve on the sump pump’s discharge pipe. It helps prevent water from flowing back into the sump pit, ensuring efficient operation and reducing the risk of flooding.
Can I Install A Check Valve On A Sump Pump?
Yes, you can install a check valve on a sump pump. It helps prevent water from flowing back into the sump pit after being pumped out. This ensures the pump doesn’t have to work twice as hard and extends its lifespan.
Should Sump Pump Check Valve Be Horizontal Or Vertical?
The sump pump check valve can be installed in both horizontal and vertical orientations.
How Do You Install A Check Valve?
To install a check valve, follow these steps: 1. Identify the flow direction and ensure it matches the arrow on the valve. 2. Cut the pipe where the valve will be installed and ensure both ends are clean and smooth.
3. Apply pipe thread sealant to the male threads of the valve. 4. Screw the valve onto the pipe, ensuring a tight connection. 5. Finally, check for any leaks and test the valve’s function.
Conclusion
To sum up, installing a check valve on your sump pump is a crucial step in maintaining its efficiency and preventing any backflow issues. By following the step-by-step guide provided in this blog post, you can ensure the smooth operation and longevity of your sump pump system.
Don’t underestimate the importance of a check valve in preventing basement flooding and protecting your property. So, get started with the installation process and enjoy a dry and protected basement for years to come.