Installing a Grohe kitchen faucet is easy. Simply follow these steps for a successful installation.
Introducing a new Grohe kitchen faucet can enhance the functionality and style of your kitchen. Whether you’re upgrading an old faucet or installing a new one, this step-by-step guide will help you complete the installation process smoothly. With a few basic tools and the right instructions, you’ll have your Grohe kitchen faucet up and running in no time.
So, let’s dive straight into the installation process to get your kitchen faucet installed quickly and efficiently.
Preparing For The Installation
Before you begin installing your new Grohe kitchen faucet, it’s important to prepare yourself and your workspace to ensure a smooth and successful installation process. This involves checking the compatibility of the faucet with your sink, gathering the necessary tools and materials, and shutting off the water supply. In this guide, we’ll walk you through each step to help you get started.
Checking the compatibility of the Grohe Kitchen Faucet with your sink
One of the first things you need to do is to check if the Grohe kitchen faucet you’ve chosen is compatible with your sink. This is crucial to ensure a proper and secure fit. Before purchasing the faucet, measure the size of the holes in your sink to make sure they match the specifications of the faucet. The packaging or product description should provide you with this information. Additionally, consider the mounting type of your sink (whether it’s deck-mounted or wall-mounted) and ensure that the faucet is designed to be compatible with that type. By double-checking these details, you’ll save yourself the hassle of having to return or exchange the faucet later on.
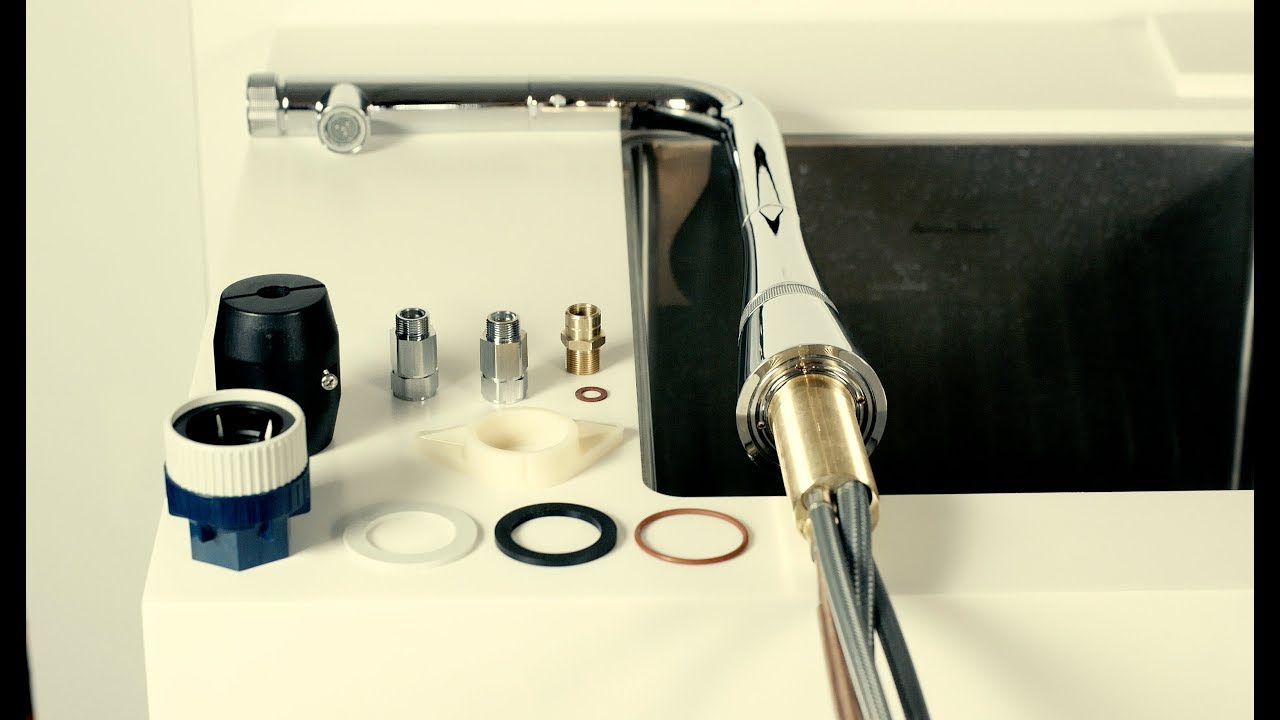
Gathering the necessary tools and materials
Now that you’ve confirmed the compatibility of the Grohe kitchen faucet with your sink, it’s time to gather the necessary tools and materials for the installation. Having everything ready before you start will save you time and frustration throughout the process. Here’s a list of the commonly needed tools and materials:
| Tools | Materials |
|---|---|
|
|
Make sure you have all the necessary tools and materials readily available before you start the installation. This will make the process go much smoother and prevent any frustrating delays.
Shutting off the water supply
Before you begin the installation, it’s crucial to shut off the water supply to your kitchen. This will prevent any water leakage or accidental flooding during the installation process. Locate the shut-off valve either under the sink or near the main water supply line in your home. Turn the valve clockwise until it is fully closed. To ensure that the water supply is completely shut off, turn on the faucet handles and verify that no water is running. Once you’ve confirmed that the water supply is off, you can proceed with the installation of your Grohe kitchen faucet.
By following these preparation steps, you’ll be well on your way to installing your Grohe kitchen faucet like a pro. Stay tuned for our next guide on the actual installation process, where we’ll take you through step-by-step instructions to ensure a successful outcome.
Credit: m.youtube.com
Removing The Old Faucet
Before installing your new Grohe kitchen faucet, you’ll need to remove the old one. This step is crucial in ensuring a smooth and successful installation. In this section, we’ll go through the process of disconnecting the supply lines and removing the old faucet, as well as cleaning the sink area and inspecting for any damages or leaks.
Disconnecting the supply lines and removing the old faucet
The first step in removing the old faucet is to disconnect the supply lines. This is an essential part of the process as it allows you to completely detach the old faucet from the plumbing system. Here’s a step-by-step guide on how to disconnect the supply lines:
- Turn off the water supply: Before starting, ensure that the water supply to the faucet is turned off. You can usually find the shut-off valves under the sink.
- Prepare a bucket: Place a bucket or a container under the sink to catch any excess water that may come out during the disconnection process.
- Detach the supply lines: Use an adjustable wrench to loosen the nuts connecting the supply lines to the faucet. Once loosened, carefully detach the supply lines from the faucet.
- Remove the old faucet: Using the same adjustable wrench, loosen and remove the nuts securing the old faucet to the sink. Once the nuts are removed, you can lift the old faucet out of the sink.
- Clean the sink area: With the old faucet removed, take the opportunity to clean the sink area thoroughly. Use a mild detergent or a specialized sink cleaner to remove any residue or grime. Be sure to dry the area before proceeding with the installation.
Cleaning the sink area and inspecting for any damages or leaks
Now that the old faucet has been removed, it’s important to clean the sink area and inspect it for any damages or potential leaks. Follow these steps to ensure a clean and safe installation:
- Inspect for damages or leaks: Examine the sink and surrounding areas for any signs of damage or leaks. Check for cracks, dents, or corrosion, as these can affect the installation of the new faucet.
- Repair or replace damaged parts: If you detect any damages or leaks, it’s essential to address them before proceeding with the installation. Depending on the severity of the issue, you may need to repair or replace certain parts of the sink or plumbing system.
- Clean the sink area: Use a damp cloth or sponge to wipe down the sink area, removing any debris or leftover cleaning solution. Ensure the area is dry and free of any dirt or grime.
By properly disconnecting the supply lines and removing the old faucet, as well as cleaning and inspecting the sink area, you’ll be well-prepared to install your new Grohe kitchen faucet. Following these steps ensures a smooth and successful installation process.
Assembling The Grohe Kitchen Faucet
Once you have gathered all the necessary tools and parts, it’s time to start assembling your Grohe kitchen faucet. Familiarizing yourself with the different parts of the faucet, installing the faucet body, handles, and spout, and connecting the supply lines are the key steps to ensure a successful installation. In this section, we will guide you through each of these steps in detail.
Familiarizing yourself with the different parts of the faucet
Before diving into the installation process, take a moment to familiarize yourself with the different parts of the Grohe kitchen faucet. This will make it easier for you to understand how everything fits together during the assembly. The main components include the faucet body, handles, spout, aerator, cartridges, and any additional parts specific to your model. Refer to the manufacturer’s instructions or the included diagrams to identify each part correctly.
Installing the faucet body, handles, and spout
Once you have identified the different parts, it’s time to begin installing the faucet body, handles, and spout. Follow these steps for a proper installation:
- Start by placing the faucet body through the mounting hole on your sink.
- Secure the faucet body in place by tightening the mounting nuts underneath the sink using an adjustable wrench.
- If your faucet includes separate handles, insert them onto the respective valves, ensuring they are aligned correctly.
- Tighten the handle screws to secure the handles in place, but be careful not to overtighten.
- Attach the spout to the faucet body, aligning the tabs or grooves to ensure a proper fit.
- Use the provided screws or clips to secure the spout, ensuring it is stable.
Take a moment to double-check that all the components are securely attached before proceeding to the next step.
Connecting the supply lines and checking for any leaks
Now that the faucet body, handles, and spout are in place, it’s time to connect the supply lines and check for any leaks. Follow these steps:
- Take the flexible supply lines that came with your Grohe kitchen faucet and connect them to the hot and cold water valves located below your sink.
- Ensure that the supply lines are properly tightened using an adjustable wrench, but avoid overtightening to prevent damage.
- Turn on the water supply valves underneath the sink to allow water flow to the faucet.
- Check for any leaks around the connections and joints, ensuring they are tightly sealed. If you notice any leaks, tighten the connections further or use plumbing tape to create a watertight seal.
- Once you are confident that there are no leaks, turn on the faucet and let the water run for a few minutes to flush out any debris that may have accumulated during installation.
Congratulations! You have successfully assembled and installed your Grohe kitchen faucet. Remember to refer to the specific instructions provided by the manufacturer for any model-specific steps or recommendations.
Mounting The Grohe Faucet To The Sink
Once you have selected the perfect Grohe faucet for your kitchen and gathered all the necessary tools, it’s time to mount the faucet to your sink. This step-by-step guide will walk you through the process, ensuring a secure and sturdy installation.
Positioning and aligning the faucet to the mounting holes
Before securing the faucet, it is essential to position and align it correctly with the mounting holes on your sink. Here is how to do it:
- Start by placing the faucet in the desired position, ensuring the spout and handles are aligned as per your preference.
- Ensure that the mounting holes on the sink align with the faucet’s base. Double-check for any obstructions such as pipes or other fixtures that could hinder the installation.
- Make sure the faucet is centered and symmetrical to maintain an aesthetically pleasing look.
Securing the faucet to the sink using mounting hardware
Now that your faucet is properly positioned, it’s time to secure it to the sink using the provided mounting hardware. Follow these steps:
- Take the mounting hardware included with your Grohe faucet and place it underneath the sink.
- Align the holes in the mounting hardware with the faucet’s mounting holes on the underside of the sink.
- Thread the nuts onto the mounting studs and tighten them by hand until they are snugly in place. Be careful not to over-tighten, as it could damage the sink or the faucet.
- Use a wrench to give the mounting nuts a final turn to ensure they are securely fastened. Check that the faucet remains in the desired position and make any necessary adjustments.
Tightening the mounting nuts and checking for stability
After securing the faucets with the mounting hardware, it’s crucial to tighten the mounting nuts adequately and check for overall stability. Follow these steps:
- Using a wrench, carefully tighten the mounting nuts in a clockwise direction. Ensure they are tightened enough to prevent any wobbling or movement.
- Check the stability of the faucet by gently twisting and pushing it from different angles. It should feel firm and not move easily.
- If you notice any slight wobbling, retighten the nuts until the faucet becomes stable.
By correctly mounting the Grohe faucet to your sink, you can ensure a secure and durable installation. Follow these steps carefully, and you’ll be on your way to enjoying the functionality and elegance of your new Grohe kitchen faucet.
Connecting The Water Supply
Attaching the hot and cold water supply lines to the faucet
When it comes to installing a Grohe kitchen faucet, connecting the water supply lines is a crucial step. This ensures a proper flow of hot and cold water to your faucet, allowing you to enjoy a refreshing kitchen experience. Attaching the hot and cold water supply lines requires attention to detail, ensuring that the connections are secure and leak-free. Let’s delve into the steps involved in this process. The first step is to identify the hot and cold water supply lines. Most commonly, the hot water supply line is labeled with a red marker or the letter ‘H’, while the cold water supply line is labeled with a blue marker or the letter ‘C’. However, this may vary depending on your specific plumbing setup. Verify these markings before proceeding. With identification in place, carefully align the hot supply line with the corresponding inlet on the faucet. Ensure that the threads match and protrude beyond the connection. This ensures a tight and secure connection that prevents leaks. Repeat the same process with the cold water supply line, aligning it properly with its designated inlet.Ensuring proper fittings and tightening the connections
Proper fittings and tight connections are vital to prevent any water leakage. Before proceeding, take a moment to ensure that the fittings on the water supply lines are the correct size and match the specifications of the faucet. This prevents any complications during installation and ensures a smooth flow of water. Once you have verified the fittings, it’s time to tighten the connections. Start by hand-tightening the connections, ensuring that they are snug and secure. Avoid overtightening, as this may damage the threads or cause leaks. Use an adjustable wrench to give each connection a gentle quarter-turn to achieve the desired tightness. This step guarantees a solid seal and reduces the risk of any water wastage or damage to your kitchen.Slowly turning on the water supply and checking for any leaks
With the water supply lines properly connected and tightened, it’s time to turn on the water supply. Slowly and gradually, turn on the shut-off valves for both hot and cold water supply lines. This allows a controlled flow of water, minimizing the risk of sudden pressure surges that could lead to leaks. As the water starts flowing, carefully inspect each connection point for any signs of leakage. Check the area around the faucets, as well as the connections at the shut-off valves. If you notice any leaks, immediately tighten the connections a little more until the leaks stop. Make sure to wipe away any water and dry the area thoroughly to prevent damage to your kitchen cabinetry. Once you are satisfied that there are no leaks, you can proceed with the remaining installation steps and enjoy the convenience and functionality of your Grohe kitchen faucet. Remember, a proper connection of the water supply lines is essential for the optimal performance of your faucet. Paying attention to detail during this step ensures a hassle-free installation and a long-lasting, leak-free kitchen experience.Testing And Adjusting The Grohe Faucet
Once you have successfully installed your Grohe kitchen faucet, it is important to test and adjust it to ensure optimal functionality. In this section, we will guide you through the process of activating the water flow, checking for smooth operation, adjusting the temperature control and flow rate, as well as troubleshooting any issues that may arise.
Activating the water flow and checking for smooth operation
To activate the water flow in your Grohe kitchen faucet, follow these simple steps:
- Ensure that the handle of the faucet is in the “off” position.
- Slowly turn on the water supply by rotating the shut-off valve counterclockwise.
- Gradually open the faucet handle to allow water to flow. Be cautious to avoid full water pressure at the beginning to prevent splashing.
Once the water is flowing, check for smooth operation by:
- Testing the handle’s motion: Gently move the handle from left to right to ensure it moves freely and smoothly.
- Checking for leaks: Examine all connection points for any signs of leakage. If you notice any leaks, tighten the connections or consult the installation manual for further guidance.
- Examining the aerator: Ensure the aerator is securely attached and functioning correctly. It should create a consistent flow of water without any irregular splashing.
Adjusting the temperature control and flow rate
After activating the water flow, you may need to adjust the temperature control and flow rate of your Grohe faucet. Here’s how:
- To control the temperature, turn the handle towards the hot or cold side, depending on your preference. Gradually fine-tune to reach the desired temperature.
- For adjusting the flow rate, locate the flow control adjustment valve typically positioned beneath the sink. Rotate the valve clockwise to decrease the flow and counterclockwise to increase it.
Remember that each Grohe faucet model may have different temperature and flow rate adjustment mechanisms, so consult the user manual if you encounter any difficulties.
Troubleshooting any issues that may arise
Despite the high-quality craftsmanship of Grohe faucets, occasional issues may arise. Here are a few troubleshooting tips to help you resolve any challenges:
- If the water pressure is too low, check the aerator for any debris buildup. Remove the aerator and clean it thoroughly, then reattach it to the faucet.
- If the faucet is dripping, it may be due to worn-out internal components. Contact Grohe customer support for replacement parts or seek assistance from a professional plumber.
- In case of uneven water temperature, ensure that the hot and cold water supply lines are correctly connected. If the issue persists, consult the manufacturer’s troubleshooting guide or reach out to their customer support.
By following these steps and troubleshooting tips, you can ensure the smooth operation and long-lasting performance of your Grohe kitchen faucet.
Finalizing The Installation
Congratulations! You are almost there to enjoy the benefits of your newly installed Grohe Kitchen Faucet. The final steps involve ensuring that everything is clean and secure before you can start using your faucet with confidence. In this section, we will cover how to clean the sink area, remove any debris, verify all connections are secure and leak-free, and finally, start enjoying your upgraded kitchen experience. Let’s dive in!
Cleaning the sink area and removing any debris
Once the installation is complete, it is essential to clean the sink area thoroughly and remove any debris that may have accumulated during the installation process. Cleaning the sink before using the faucet will provide a hygienic surface and prevent any unwanted particles from getting into the water supply.
To clean the sink area, follow these simple steps:
- Remove any tools or materials that may be lying around the sink.
- Wipe the sink surface with a mild soap or detergent using a soft cloth or sponge.
- Rinse the sink thoroughly with clean water.
- Dry the sink surface using a clean, lint-free cloth to avoid water spots.
Verifying all connections are secure and leak-free
Before using your Grohe Kitchen Faucet, it is crucial to ensure that all connections are securely tightened and free from any leaks. This step will guarantee a seamless faucet operation and prevent any potential water damage to your kitchen.
To verify the connections, follow these steps:
- Inspect the connections between the faucet body, supply lines, and water shutoff valves.
- Tighten any loose connections using an adjustable wrench or pliers. **Note: Be careful not to overtighten as it may lead to damage.
- Turn on the water supply and check for any leaks around the connections.
- If you notice any leaks, tighten the connections further or consider applying a plumber’s tape for added security.
Enjoying your newly installed Grohe Kitchen Faucet
With a clean sink and secure connections, it’s time to enjoy the benefits of your newly installed Grohe Kitchen Faucet. Take a moment to appreciate the sleek design, convenience features, and superior water flow that Grohe faucets offer.
Here are a few tips to enhance your experience:
- Experiment with the different spray modes to find the one that best suits your needs.
- Adjust the temperature and flow rate using the faucet’s control lever for optimal comfort.
- Explore additional features, such as pull-out or pull-down sprayers, for added convenience during kitchen tasks.
- Maintain your faucet’s performance by regularly cleaning it with a non-abrasive cleaner and a soft cloth.
Now that you have successfully finalized the installation, cleaned the sink area, checked all connections, and familiarized yourself with the features of your new Grohe Kitchen Faucet, it’s time to put it to good use. Enjoy the ease and efficiency that a high-quality faucet brings to your cooking and cleaning routines!
Conclusion (No Heading)
The conclusion of the installation process of a Grohe kitchen faucet is an important step that should not be overlooked. Proper installation and maintenance are crucial to ensuring the longevity and optimal functioning of your kitchen faucet. By following the steps outlined in this guide, you can confidently install your Grohe kitchen faucet and enjoy its benefits for years to come.
Recap of the Installation Process:
Let’s quickly recap the installation process of a Grohe kitchen faucet in sequential order:
| Step 1: | Prepare the workspace by turning off the water supply and placing a bucket underneath the sink to catch any residual water. |
| Step 2: | Remove the existing faucet by disconnecting the supply lines and any mounting hardware holding it in place. |
| Step 3: | Clean the sink surface and ensure it is free from debris or old sealant. |
| Step 4: | Follow the manufacturer’s instructions to assemble the Grohe kitchen faucet. |
| Step 5: | Install the faucet by inserting it into the mounting hole in the sink, aligning the supply lines properly. |
| Step 6: | Tighten the mounting hardware and connect the supply lines, ensuring they are securely fastened. |
| Step 7: | Turn on the water supply, check for any leaks, and test the functionality of the Grohe kitchen faucet. |
Following these steps will ensure a smooth installation process and provide you with confidence in the functionality of your Grohe kitchen faucet.
It is worth emphasizing the importance of proper installation and maintenance when it comes to your Grohe kitchen faucet. A poorly installed faucet can lead to leaks, reduced water flow, and potential damage to your sink and surrounding areas. To avoid these problems, make sure to adhere to the manufacturer’s instructions and take the necessary time and care during the installation process. Additionally, regular maintenance, such as cleaning the aerator and checking for any loose connections, will help keep your faucet in optimal condition for years to come.
Installing a Grohe kitchen faucet is a straightforward process that can bring a touch of elegance and functionality to your kitchen. By following the steps outlined in this guide, you can confidently complete the installation and enjoy the benefits of a well-designed and reliable kitchen faucet. Remember to prioritize proper installation and ongoing maintenance to extend the lifespan of your Grohe kitchen faucet and enhance your culinary experience.
Frequently Asked Questions For How To Install A Grohe Kitchen Faucet
Can I Install A Kitchen Faucet Myself?
Yes, you can install a kitchen faucet by yourself. Just follow the instructions carefully and use the necessary tools. It is a simple and manageable task that doesn’t require professional help.
How Do You Install A Grohe Mixer Tap?
To install a Grohe mixer tap, follow these steps: 1. Shut off the water supply and remove the existing tap. 2. Insert the new tap into the mounting hole and tighten the fixing nut. 3. Connect the supply hoses to the tap and the water supply valves.
4. Open the valves to check for leaks. 5. Test the tap’s functionality and adjust as needed.
How Do You Remove A Grohe Faucet Cartridge?
To remove a Grohe faucet cartridge, follow these steps: First, turn off the water supply. Then, use a screwdriver to remove the handle cover and screw. Next, detach the cartridge by pulling it out. Finally, replace with a new cartridge, and reassemble the faucet.
How Do You Install A Kitchen Faucet Bridge?
To install a kitchen faucet bridge, first, gather the necessary tools and materials. Then, shut off the water supply and disconnect the existing faucet. Position the bridge faucet and secure it in place using the provided hardware. Attach the water lines and tighten the connections.
Turn on the water supply, check for leaks, and you’re done!
Conclusion
Installing a Grohe kitchen faucet is a straightforward process that allows you to upgrade your kitchen with ease. By following the step-by-step instructions provided in this blog post, you can confidently complete the installation without any hassle. Remember to gather all the necessary tools and materials before starting, and ensure that you follow safety precautions throughout the process.
With a little patience and effort, you’ll have a beautiful and functional Grohe kitchen faucet in no time. Happy installing!