To install a sprinkler timer, first turn off the water supply and disconnect the old timer if there is one. Then, mount the new timer onto a wall near an electrical outlet and connect the wires to the corresponding terminals, following the manufacturer’s instructions.
Finally, connect the water supply to the timer and test the system to ensure proper operation. The installation of a sprinkler timer is a crucial step in maintaining an efficient and well-watered lawn or garden. By automating the watering process, a sprinkler timer can help save time, conserve water, and ensure that your plants receive the right amount of hydration.
However, the installation process may seem daunting for someone unfamiliar with the necessary steps. We will guide you through the precise installation process, providing clear instructions and useful tips to make the installation as seamless as possible. So, whether you are a seasoned gardener or a beginner, read on to learn how to install a sprinkler timer and take control of your watering schedule.
Importance Of Sprinkler Timers
Installing a sprinkler timer is crucial in managing the irrigation system for your lawn or garden. By automating the watering process, sprinkler timers offer a range of benefits that can contribute to maintaining a healthy and vibrant landscape. From efficient water usage to consistent watering schedules, here are some significant advantages of using sprinkler timers.
Efficient Water Usage
One of the primary benefits of using a sprinkler timer is its ability to promote efficient water usage. With a sprinkler timer in place, you can set specific watering durations and intervals, ensuring that your lawn or garden receives the appropriate amount of water without any wastage. This feature is especially useful in areas where water conservation is essential.
By programming your sprinkler timer to operate during the early morning or late evening, when temperatures are cooler and there’s less evaporation, you can minimize water loss and maximize absorption. This way, you can maintain lush greenery while being conscious of conserving water resources.
Consistent Watering Schedule
A sprinkler timer helps establish a consistent watering schedule for your landscape, which is essential for the healthy growth and development of plants. By setting specific start times and durations, you ensure that all areas of your lawn or garden receive adequate water consistently.
This consistency is particularly beneficial for promoting deep root growth. By providing water at the same time and duration regularly, plants develop deep roots that can access moisture deeper in the soil. This enables them to withstand drought conditions and become more resilient overall.
Saves Time and Effort
Another advantage of using a sprinkler timer is that it saves you time and effort in watering your landscape manually. Instead of spending hours moving hoses or manually turning on sprinklers, the timer will do the work for you.
With a programmed sprinkler timer, you can free up your schedule and eliminate the need for remembering to water your lawn or garden. This convenience is particularly beneficial when you have a busy lifestyle or when you’re away from home for extended periods. Your landscape will still receive the necessary watering without any extra effort required on your part.
Installing a sprinkler timer not only helps you save time and effort but also ensures that your lawn or garden receives consistent and efficient watering. By promoting efficient water usage, establishing a consistent watering schedule, and offering convenience, a sprinkler timer becomes an indispensable tool in maintaining a healthy and vibrant landscape.
Preparing For Installation
Before you begin installing your new sprinkler timer, it’s important to make sure you have everything you need and properly remove any existing timer. This will ensure a smooth installation process and the optimal performance of your sprinkler system. In this section, we will guide you through the necessary steps to gather the required tools and materials, remove the old sprinkler timer (if applicable), and familiarize yourself with the new sprinkler timer.
Gathering necessary tools and materials
Start by gathering the following tools and materials:
| Tools: | Materials: |
|
|
Having these tools and materials readily available will save you time and prevent any unnecessary interruptions during the installation process.
Removing old sprinkler timer (if applicable)
If you already have a sprinkler timer installed, you’ll need to remove it before installing the new one. Follow these steps to safely remove the old timer:
- Turn off the power to the sprinkler system.
- Locate the main circuit breaker or disconnect switch for the timer and switch it off.
- Open the existing timer box by removing its cover with a screwdriver.
- Take a photo or make a note of the wiring connections. This will help you when connecting the wires to the new timer.
- Disconnect the wires from the old timer using a screwdriver or wire stripper.
- Remove the old timer from the wall or mounting surface.
- Dispose of the old timer responsibly or store it for future use.
By carefully following these steps, you’ll be able to remove the old sprinkler timer without any hassle.
Familiarizing yourself with the new sprinkler timer
Before you start the installation, take some time to familiarize yourself with the new sprinkler timer. This will help you understand its features and functions, making the installation process easier. Refer to the timer’s manual and pay attention to the following:
- Timer wiring diagram: Understand how the wires should be connected to the new timer.
- Program settings: Familiarize yourself with the programming options to ensure your sprinkler system is set up correctly.
- Power requirements: Check the power requirements of the new timer and make sure your electrical system meets them.
By familiarizing yourself with the new sprinkler timer, you’ll have a better grasp of the installation process and be confident in setting it up correctly.
Now that you are well-prepared with the necessary tools, have removed the old timer (if applicable), and familiarized yourself with the new timer, you are ready to proceed with the installation. Stay tuned for the next section, where we will guide you through the step-by-step installation process.
Choosing The Right Sprinkler Timer
Installing a sprinkler timer is an essential step in maximizing the efficiency and convenience of your irrigation system. Whether you have a large garden or a small lawn, choosing the right sprinkler timer is crucial to ensure that your plants and lawn receive the right amount of water at the optimal times. In this section, we will guide you through the process of making an informed decision when it comes to selecting a sprinkler timer that fits your specific needs. Here, we will cover the different types of sprinkler timers, the importance of considering your watering needs, and comparing the various features and specifications.
Understanding the different types of sprinkler timers
Before diving into the process of choosing a sprinkler timer, it is important to understand the different types available. Sprinkler timers can be categorized into three main types: mechanical timers, digital timers, and smart timers.
1. Mechanical timers: These are the most basic and cost-effective type of sprinkler timers. They operate using a mechanical clock mechanism that is manually set to control the watering schedule. Mechanical timers are simple to install and use, making them a popular choice for beginners or those on a tight budget. However, they do not offer the same level of precision and flexibility as digital or smart timers.
2. Digital timers: Digital timers have become increasingly popular due to their increased precision and programmability. Unlike mechanical timers, digital timers allow you to set a specific watering schedule with different start times, durations, and days of the week. They often come with user-friendly interfaces and intuitive controls, making them a convenient choice for most homeowners.
3. Smart timers: Smart timers, also known as Wi-Fi or app-controlled timers, take convenience to a whole new level. These timers can be controlled remotely using a smartphone, tablet, or computer. Smart timers offer advanced features like weather-based adjustments, which automatically adjust the watering schedule based on real-time weather conditions. This ensures that your plants get the right amount of water without wasting it. While smart timers are typically more expensive than mechanical or digital timers, their advanced features and connectivity make them a valuable investment for those seeking maximum control and efficiency.
Considering your specific watering needs
Once you have familiarized yourself with the different types of sprinkler timers, the next step is to consider your specific watering needs. This involves assessing factors such as the size of your lawn or garden, the types of plants you have, and the amount of water they require.
Some key considerations to keep in mind include:
- The size and layout of your lawn or garden
- Measure the area that needs to be irrigated to determine the right capacity for your sprinkler timer.
- The water requirements of your plants
- Research the water needs of the plants in your garden to ensure that the sprinkler timer you choose can meet their specific requirements.
- The local climate and weather conditions
- If you live in an area with variable weather patterns, consider opting for a smart timer that can adjust the watering schedule based on real-time weather data.
Comparing features and specifications
Finally, it is essential to compare the various features and specifications of sprinkler timers before making a final decision. Some key features to look out for include:
- Number of stations: Consider the number of irrigation zones or stations your timer needs to support to ensure it can accommodate your entire watering system.
- Programmability: Look for timers that offer flexible programming options, including multiple start times, duration settings, and customizable watering schedules.
- Power source: Determine whether you prefer a timer that runs on batteries or one that is hard-wired into your electrical system.
- Weather resistance: Ensure that the timer is designed to withstand outdoor conditions and is waterproof to prevent damage from rain or sprinkler overspray.
By understanding the different types, considering your specific watering needs, and comparing the features and specifications, you can confidently choose a sprinkler timer that will suit your garden, enhance water efficiency, and ultimately save you time and money in the long run.
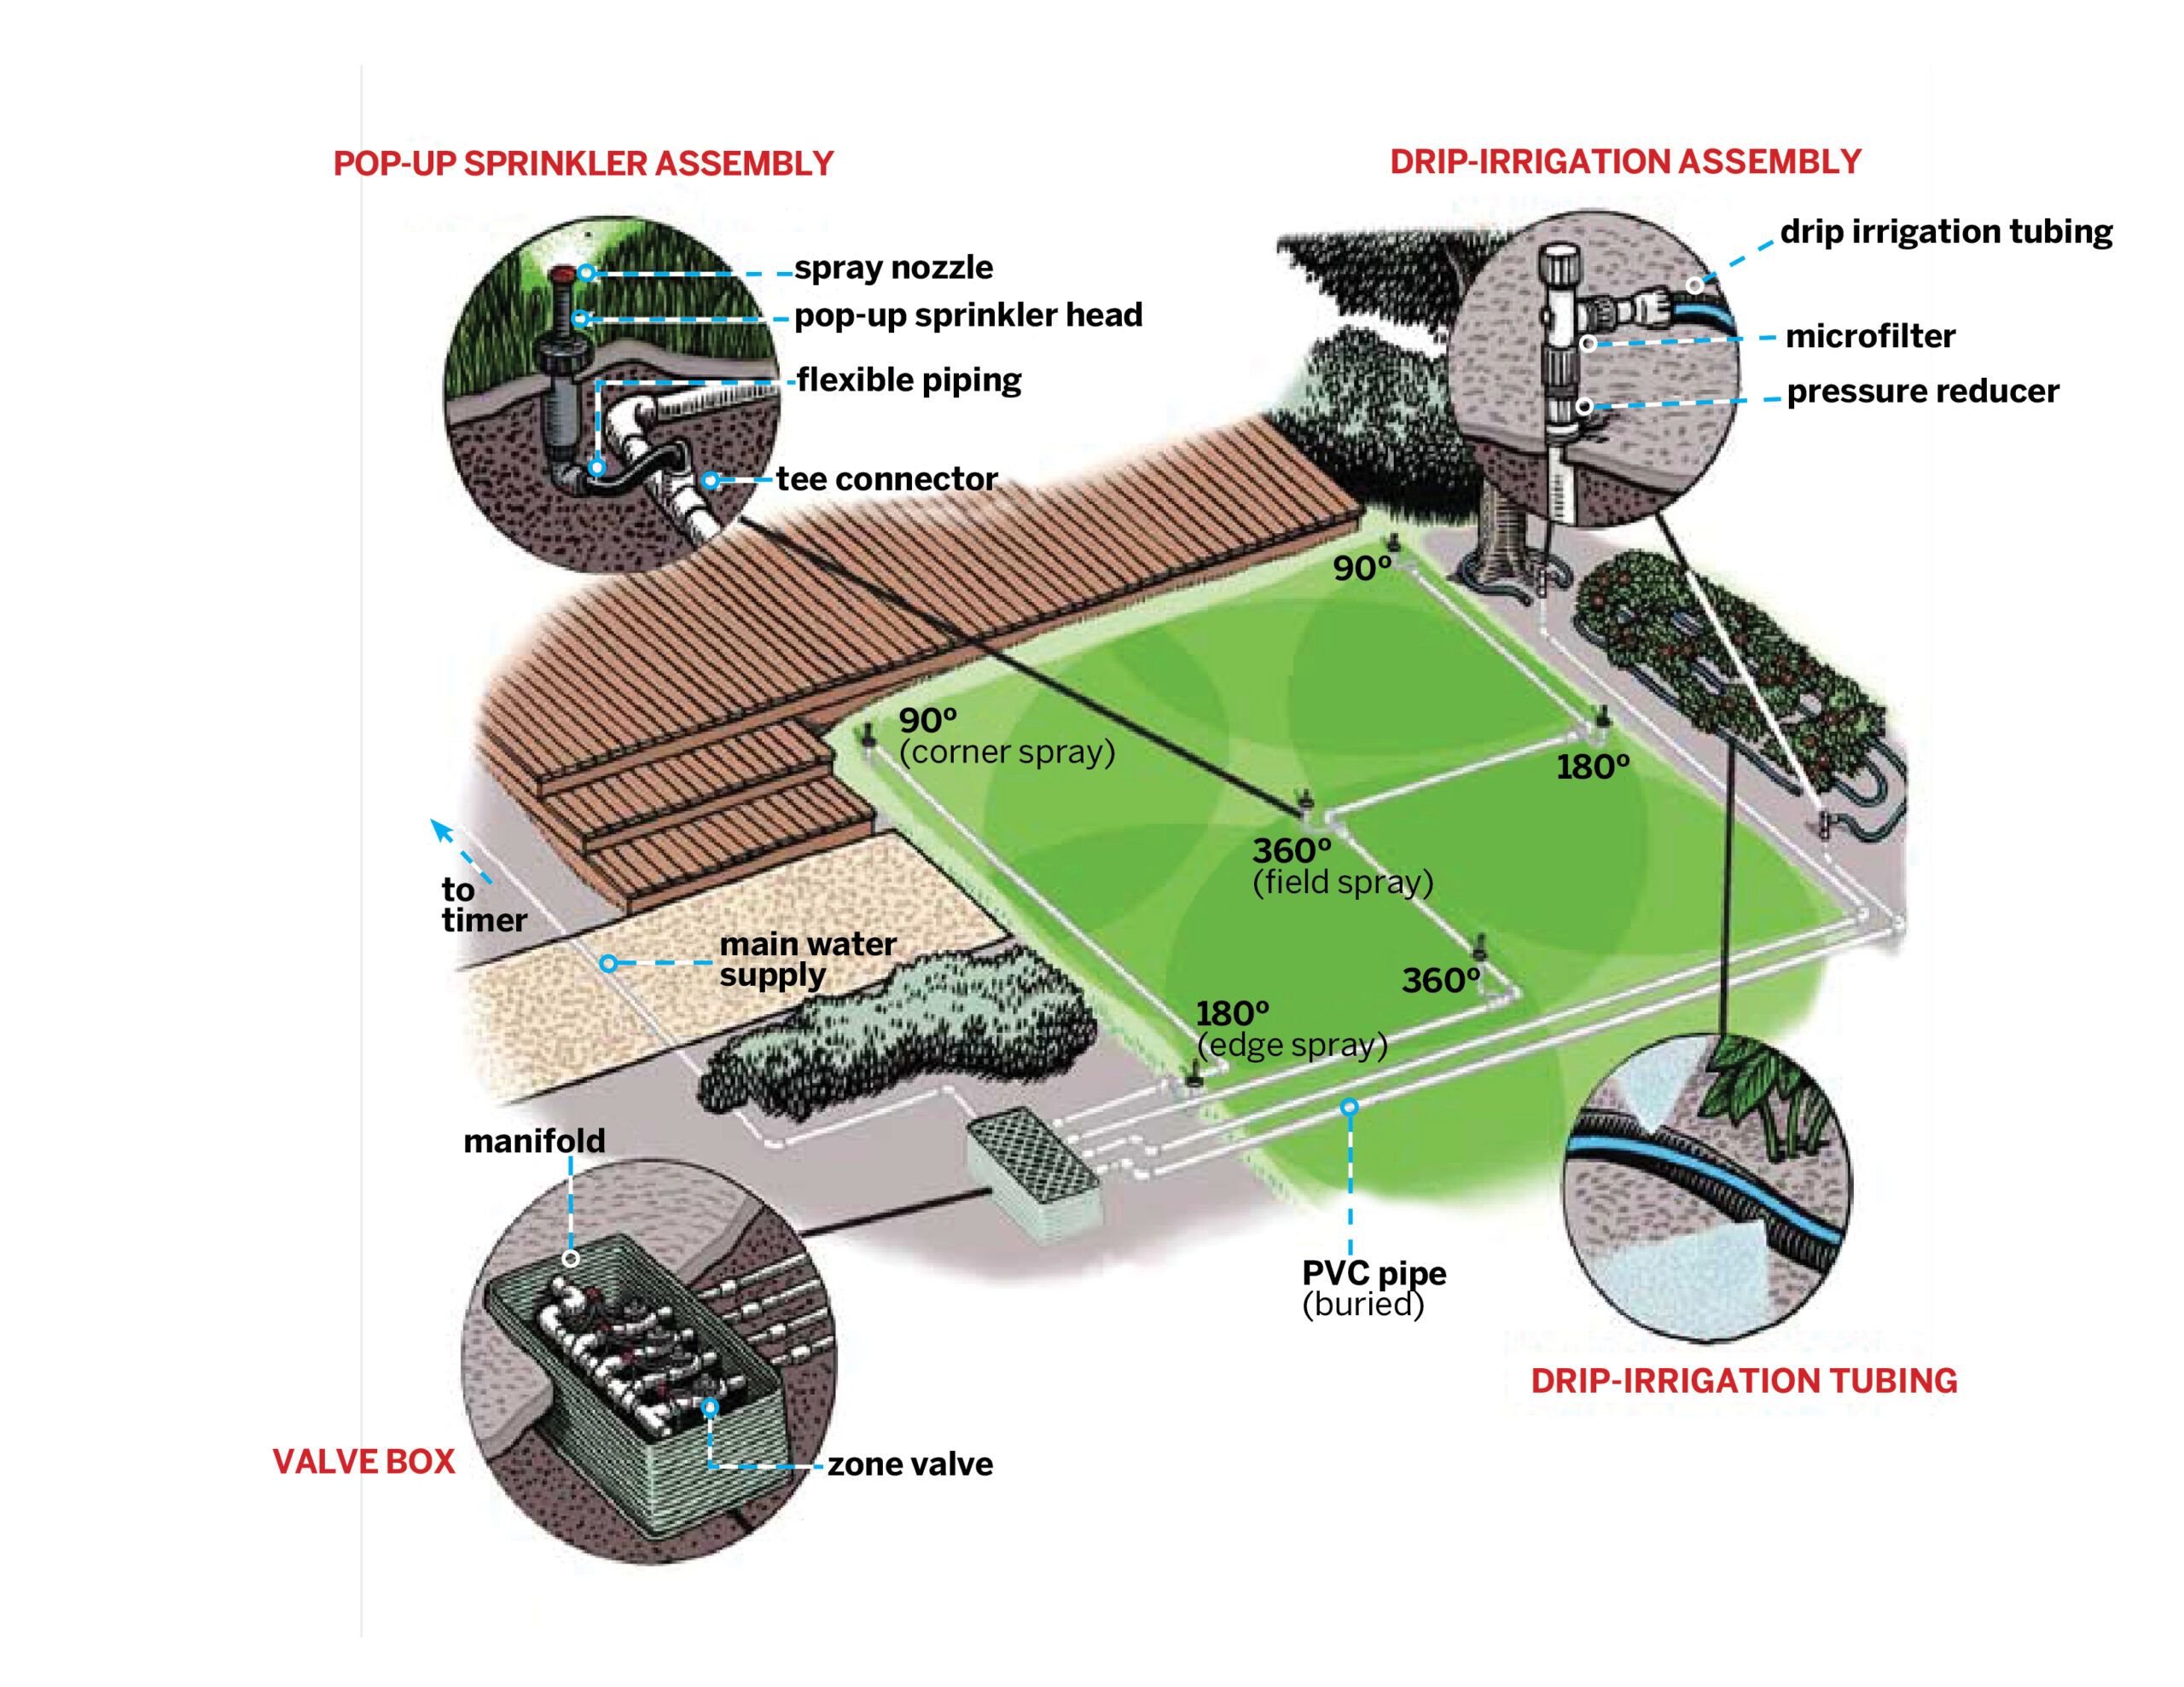
Credit: www.thisoldhouse.com
Step-By-Step Installation Process
Installing a sprinkler timer is a crucial step in automating your irrigation system. By following the step-by-step process, you can ensure that your timer is correctly installed and functioning efficiently. In this guide, we will walk you through the installation process, from shutting off the main water supply to programming the timer settings. Let’s get started!
Shutting off the main water supply
The first step in installing a sprinkler timer is to shut off the main water supply to avoid any potential leaks or accidents during the installation process. Follow these simple instructions:
- Locate your main water shut-off valve. This valve is usually located near the water meter or outside your house.
- Turn the valve clockwise until it is fully closed. This will stop the water flow to your sprinkler system.
- Once the main water supply is shut off, you can proceed with the installation process.
Mounting the sprinkler timer
Once the main water supply is shut off, it’s time to mount the sprinkler timer. Follow these steps to ensure proper installation:
- Select a suitable location for your timer. It should be easily accessible and protected from the elements.
- Using a drill and screws, attach the timer to the wall or a post. Make sure it is securely fastened and level.
- Ensure that the timer is installed near a power source or have an electrical outlet nearby to connect the adapter.
Connecting the wires and valves
With the sprinkler timer installed, you can now connect the wires and valves. Follow these steps carefully:
| Wire Color | Terminal Label |
|---|---|
| Red | Master Valve |
| White | Common |
| Other Colors | Station Number (1, 2, 3, etc.) |
- Identify the wires according to their colors and their corresponding terminal labels on the sprinkler timer.
- Strip the ends of each wire to expose the copper strands.
- Insert each wire into the designated terminal, ensuring a secure connection.
- Check the wiring diagram provided with your sprinkler timer to ensure correct wiring configuration.
- After connecting the wires, you can proceed with connecting the valves to the timer.
- Identify each valve based on its location in your irrigation system.
- Attach each valve’s wires to the corresponding station number terminals on the timer.
Programming the timer settings
After connecting the wires and valves, it’s time to program the timer settings. Follow these steps:
- Refer to the instruction manual provided with your sprinkler timer for specific programming instructions.
- Set the current time and date on the timer.
- Specify the watering schedule for each zone or station, including the start time, duration, and frequency.
- Consider any additional features or programming options your timer may offer, such as rain delay or seasonal adjustments.
- Review and double-check your programming settings to ensure accuracy.
- Once your timer is programmed, you can activate and test each zone to ensure proper operation.
By following these step-by-step instructions, you can successfully install a sprinkler timer and enjoy the convenience of an automated irrigation system. Remember to regularly maintain and adjust your timer settings to cater to the changing needs of your lawn and garden.
Troubleshooting And Common Issues
Installing a sprinkler timer can significantly improve the efficiency and convenience of watering your garden. However, like any electronic device, sprinkler timers can sometimes encounter issues that need to be resolved. In this section, we will discuss the most common installation problems, wiring issues, and programming errors that you may come across while installing a sprinkler timer.
Identifying common installation problems
During the installation of a sprinkler timer, you may encounter several common problems that can hinder its proper functioning. Here are some issues you may encounter:
- Power supply problems: Ensure that the power source you are using is suitable for the sprinkler timer’s voltage requirements. It is recommended to connect the timer to a dedicated circuit to avoid overload issues.
- Valve compatibility: Check if the sprinkler valves are compatible with the timer you are installing. Some timers may require specific types of valves or may not be compatible with certain brands.
- Water pressure: Insufficient water pressure could lead to inadequate sprinkler system performance. Make sure that the water pressure meets the requirements of both the timer and the sprinkler system.
- Timer location: Improper placement of the timer can disrupt signals and cause communication issues. Ensure that the timer is placed in a location with good reception and away from interference sources such as electrical panels or other electronics.
Addressing wiring issues
Wiring problems can often prevent the sprinkler timer from functioning correctly. Here are some common wiring issues and how to address them:
- Loose connections: Check all the wiring connections to ensure they are properly secured. Loose or disconnected wires can affect the flow of power and lead to erratic behavior of the sprinkler system.
- Short circuits: Inspect the wiring for any signs of damage or exposed wires that could cause a short circuit. Replace any damaged wires and make sure they are properly insulated.
- Incorrect wiring: Verify that the wires are connected to the correct terminals according to the manufacturer’s instructions. Refer to the wiring diagram provided with the sprinkler timer to ensure proper connectivity.
Troubleshooting programming errors
Programming errors can occur when setting up the sprinkler timer’s schedule. Here are some common programming errors and how to troubleshoot them:
- Incorrect time or date: Double-check that the time and date are set accurately on the sprinkler timer. Correct any discrepancies to ensure the timer operates on the intended schedule.
- Overlapping schedules: Ensure that there are no overlapping watering schedules. Conflicting schedules can result in improper water distribution and system malfunctions.
- Skipping or missed watering: If the sprinkler system is skipping or missing watering cycles, check the programming settings to ensure that the appropriate watering duration and frequency are programmed.
By identifying and resolving these common installation problems, wiring issues, and programming errors, you can optimize the performance of your sprinkler timer and ensure efficient and effective watering for your garden.
Maintenance And Care Tips
Proper maintenance and care is essential for keeping your sprinkler timer in optimal condition and ensuring the efficient operation of your irrigation system. By following these simple steps, you can prolong the lifespan of your timer and ensure it continues to work effectively.
Regularly Checking and Cleaning the Sprinkler Timer
Regularly checking and cleaning your sprinkler timer is crucial in preventing any potential issues and ensuring smooth operation. Here’s what you need to do:
- Start by turning off the power to your sprinkler system before inspecting the timer. Safety first!
- Inspect the timer for any signs of damage or loose connections. Secure any loose wires or connections promptly.
- Clean the exterior of the timer using a damp cloth to remove any dust or debris that may have accumulated over time.
- Open the timer cover to access the interior. Check for any debris or spider webs that might obstruct the buttons or affect the functionality of the timer.
- If you notice excessive dirt or grime, use a small brush or a can of compressed air to carefully clean the interior components of the timer.
- Closing the timer cover and restoring power, check if the buttons and display are functioning correctly. If anything seems amiss, consult the manufacturer’s instructions or seek professional help.
Inspecting for Leaks and Malfunctions
Regular inspections are crucial for identifying leaks and malfunctions that can negatively impact your sprinkler system’s performance. Follow these steps to ensure everything is in working order:
- Turn on your sprinkler system and observe each zone for any signs of leakage. This includes checking the connections between the timer and the valves as well as any visible leaks along the piping.
- Inspect the valves and solenoids for any signs of wear or damage. Replace any faulty components as necessary.
- Check the wiring connections to ensure they are secure and free from corrosion.
- Verify that each sprinkler head is spraying correctly and adjust as needed to ensure even coverage.
- If you notice any leaks or malfunctions that are beyond your expertise, consider consulting a professional to ensure proper repair and prevent further damage.
Replacing Batteries (if applicable)
If your sprinkler timer operates on battery power, it’s important to replace the batteries regularly to ensure uninterrupted performance. Follow these steps:
- Before replacing the batteries, ensure you have the correct size and type as specified by the manufacturer.
- Turn off the power to the sprinkler system and locate the battery compartment on the timer.
- Remove the old batteries and dispose of them properly.
- Insert the new batteries in the correct orientation, following the polarity markings.
- Close the battery compartment, restore power, and verify that the timer is functioning correctly.
Winterizing the Sprinkler System
Preparing your sprinkler system for winter is essential to prevent freezing and damage to the pipes and components. Follow these steps to winterize your system:
- Turn off the water supply to the sprinkler system.
- Turn off the power to the sprinkler timer and unplug it.
- Drain any remaining water from the pipes by opening the drain valves or using an air compressor.
- Cover the exposed sprinkler heads and valves with insulated covers to protect them from freezing temperatures.
- Store the sprinkler timer indoors in a cool and dry place for the winter.
- In the spring, before using your system again, check all components for any damage and perform any necessary repairs or replacements.
By following these maintenance and care tips for your sprinkler timer, you can enjoy a well-maintained irrigation system that keeps your landscape lush and healthy year-round.
Benefits Of Installing A Sprinkler Timer
Installing a sprinkler timer offers numerous benefits that make it an essential addition to any garden or lawn irrigation system. Not only does it conserve water and reduce water bills, but it also promotes healthier plants and lawns. Additionally, it provides convenience and time-saving, ensuring efficient watering that meets the specific needs of your plants and landscaping.
Conserves Water and Reduces Water Bills
A sprinkler timer can help you conserve water and reduce water bills significantly. By allowing you to set specific watering schedules and durations, you can avoid overwatering and ensure that your plants receive just the right amount of water they need. This not only prevents wastage but also saves you money by reducing water consumption.
Promotes Healthier Plants and Lawns
One of the key benefits of a sprinkler timer is that it promotes healthier plants and lawns. By providing consistent and regular watering, you create ideal conditions for your plants to thrive. With a timer, you can schedule watering sessions during the early morning or late evening when the temperature is cooler, reducing evaporation and allowing your plants to absorb more water and nutrients.
Moreover, a sprinkler timer enables you to customize your watering schedule based on the specific needs of different areas in your garden or lawn. For instance, you can adjust the frequency and duration of watering depending on factors such as sunlight exposure, soil type, and the water requirements of various plant species. This precision allows you to achieve optimal growth, prevent under or over-watering, and maintain a vibrant and healthy outdoor space.
Provides Convenience and Time-Saving
Installing a sprinkler timer provides convenience and saves you valuable time. Instead of manually turning on and off individual sprinklers, a timer automates the process, ensuring consistent and efficient watering. You can set it to operate at specific times and days that work best for you, even when you are away from home.
By eliminating the need for manual watering, you can focus your time and energy on other gardening tasks, reducing the overall maintenance required. Whether you have a small garden or a large lawn, a sprinkler timer streamlines the irrigation process, simplifying your gardening routine and freeing up time for you to enjoy your outdoor space.
In conclusion, installing a sprinkler timer offers a range of benefits that make it an indispensable tool for efficient and effective garden and lawn irrigation. Not only does it promote water conservation and save you money, but it also enhances the health of your plants and provides the convenience of automated watering. Take advantage of this time-saving device and enjoy all the advantages it brings to your gardening experience.
Frequently Asked Questions Of How To Install Sprinkler Timer
How Do I Choose The Right Sprinkler Timer For My Garden?
Choosing the right sprinkler timer involves considering factors such as the size of your garden, the type of plants you have, and your watering needs.
What Are The Benefits Of Installing A Sprinkler Timer?
Installing a sprinkler timer offers benefits such as efficient water usage, convenience, and the ability to set specific watering schedules.
Can I Install A Sprinkler Timer Myself Or Should I Hire A Professional?
While it is possible to install a sprinkler timer yourself, it is recommended to hire a professional if you are not familiar with electrical work or plumbing.
How Do I Install A Sprinkler Timer?
To install a sprinkler timer, start by turning off the water supply, mounting the timer to a wall or post, connecting the wires to the control panel, and then adjusting the settings according to your preferences.
Are There Any Maintenance Tasks Involved With A Sprinkler Timer?
Regular maintenance tasks for a sprinkler timer include checking for any leaks, cleaning the system, and updating the watering schedule as needed.
Can A Sprinkler Timer Be Used With Different Types Of Sprinkler Systems?
Yes, a sprinkler timer can be used with different types of sprinkler systems such as drip irrigation, oscillating sprinklers, and impact sprinklers.
Conclusion
Installing a sprinkler timer is a simple yet crucial step in ensuring a healthy and well-maintained lawn. By following the step-by-step guide provided in this blog post, you can easily set up and activate your sprinkler system. Remember to carefully connect the wires, program the timer, and perform a test run to ensure everything is functioning correctly.
With a properly installed sprinkler timer, you can automate your watering schedule and enjoy a vibrant and lush garden all season long.