To install a countertop on cabinets, measure and cut the countertop to fit, then secure it in place using screws and adhesive. This article will provide step-by-step instructions to help you successfully install a countertop on your cabinets.
Whether you’re upgrading your kitchen or completing a DIY project, installing a countertop adds both functionality and aesthetic appeal to your space. With the proper tools and materials, this task can be accomplished by any homeowner, regardless of their experience level.
By following these guidelines, you can quickly and easily install a countertop that will enhance the overall look and feel of your cabinets. So, let’s get started with the installation process.
Planning And Preparation
In order to successfully install a countertop on cabinets, proper planning and preparation are essential. This involves measuring the cabinets and countertop dimensions, choosing the right countertop material and style, and purchasing all the necessary tools and materials. By following these steps, you can ensure a smooth and efficient installation process.
Measure the cabinets and countertop dimensions
Before you can begin the installation process, it is important to accurately measure both the dimensions of your cabinets and the countertop that you will be installing. This will help you determine the appropriate size and shape of the countertop that you need to purchase, and ensure a proper fit.
When measuring the cabinets, take precise measurements of the length, width, and depth. Measure each cabinet individually, as some may have slight variations in size. Additionally, measure the space where the countertop will be placed, accounting for any overhang or edging that you plan to include.
Once you have gathered these measurements, write them down and double-check for accuracy. This will guide you in selecting the right countertop dimensions and help you avoid any costly mistakes.
Choose the right countertop material and style
The next step in planning and preparation is selecting the appropriate countertop material and style that best suits your needs and preferences. Countertops are available in a wide range of materials, including laminate, granite, quartz, marble, and more.
Consider factors such as durability, maintenance requirements, and overall aesthetic appeal when choosing the right material. Each material has its own unique characteristics, so make sure to do thorough research before making a decision. Additionally, take into account the style and design of your kitchen or bathroom to ensure that the countertop complements the overall theme.
Purchase all necessary tools and materials
Once you have finalized your measurements and chosen the perfect countertop material and style, it’s time to gather all the necessary tools and materials for the installation process. This ensures that you have everything you need within reach, saving you time and effort.
Make a checklist of the required tools and materials including a tape measure, saw, screws, adhesive, caulk, brushes, and any other specific items that may be needed based on the countertop material you have chosen. Verify that you have everything on the list before starting the installation process to prevent any delays or interruptions.
Remember, proper planning and preparation are key to a successful countertop installation. By measuring the cabinets and countertop dimensions, choosing the right material and style, and acquiring all the necessary tools and materials, you are setting yourself up for a hassle-free and satisfying installation experience.
Removing The Old Countertop
Clear the Cabinet Area
Before you can begin removing the old countertop, it’s important to clear the cabinet area to create a clutter-free workspace. Remove all items, such as utensils, pots, and pans, from the cabinets. This will give you the space you need to work efficiently and ensure that nothing gets damaged during the countertop removal process.
Disconnect and Remove Appliances
Next, disconnect and remove any appliances that are placed on or around the countertop. This may include the sink, stove, and dishwasher. Carefully follow the manufacturer’s instructions for each appliance to ensure safe disconnection. Move the appliances to a safe location where they won’t be in the way during the countertop removal and installation.
Remove the Old Countertop Carefully
Now comes the exciting part – removing the old countertop! This should be done with caution to prevent any damage to your cabinets. Follow these steps:
- Step 1: Start by using a utility knife to carefully cut through any caulk or adhesive sealing the countertop to the cabinets. This will make the removal process smoother.
- Step 2: With the caulk or adhesive loosened, gently lift the countertop to see if it easily comes off. If it doesn’t, check for any screws or brackets that may be securing it to the cabinets.
- Step 3: Using a screwdriver or drill, remove any screws or brackets that are holding the countertop in place. Take your time to ensure you remove them all, as leaving any behind could damage the new countertop during installation.
- Step 4: With the fasteners removed, carefully lift and maneuver the old countertop out of the cabinet. Be mindful of its weight and size to avoid any accidents or injuries.
By following these steps, you can safely remove your old countertop and prepare your cabinets for the installation of a shiny new one. Remember to take your time and be gentle during the removal process to avoid any unwanted mishaps. In the next section, we will dive into the exciting world of selecting and measuring your new countertop.
Installing The New Countertop
Installing the new countertop is an exciting step towards transforming your kitchen or bathroom. It’s the finishing touch that brings the whole space together and enhances its functionality. However, before you start the installation process, there are a few important steps to follow to ensure a flawless result. In this article, we will guide you through the process of installing a new countertop on cabinets, covering everything from leveling and securing the cabinets to applying the final sealant and caulk. So let’s dive right in and get your countertop installed seamlessly!
Ensure the Cabinets are Level and Secure
Before positioning the new countertop on your cabinets, it’s vital to ensure that the cabinets are level and secure. Follow these steps to check and adjust the level of your cabinets:
- Using a carpenter’s level, place it on top of the cabinets and check for any unevenness.
- If you find any areas that are not level, use shims to level them out.
- Once the cabinets are level, make sure they are securely fastened to the wall or the floor.
- Tighten any loose screws or hardware to ensure stability.
Position the New Countertop on the Cabinets
With the cabinets level and secure, it’s time to position the new countertop on top. Follow these steps to ensure a proper fit:
- Carefully lift the countertop and place it on the cabinets, aligning it with the edges.
- If necessary, trim the countertop to fit around appliances or other obstructions.
- Double-check the alignment and adjust as needed before moving on to the next step.
Secure the Countertop to the Cabinets
Once the countertop is properly positioned, it’s crucial to secure it to the cabinets to ensure stability and longevity. Here’s how you can do it:
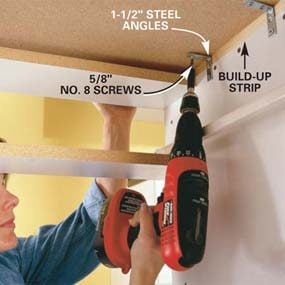
- From underneath the cabinets, use screws to attach the countertop to the cabinet frames.
- Space the screws evenly along the edges and in the middle to distribute the weight evenly.
- Ensure that the screws do not penetrate the countertop surface.
- Check for any gaps between the countertop and the cabinets and make adjustments if necessary.
Apply Sealant and Caulk Around the Edges
To complete the countertop installation and prevent any moisture or debris from seeping through, it’s important to apply sealant and caulk around the edges. Follow these steps for a professional finish:
- Choose a high-quality sealant or caulk suitable for your countertop material.
- Apply a thin bead of sealant along the edges of the countertop where it meets the cabinets.
- Smooth out the sealant using a caulk finishing tool or your finger.
- Wipe away any excess sealant or caulk with a damp cloth.
- Allow the sealant to cure according to the manufacturer’s instructions.
By following these steps, you can ensure a secure and visually appealing installation of your new countertop. With proper care and maintenance, your countertop will not only enhance the aesthetics of your space but also provide a functional and durable surface for years to come.
Fine-Tuning And Finishing Touches
Once the countertop has been securely installed on the cabinets, it’s time to focus on the fine-tuning and finishing touches to ensure a flawless result. This crucial step involves checking for any gaps or unevenness, making necessary adjustments, installing a backsplash if desired, and reconnecting and reinstalling appliances.
Check for any gaps or unevenness
Before proceeding further, carefully inspect the countertop for any gaps or uneven areas that may have occurred during the installation process. These imperfections can affect the overall appearance as well as the functionality of your countertop. Take your time to thoroughly examine all edges, corners, and seams.
Make adjustments as needed
If you encounter any gaps or uneven areas during the inspection, it’s essential to make adjustments promptly. This may involve sanding down high spots, filling in gaps with caulk or putty, or applying a leveling compound to create a smooth and even surface. Paying attention to these small details can make a significant difference in the final outcome.
Install backsplash if desired
A backsplash not only adds character and style to your kitchen but also protects the wall behind the countertop from moisture and stains. If you desire a backsplash, now is the perfect time to install it. Measure the area, gather the necessary materials, and carefully follow the manufacturer’s instructions to achieve a professional-looking result.
Reconnect and reinstall appliances
With the countertop and backsplash in place, it’s time to reconnect and reinstall your appliances to complete the installation. Start by carefully reconnecting the water supply and drainage systems for your sink, dishwasher, and any other appliances. Then, ensure the appliances are properly placed and secured, making any necessary adjustments to ensure they are level and aligned with the countertop.
Remember that fine-tuning and finishing touches are what truly elevate the overall appearance and functionality of your newly installed countertop. Taking the time to check for gaps or unevenness, make adjustments as needed, install a backsplash if desired, and reconnect and reinstall appliances will provide you with a stunning and seamlessly integrated countertop that will make your kitchen a focal point of your home.
Cleaning And Maintenance Tips
Proper cleaning and maintenance are essential to keep your countertop looking its best and prolong its lifespan. By following these tips, you can ensure that your countertop remains clean, hygienic, and free from damage.
Clean the countertop thoroughly before use
To start off, it’s important to clean your countertop thoroughly before using it for the first time. Remove any dust, dirt, or debris that may have accumulated during the installation process. Use a gentle cleaner or a mild detergent and warm water to wipe down the entire surface, ensuring that you reach all corners and edges.
When cleaning, be sure to avoid abrasive materials or harsh chemicals that can potentially damage the countertop surface. Instead, opt for non-abrasive cleaning solutions that are specifically formulated for your countertop material.
Use appropriate cleaning products for different materials
Different countertop materials require specific cleaning products to maintain their appearance and longevity. Here are some recommendations for various countertop materials:
| Countertop Material | Recommended Cleaning Products |
|---|---|
| Granite | Non-acidic, pH-neutral granite cleaner |
| Quartz | Non-abrasive cleaner or mild soap and water |
| Marble | Mild, pH-neutral soap and water |
| Butcher Block | Mineral oil or specialized butcher block conditioner |
It’s crucial to read the manufacturer’s recommendations for your specific countertop material to ensure you’re using the appropriate cleaning products. Avoid using vinegar, bleach, or harsh chemicals on countertops, as they can cause permanent damage.
Regularly maintain and inspect the countertop for any issues
Regular maintenance and inspection are key to identifying any potential issues and addressing them promptly. Here are some maintenance tips to keep in mind:
- Wipe up spills immediately to prevent staining.
- Use cutting boards and trivets to protect the countertop surface from scratches and heat damage.
- Reapply sealants or coatings as recommended by the manufacturer to maintain the countertop’s protective layer.
- Inspect the countertop regularly for any signs of damage or wear, such as cracks, chips, or discoloration. If you notice any issues, contact a professional for repairs.
By following these cleaning and maintenance tips, you can ensure that your countertop remains in pristine condition, extending its lifespan and preserving its beauty for years to come.
Credit: www.familyhandyman.com
Troubleshooting Common Issues
While installing a countertop on cabinets can be a rewarding project, it’s not always smooth sailing. Common issues such as misalignment, chips or cracks, and water damage can hinder the installation process. But fear not! In this section, we’ll address these problems and provide solutions to ensure your countertop installation goes off without a hitch.
Addressing Countertop Alignment Problems
Proper alignment is crucial for a visually appealing countertop installation. If you notice that your countertop is not sitting flush with the cabinets or there are gaps between the countertop and the wall, here are a few steps to troubleshoot and rectify the issue:
- Check the levelness of your cabinets using a carpenter’s level. If the cabinets are not level, use shims to make necessary adjustments.
- Use a tape measure to ensure that the countertop overhang is consistent on all sides of the cabinets.
- If you encounter gaps between the countertop and the wall, consider using silicone caulk to seal the spaces and provide a seamless appearance.
Fixing Chips or Cracks in the Countertop
Although countertop materials are designed to be durable, chips or cracks can occur during installation or regular use. Here’s how you can fix these issues and restore the beauty of your countertop:
- For small chips or cracks, use an epoxy adhesive specifically made for countertop repairs. Apply the adhesive according to the manufacturer’s instructions and let it cure.
- If the damage is extensive, it might be necessary to replace the affected section of the countertop. Contact a professional to assess the situation and provide guidance on the best course of action.
Dealing with Water Damage or Stains
Water damage and stains are common issues that can occur over time, especially in areas near sinks. To tackle these problems and keep your countertop looking pristine, follow these steps:
- Clean the affected area using a mild soap and warm water. Gently scrub the surface to remove any dirt or residue.
- If stains persist, create a paste using baking soda and water. Apply the paste to the stained area and let it sit for a few minutes before scrubbing with a soft cloth.
- To prevent future water damage, ensure that sinks are properly sealed and install a protective barrier, such as a silicone mat, around the sink area.
By addressing these common issues promptly and effectively, you can ensure your countertop installation remains visually appealing and durable in the long run. Don’t let these challenges deter you from achieving the kitchen of your dreams!
Frequently Asked Questions For How To Install A Countertop On Cabinets
How Do You Attach Countertops To Cabinets?
Attach countertops to cabinets by following these steps: 1. Measure and cut the countertop to fit the cabinet accurately. 2. Apply a bead of adhesive along the top edges of the cabinets. 3. Carefully lower the countertop onto the cabinet, aligning it properly.
4. Use clamps to hold the countertop in place while the adhesive dries. 5. Finally, secure the countertop to the cabinets using screws or brackets.
Do Countertops Sit Directly On Cabinets?
Countertops do sit directly on top of cabinets. They act as a surface for preparing food and other activities in the kitchen or bathroom. The cabinets provide support for the countertops and help to create a cohesive and functional space.
How Do You Attach Countertops To Wall Cabinets?
Attach countertops to wall cabinets by following these steps: 1. Measure and mark the placement. 2. Screw mounting brackets to the cabinets and secure them. 3. Apply adhesive along the cabinet tops. 4. Align the countertop and press it firmly onto the adhesive.
5. Secure the countertop with screws from underneath.
Is It Easy To Install Countertops Yourself?
Installing countertops yourself can be challenging but not impossible. With proper guidance and the right tools, it can be relatively easy to install countertops on your own. However, it is crucial to follow instructions carefully and ensure that you have the necessary skills and experience to handle the task.
Conclusion
Installing a countertop on cabinets may seem like a daunting task, but with the right guidance, it becomes a manageable project. By following the step-by-step instructions in this blog post, you can successfully transform your kitchen or bathroom with a beautiful new countertop.
Remember to choose the right materials and tools, measure and cut accurately, and secure the countertop firmly to the cabinets. With these tips, you’ll be able to achieve professional-looking results and enjoy your new countertop for years to come. Happy DIYing!