To install a jet pump, first, gather all necessary tools and materials. Then, follow the manufacturer’s instructions and connect the pump to the water supply and electrical system.
Finally, test the pump to ensure proper functioning. Installing a jet pump is an essential task for those who rely on well water systems or want to boost their water pressure. Whether you’re a DIY enthusiast or hiring a professional, understanding the installation process is vital.
This comprehensive guide provides step-by-step instructions on how to install a jet pump correctly. By carefully following these instructions and using the appropriate tools and materials, you can ensure a smooth installation and enjoy an efficient water supply. So, let’s dive into the details and learn how to install a jet pump and make the most out of your well system!
Factors To Consider When Selecting A Jet Pump
When it comes to installing a jet pump for your water system, there are several factors that you need to consider. These factors will help you determine the right type of pump, the required horsepower, and the pumping capacity. By taking these factors into account, you can ensure that the jet pump you choose will meet your specific needs and provide efficient and reliable performance. Let’s explore these factors in detail.
Different Types of Jet Pumps
Before selecting a jet pump, it’s essential to understand the different types available. There are two main types of jet pumps: shallow well and deep well jet pumps. Shallow well jet pumps are designed for applications where the water source is less than 25 feet deep, while deep well jet pumps are suitable for deeper water sources. Understanding the depth of your water source is crucial in selecting the appropriate type of jet pump.
Calculating the Required Horsepower
Determining the required horsepower for your jet pump is crucial in ensuring optimal performance. The horsepower is directly related to the pump’s capacity to move water efficiently. To calculate the required horsepower, you need to consider factors such as the total head (vertical distance between the water source and the pump), the flow rate, and any additional friction losses in the system. Consulting a professional or referring to the manufacturer’s guidelines can help you accurately calculate the required horsepower for your specific application.
Determining the Pumping Capacity
Another factor to consider when selecting a jet pump is the pumping capacity. This refers to the amount of water the pump can deliver within a certain time frame, usually measured in gallons per minute (GPM). To determine the appropriate pumping capacity, you need to consider factors such as the household’s water demand, the number of fixtures or appliances that will be using water simultaneously, and any potential future increases in water usage. By accurately determining the pumping capacity required, you can ensure that the jet pump can meet the demands of your water system effectively.
Gathering The Necessary Tools And Materials
Gathering the necessary tools and materials is an essential first step before installing a jet pump. Ensuring that you have all the required equipment ready will ensure a smooth and efficient installation process. Below, we have provided a detailed list of tools and materials you will need for this task.
List of tools needed:
- Adjustable wrench
- Screwdriver
- Drill
- Pipe wrench
- Teflon tape
- Plumber’s tape
- Utility knife
- Measuring tape
- Pliers
- Hacksaw
- Pressure gauge
Required materials and accessories:
- Jet pump unit
- Pressure tank
- Submersible well pipe
- Well cap
- Well seal
- Check valve
- Pressure switch
- Electrical wires
- PVC pipes and fittings
- Teflon tape
- PVC primer and cement
- Thread sealant
- Mounting brackets or straps
- Optional: Well screen or foot valve
It’s crucial to gather all the tools and materials before starting the installation. By having everything readily available, you can avoid unnecessary interruptions or trips to the hardware store. Now that you have a comprehensive list of tools and materials required, you’re one step closer to successfully installing your jet pump.
Measuring And Planning
Before installing a jet pump, it’s important to start with proper measuring and planning to ensure a successful installation. This crucial step will help you determine the well depth, evaluate pump placement options, and determine the required pipe length.
Measuring the well depth
Measuring the well depth is the first and most important step in installing a jet pump. This measurement will determine the length of pipe needed to reach the water source.
To measure the well depth, follow these steps:
- Secure a measuring tape or a string with a weight attached to one end.
- Lower the tape or string into the well until it hits the water level.
- Slowly pull it back up, making sure to keep it straight.
- Once it is completely out of the well, measure the length of the tape or string to determine the well depth.
Evaluating the pump placement options
After measuring the well depth, the next step is to evaluate the pump placement options. This step involves determining the ideal location to install the pump for optimal performance.
Consider the following factors when evaluating pump placement options:
- Proximity to the power source: Ensure that the pump’s location is close enough to a power outlet to avoid excessive wiring.
- Accessibility: Choose a location that offers easy access for maintenance and repairs.
- Avoiding obstructions: Keep in mind any obstructions, such as other equipment or structures, that could impede the pump’s function.
- Ventilation: Adequate ventilation is essential to prevent heat build-up around the pump.
Determining the required pipe length
Now that you have measured the well depth and evaluated the pump placement options, it’s time to determine the required pipe length. The pipe length will depend on the well depth and the pump’s ideal location.
To determine the required pipe length, follow these steps:
- Add the well depth to the distance from the ideal pump location to the ground level.
- Add any additional length needed to connect the pump to the water storage or distribution system.
- Consider adding a few extra feet for flexibility during installation and any future adjustments.
- With the total length calculated, ensure you have the right pipe size to handle the water flow and pressure requirements.
By carefully measuring the well depth, evaluating the pump placement options, and determining the required pipe length, you will be well-prepared for the installation process. Taking the time to plan this crucial step will ensure a successful and efficient jet pump installation.
Ensuring Proper Electrical Requirements
Installing a jet pump requires careful attention to the electrical requirements. Without proper electrical compatibility, the pump may not function correctly or even pose safety hazards. In this section, we will discuss the essential steps to ensure the electrical components of your installation are working efficiently.
Understanding the Power Supply Specifications
Before initiating the installation process, it is crucial to have a clear understanding of the power supply specifications. The power supply should meet the requirements specified by the manufacturer. This information can usually be found in the user manual or on the manufacturer’s website. The power supply specifications typically include voltage, phase, and frequency.
Checking the Electrical Compatibility
Once you have gathered the necessary power supply specifications, it’s time to check the compatibility of your electrical system. This step is crucial to avoid any safety risks and potential damage to the pump. Here are the key factors to consider:
- Voltage: Confirm that the voltage of your electrical system matches the voltage specified by the manufacturer. Voltage mismatches can lead to pump malfunctions and reduce its lifespan.
- Phase: Determine whether your electrical system operates on a single-phase or three-phase power supply. Make sure the phase matches the specifications of the jet pump. Mismatched phases can lead to motor failures and other electrical issues.
- Frequency: Check the frequency of your electrical system. Most residential systems operate at 60Hz, but some areas may have a different frequency. Ensure that the pump’s frequency requirements align with your electrical system to prevent inefficiencies or damage.
It’s essential to note that if you’re unsure about any of the electrical compatibility aspects, seek guidance from a licensed electrician. They are well-versed in analyzing electrical systems and can provide expert advice and assistance.
By understanding the power supply specifications and checking electrical compatibility, you can ensure a smooth and safe installation process for your jet pump. Taking the time to verify these requirements will not only prevent potential issues down the line but also optimize the pump’s performance for years to come.
Installing The Pump And Pressure Tank
Once you have found the perfect spot for your jet pump, it’s time to start the installation process. This involves positioning the pump in the well casing, connecting it to the pressure tank, and securing both in place. Follow these step-by-step instructions to ensure a smooth and successful installation.
Positioning the pump in the well casing
It’s crucial to position the pump correctly within the well casing to ensure efficient water flow and optimal performance. Here’s how you do it:
- Lower the pump into the well casing, ensuring that it is centered and aligned.
- Check the clearance between the pump and the well casing walls. There should be enough space for water to flow freely without any obstructions.
- Make sure the pump is submerged in water to prevent overheating.
- Adjust the depth of the pump if needed, keeping in mind the manufacturer’s recommendations.
Connecting the pump to the pressure tank
Now that the pump is in place, it’s time to connect it to the pressure tank. This connection allows water to build up pressure and be distributed throughout your household. Here’s what you need to do:
- Locate the outlet pipe on the pump and insert a pipe fitting to connect it with the pressure tank.
- Tighten the pipe fitting using a wrench to ensure a secure connection.
- Inspect the joint for any leaks and make necessary adjustments if needed.
- Double-check the alignment and positioning of the pipes to facilitate water flow without restrictions.
Securing the pump and tank in place
Lastly, it’s essential to secure both the pump and pressure tank firmly in place to prevent any shifting or movement. This step ensures the long-term stability and reliability of your water system. Follow these steps to secure them securely:
- Attach the pump and pressure tank to a stable base using appropriate mounting brackets or straps. Make sure they are tightly secured.
- Inspect the connections between the pump, pressure tank, and the base. Ensure there are no loose or damaged parts.
- Verify that the pump and tank are level and plumb to maintain reliable operation.
- Perform a final check to ensure all connections are secure and free from leaks.
By following these simple steps, you can install a jet pump and pressure tank efficiently. It’s always a good idea to consult the manufacturer’s instructions for your specific pump model before starting the installation process. Once everything is properly installed, you can enjoy a reliable water supply for your household needs.
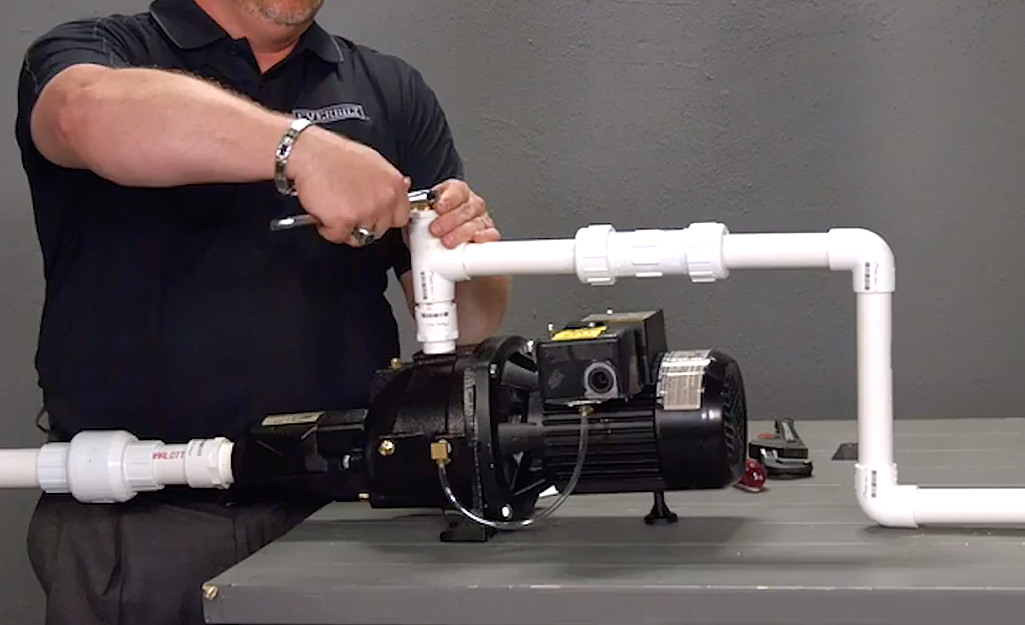
Credit: www.homedepot.com
Connecting The Plumbing System
When it comes to installing a jet pump, connecting the plumbing system is a crucial step that ensures proper functionality and water flow. This process involves installing various components such as the check valve and foot valve, connecting the suction pipe, installing the pressure gauge and pressure switch, and finally, connecting the discharge pipe. In this article, we will guide you through each of these steps, providing clear instructions to help you successfully connect the plumbing system for your jet pump installation.
Installing the Check Valve and Foot Valve
The check valve and foot valve are vital components that prevent water from flowing back into the well and maintain prime in the pump. Follow these steps to install them:
- Locate the check valve and foot valve. The check valve is typically installed at the top of the well, while the foot valve is placed at the end of the suction pipe.
- Apply plumber’s tape to the threaded ends of the valves to ensure a watertight seal.
- Insert the check valve onto the top of the well, making sure it is securely attached.
- Attach the foot valve to the end of the suction pipe, using pipe fittings if necessary.
- Tighten all connections using a wrench, ensuring they are snug and leak-free.
Connecting the Suction Pipe
The suction pipe is responsible for drawing water from the well into the jet pump. Follow these steps to connect it properly:
- Determine the appropriate length of the suction pipe, ensuring it reaches from the foot valve to the jet pump.
- Cut the suction pipe to the desired length using a pipe cutter.
- Apply plumber’s tape to the threaded end of the suction pipe.
- Attach one end of the suction pipe to the foot valve, ensuring it is securely connected.
- Connect the other end of the suction pipe to the suction port on the jet pump.
- Use pipe fittings if necessary to ensure a proper and secure connection.
Installing the Pressure Gauge and Pressure Switch
The pressure gauge and pressure switch play an important role in monitoring and controlling the water pressure. Here’s how to install them:
- Locate the pressure gauge and pressure switch on the jet pump.
- Apply plumber’s tape to the threaded ends of the pressure gauge and pressure switch.
- Screw the pressure gauge into the designated port on the jet pump.
- Connect the pressure switch to the corresponding electrical terminals on the jet pump.
- Tighten all connections using a wrench, ensuring they are secure.
Connecting the Discharge Pipe
The discharge pipe is responsible for delivering pressurized water from the jet pump to the desired location. Follow these steps to connect it:
- Determine the appropriate length of the discharge pipe, ensuring it reaches from the jet pump to the desired location.
- Cut the discharge pipe to the desired length using a pipe cutter.
- Apply plumber’s tape to the threaded end of the discharge pipe.
- Attach one end of the discharge pipe to the discharge port on the jet pump, ensuring it is securely connected.
- Connect the other end of the discharge pipe to the desired location, such as a water tank or household plumbing.
- Use pipe fittings if necessary to ensure a proper and secure connection.
By following these steps and properly connecting the plumbing system, you can ensure a reliable and efficient installation of your jet pump. Take your time and double-check all connections for any leaks or loose fittings before testing the pump’s functionality. With proper installation, your jet pump will provide a steady supply of water for your household needs.
Wiring The Jet Pump
When it comes to installing a jet pump, one crucial step that you must not overlook is wiring the pump. Proper wiring ensures that the pump is safely connected to the power supply, allowing it to function efficiently. In this section, we will guide you through the process of wiring the jet pump, step by step.
Wiring the pump to the power supply
To wire the jet pump to the power supply, follow these simple instructions:
- Begin by turning off the electricity to the circuit you will be working on. This will help prevent any accidents or electrical shocks.
- Next, locate the wiring box on the pump. This is typically located near the motor or control box.
- Remove the cover of the wiring box to reveal the connection terminals.
- Strip the insulation from the ends of the wires that will be connecting to the pump. Use wire strippers to ensure a clean cut.
- Identify the wires that correspond to the power supply. Typically, these will be colored black, white, and green or bare copper for the ground wire.
- Connect the black wire from the power supply to the black wire from the pump, and tighten the connection securely using a wire nut.
- Connect the white wire from the power supply to the white wire from the pump, and again, secure the connection with a wire nut.
- If your pump includes a ground wire, connect the green or bare copper wire from the power supply to the ground wire from the pump. Ensure that the connection is tight and secure.
- Once all the connections are made, carefully tuck the wires into the wiring box, ensuring they are not pinched or damaged.
- Replace the cover of the wiring box, and secure it tightly in place.
- Finally, turn the electricity back on to the circuit, and test the pump to ensure it is working properly.
Installing the control box (if applicable)
If your jet pump includes a control box, follow these additional steps to install it:
- Locate the control box on the pump. This is typically a separate box that houses the control circuitry.
- Position the control box near the pump, within easy reach of the wiring box.
- Connect the wires from the control box to the corresponding terminals in the pump’s wiring box. Refer to the manufacturer’s instructions for the specific wiring configuration.
- Ensure that all connections are secure, and there is no loose wiring.
- Once the connections are made, secure the control box in place using screws or mounting brackets provided.
Verifying the electrical connections
Before completing the installation, it is important to verify the electrical connections to ensure everything is in order. Take the following steps:
- Check all the connections in the pump’s wiring box, making sure they are tight and secure.
- Inspect the wires for any signs of damage, such as fraying or exposed copper.
- If any issues are found, fix them immediately before proceeding.
By following these instructions, you can successfully wire the jet pump to the power supply and install the control box if applicable. Remember to exercise caution and follow all safety guidelines to ensure a smooth and efficient installation process.
Priming And Testing The Jet Pump
Priming the Pump for Initial Use
Before you can enjoy the benefits of your newly installed jet pump, it’s essential to prime it for initial use. Priming ensures proper functionality and optimal performance. Follow these steps to ensure a smooth and successful priming process:
- Start by ensuring the power to the jet pump is switched off. Electrical safety should always be a top priority.
- Locate the priming plug or priming port on your jet pump. This plug is typically found on the top or side of the pump and is easily identifiable.
- Remove the priming plug and pour water into the port until it fills the pump chamber. Make sure to fill it to the proper capacity as mentioned in the manufacturer’s instructions.
- Replace the priming plug securely to prevent any leakage.
- Turn on the power supply to the jet pump.
- Allow the pump to run for a few minutes, ensuring that the water is being properly circulated.
Priming your jet pump is crucial as it removes any air trapped in the pump and ensures that the impeller is properly lubricated. This initial priming process sets the stage for the pump to function smoothly and efficiently.
Testing the Pump for Proper Operation
Once the priming process is complete, it’s time to test your jet pump to ensure it’s operating correctly. Follow these steps to perform a simple yet effective test:
- Make sure the pump is powered on and properly primed as per the previous steps.
- Inspect the pressure gauge on the pump. It should display the pressure level within the acceptable range. Refer to the manufacturer’s instructions for the recommended pressure levels for your specific pump.
- Open a faucet or hose connected to the pump’s water outlet. Observe the flow of water to ensure it is consistent and steady.
- Check for any unusual noises or vibrations coming from the pump. If you notice any abnormal sounds or vibrations, it may indicate an issue that needs further attention or troubleshooting.
Testing your jet pump is vital to identify potential problems early on and ensure its proper operation. Regular testing also allows you to monitor its performance and make any necessary adjustments.
Adjusting the Pressure Switch Settings if Necessary
If you have completed the priming and testing steps outlined above but notice issues with the water pressure or any other pump-related problems, adjusting the pressure switch settings might be necessary. Here’s how you can do it:
Note: Before making any adjustments to the pressure switch, make sure to consult the manufacturer’s instructions, as specific steps and recommended pressure settings may vary.
- Locate the pressure switch on your jet pump. It is usually located near the pump motor or on the pressure tank itself.
- Using a screwdriver or the appropriate tool, adjust the pressure switch by turning the adjustment screws. Be cautious and make small adjustments at a time.
- Monitor the water pressure as you adjust the switch. Check if the pressure aligns with your desired settings and if the pump is functioning optimally.
- If necessary, repeat the adjustment process until the desired pressure level is achieved.
By adjusting the pressure switch settings, you can fine-tune the performance of your jet pump to meet your specific water pressure requirements. Remember to exercise caution and refer to the manufacturer’s instructions as needed.
Regular Maintenance Tips To Extend The Pump’S Lifespan
Your jet pump is a crucial component of your water system, ensuring a steady and reliable water supply. To keep it running smoothly and extend its lifespan, regular maintenance is essential. In this section, we will discuss some vital maintenance tips to help you maintain your jet pump effectively.
Checking for leaks and damaged components
Regularly inspecting your jet pump for leaks and damaged components is an essential part of maintenance. These issues can hinder the pump’s performance and lead to further damage if left unaddressed. Here’s how you can do it:
- Begin by visually inspecting the pump and its surrounding area for any signs of leakage. Look for water puddles or wet spots, which indicate a leak in the system.
- Check the pump’s pressure gauge and ensure it is functioning correctly. If the gauge shows an abnormally low or high reading, it may indicate a problem with the pump or pressure tank.
- Inspect the pump’s connections and fittings. Tighten any loose connections and replace any damaged or worn-out fittings.
- Examine the pump’s electrical wiring for any signs of damage or wear. Frayed wires or exposed connections should be repaired or replaced immediately to prevent any electrical hazards.
Cleaning the pump and pressure tank
Keeping your pump and pressure tank clean is crucial to ensure optimal performance. Over time, debris and sediment can accumulate, affecting the pump’s efficiency. Follow these steps to clean your jet pump:
- Turn off the power supply to the pump before starting the cleaning process.
- Remove any debris or leaves that may have accumulated around the pump.
- Open the pump’s housing and inspect the interior for any dirt or sediment buildup.
- Using a soft brush or cloth, gently clean the impeller and other components of the pump. Take care not to damage any delicate parts.
- For the pressure tank, drain it completely and scrub the interior with a mild detergent solution.
- Rinse both the pump and pressure tank thoroughly with clean water.
- Allow the pump and pressure tank to dry completely before reassembling.
Flushing the system to remove sediment buildup
Sediment buildup in your water system can reduce the efficiency of your jet pump and cause damage to other components. Flushing the system regularly helps remove these sediments and prolongs the lifespan of your pump. Here’s how you can do it:
- Turn off the power supply to the pump.
- Locate the drain valve on your system, typically found near the pressure tank.
- Attach a hose to the drain valve and place the other end in a suitable drainage area.
- Open the drain valve and allow the water to flush out for a few minutes, ensuring all sediments are expelled.
- Close the drain valve and remove the hose.
- Turn on the power supply to the pump and allow it to refill the system.
By following these regular maintenance tips for your jet pump, you can maximize its lifespan and ensure a dependable water supply. Regular inspections, cleaning, and flushing of the system will keep your pump running smoothly for years to come.
Common Issues And Troubleshooting Techniques
In this section, we’ll discuss some common issues that you may encounter while installing a jet pump and provide you with effective troubleshooting techniques to resolve them. By understanding these problems and their solutions, you’ll be better equipped to install your jet pump and ensure its efficient operation.
Low Water Pressure
Low water pressure is a common issue faced by many homeowners. If your jet pump is not generating enough pressure, there are a few troubleshooting techniques you can try:
- Check the pressure switch: Ensure that the pressure switch is properly adjusted to the desired pressure setting. If not, adjust it accordingly.
- Inspect the pressure tank: A malfunctioning pressure tank can lead to low water pressure. Check for any signs of damage or leaks, and if necessary, replace the tank.
- Clean the impeller and nozzle: Over time, debris can accumulate in the impeller and nozzle, affecting their performance. Thoroughly clean these components to improve water pressure.
Pump Cycling Frequently
If your jet pump is cycling on and off too frequently, it can be a sign of various issues. Here are some troubleshooting techniques to address this problem:
- Inspect the pressure tank: A waterlogged or faulty pressure tank can cause frequent cycling. Check the tank’s air pressure and make sure it matches the recommended levels.
- Check for leaks: Examine the entire system for any leaks, both in the suction and discharge lines. Even a small leak can cause the pump to cycle frequently, so ensure all connections are tight and secure.
- Adjust the pressure switch: If the pressure switch is set too low, it may cause the pump to cycle unnecessarily. Increase the pressure setting to reduce frequent cycling.
Noisy Operation
If your jet pump is making unusual or excessive noise during operation, there are a few troubleshooting techniques you can try:
- Check for air in the system: Air trapped in the pipes can cause noise. Make sure all connections are airtight and consider bleeding the air from the system.
- Inspect the impeller and motor shaft: Worn-out impeller blades or a loose motor shaft can result in noise. Replace the impeller if necessary or tighten the motor shaft to eliminate the noise.
- Consider installing noise-reducing accessories: If the noise persists, you can install noise-reducing accessories such as vibration dampeners or insulation to minimize sound.
Water Discoloration or Odor
If your water from the jet pump is discolored or carries an unpleasant odor, follow these troubleshooting techniques:
- Check the well water quality: Conduct a water test to assess the mineral content, pH level, and any bacterial presence. Based on the results, you may need to install additional filtration or purification systems.
- Inspect the well casing: A damaged or cracked well casing can allow contaminants to enter the water supply. Repair or replace the casing as needed.
- Flush the system: Occasionally, sediment or buildup can accumulate in the system, causing discoloration or odor. Flush the system thoroughly to remove any debris or contaminants.
By utilizing these troubleshooting techniques, you can overcome common issues that may arise during the installation of a jet pump. Remember to consult the manufacturer’s instructions and seek professional help if needed. With proper troubleshooting, your jet pump will operate efficiently, providing you with a reliable supply of water.
Frequently Asked Questions For How To Install Jet Pump
What Is Required When Installing A Deep Well Jet Pump?
To install a deep well jet pump, follow these guidelines: 1. Dig a well and install casing. 2. Connect the pump to the well. 3. Install the suction line and foot valve. 4. Connect the pump to the power source.
5. Prime the pump by filling it with water.
Do You Need A Pressure Tank With A Jet Pump?
Yes, a pressure tank is necessary when using a jet pump. The pressure tank helps maintain a steady water supply by storing water that the jet pump has already pumped. This allows the pump to cycle on and off as needed, preventing frequent starts and stops.
How Deep Will A Jet Pump Work?
A jet pump can typically work up to a depth of 25 feet, although some models can reach depths of up to 120 feet. The specific depth depends on factors such as the pump’s horsepower and the water source’s location.
What Size Jet Pump Do I Need For My House?
To determine the size of the jet pump for your house, consider the water demand and distance between the pump and water source. Consult a professional to calculate the required flow rate and pressure. They will provide expert advice and recommendations for selecting the appropriate jet pump size for your specific needs.
Conclusion
Installing a jet pump doesn’t have to be a daunting task. By following these step-by-step instructions, you’ll be able to successfully install a jet pump without any hassle. Remember to start by gathering all the necessary tools and materials, and carefully read the manufacturer’s instructions.
Take your time and ensure that each step is executed correctly. With a properly installed jet pump, you’ll enjoy a reliable water supply for years to come. Happy pumping!