Installing a battery backup sump pump is easy. Here are the steps to install a battery backup sump pump in your home.
Battery backup sump pumps are an effective solution to prevent basement flooding during power outages or pump failures. With a battery backup system in place, you can rely on a secondary pump to keep water out of your basement and protect your property.
In this guide, we will walk you through the process of installing a battery backup sump pump, from gathering the necessary tools and materials to completing the installation. By following these steps, you can ensure a smoothly functioning backup system and the peace of mind that comes with it. Don’t wait for disaster to strike, take proactive measures to protect your basement today.
Importance Of Having A Backup System
Installing a battery backup sump pump is essential to protect your basement from flooding and ensure continuous operation during power outages. When it comes to safeguarding your home from potential water damage, there is no room for compromise. That’s why having a reliable backup system in place is of utmost importance.
Protecting Your Basement from Flooding
Imagine waking up one morning after a heavy storm, only to find your basement flooded with water. The damage caused by flooding is not only costly to repair but can also lead to the growth of mold and mildew, creating health hazards for you and your family. To avoid such a nightmare scenario, it is imperative to have a battery backup sump pump installed.
A battery backup sump pump works in conjunction with your primary sump pump, kicking into action when the primary pump fails or when the power goes out. It acts as a safety net, ensuring that excess water is efficiently moved out of your basement even when you least expect it. This extra layer of protection gives you peace of mind, knowing that your basement is shielded from potential water damage at all times.
Ensuring Continuous Operation during Power Outages
A power outage can happen unexpectedly, leaving your primary sump pump powerless and unable to function. Without a backup system in place, you are vulnerable to basement flooding even during short periods of power loss. With a battery backup sump pump, on the other hand, you can ensure continuous operation and uninterrupted protection, regardless of the power situation.
The battery backup system is designed to automatically activate when it detects a power loss, seamlessly taking over the pumping duties. So, even if a storm knocks out your electricity, you can rest easy knowing that your backup sump pump has got you covered. This means no more anxiously waiting for the power to be restored, as your basement remains protected from potential flooding.
Conclusion
Installing a battery backup sump pump is a wise investment in the safety and security of your home. By protecting your basement from flooding and ensuring continuous operation during power outages, a backup system provides you with peace of mind and saves you from costly water damage repairs. Don’t wait for a disaster to strike – take proactive measures and install a battery backup sump pump today.
Understanding Battery Backup Sump Pumps
A battery backup sump pump is an essential component for homeowners who want to protect their basement from flooding during power outages or primary pump failures. While traditional sump pumps rely on electricity to function, a battery backup sump pump provides an additional layer of protection by continuing to pump water even when the power goes out. In this section, we will explore how battery backup sump pumps work, the different types of systems available, and how to select the right system for your needs.
How Battery Backup Sump Pumps Work
Battery backup sump pumps work by utilizing a rechargeable battery to power the pump when the electricity is unavailable. They consist of a pump, a battery, a battery charger, and a control unit. Here’s a breakdown of how they operate:
- When the primary sump pump fails or there is a power outage, the control unit detects the water level rising in the sump pit.
- The control unit signals the battery backup sump pump to activate.
- The battery backup pump starts pumping water out of the sump pit and away from the basement.
- The battery charger keeps the battery charged when the power is on, ensuring it’s ready for use during emergencies.
- Once the power is restored or the primary pump starts working again, the control unit switches back to the primary pump and recharges the battery.
This seamless transition between the primary and battery backup sump pump prevents basement flooding and keeps your home protected.
Types of Battery Backup Systems
When it comes to battery backup sump pumps, there are two main types of systems available:
| 1. DC-Powered Backup Systems | These systems use a direct current (DC) powered pump connected to a battery. They are more efficient and typically have longer runtimes compared to AC-powered backup systems. DC-powered systems are a popular choice for homeowners with higher water volume or longer power outages. |
| 2. AC/DC-Powered Combination Systems | These systems combine an AC-powered primary pump with a DC-powered backup pump. They offer the benefit of functioning as a primary pump under normal conditions and switching to the backup pump when needed. AC/DC-powered combination systems are great for homeowners who want the versatility of both types of pumps. |
Regardless of the type, it’s important to choose a battery backup system that matches your specific needs and the size of your sump pit.
Selecting the Right System for Your Needs
When selecting a battery backup sump pump system, consider the following factors:
- The capacity and pumping power of the backup pump to ensure it can handle the amount of water your sump pit receives.
- The battery type and capacity for longer runtimes and reliability.
- The charging system efficiency to ensure the battery remains fully charged during normal operation.
- The ease of installation and maintenance for convenience.
- Any additional features or accessories that may improve the system’s performance and durability.
By carefully evaluating these factors, you can select a battery backup sump pump system that meets your specific requirements and provides reliable protection against basement flooding.
Step 1: Gathering The Necessary Tools And Materials
If you live in an area prone to heavy rainfall or flooding, having a battery backup sump pump installed is a wise investment. A battery backup sump pump can provide added protection during power outages or when the primary sump pump fails. In this step-by-step guide, we will walk you through the installation process. Let’s start with Step 1: Gathering the Necessary Tools and Materials.
Tools Required for Installation
Before you begin installing the battery backup sump pump, make sure you have the following tools handy:
- Adjustable wrench
- Hacksaw
- Utility knife
- Hammer
- Drill
- Screwdriver
- Plumbers tape
- Measuring tape
Materials Needed for the Installation Process
In addition to the tools mentioned above, you will also need the following materials:
| Materials | Description |
|---|---|
| Battery backup sump pump system | A reliable battery backup sump pump system to serve as a backup to your primary pump |
| PVC pipe and fittings | To connect the battery backup sump pump to the existing sump pump system |
| Battery | A deep cycle marine battery specifically designed for sump pump backup systems |
| Battery box | To securely hold and protect the battery |
| Battery charger | To keep the backup battery charged at all times |
| Check valve | To prevent water from flowing back into the sump pit |
| Waterproofing sealant | To seal any connections and ensure no water leakage |
Now that you are equipped with the necessary tools and materials, you are ready to move on to the next step of the installation process. Remember, proper installation is crucial to ensure the effectiveness and reliability of your battery backup sump pump system. Stay tuned for Step 2: Preparing the Sump Pit.
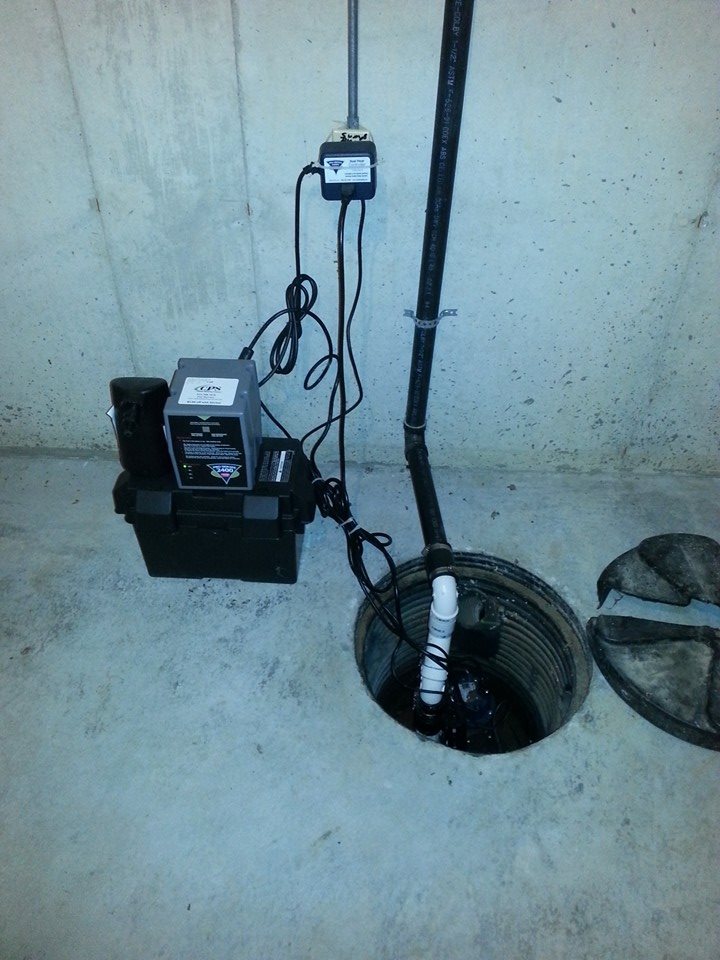
Credit: www.connellyplumbingsolutions.com
Step 2: Preparing Your Sump Pit
Cleaning the Sump Pit
Before installing a battery backup sump pump, it’s important to ensure that your sump pit is clean and free from any debris or obstructions. A clean sump pit will allow the pump to work efficiently and prevent any clogs that could hinder its performance. Here’s how you can clean it:
- Start by removing the primary pump from the sump pit. This will give you better access to the pit for cleaning.
- Using a sturdy bucket or a scoop, remove any accumulated dirt, mud, or debris that may have settled at the bottom of the pit. Dispose of it properly.
- Inspect the walls of the sump pit and ensure that they are free from any slime or buildup. If you notice any, use a scrub brush or a hose with high-pressure water to clean them thoroughly.
- After cleaning, allow the sump pit to dry completely before proceeding to the next step.
Checking for Proper Functioning of Primary Pump
Before installing a battery backup sump pump, it’s crucial to check if your primary pump is functioning correctly. This step ensures that your backup pump will kick in only when necessary. Follow these steps to check your primary pump:
- Ensure that the primary pump is plugged in or connected properly to its power source.
- Pour water into the sump pit until the float rises and triggers the primary pump to activate automatically.
- Observe the pump as it removes water from the pit. Check for any signs of malfunction, such as strange noises, vibrations, or water leakage.
- If the primary pump operates smoothly without any issues, you can proceed with the installation of the battery backup sump pump.
- If you notice any problems with the primary pump, it’s advisable to address them before installing the backup pump. You may need to consult a professional plumber or repair the pump yourself if you have the necessary expertise.
By cleaning your sump pit and ensuring the proper functioning of your primary pump, you can create an optimal environment for your battery backup sump pump to operate effectively. These steps help to alleviate any potential problems and provide you with peace of mind knowing that your basement will be protected from flooding even during power outages.
Step 3: Installing The Battery Backup Sump Pump
Now that you have gathered all the necessary equipment and prepared the sump pit, it’s time to proceed to the installation of the battery backup sump pump. In this step, we will guide you through assembling the backup pump components, connecting the backup pump to the discharge pipe, and mounting the backup pump in the sump pit. Follow these instructions carefully to ensure a successful installation.
Assembling the Backup Pump Components
Before you begin assembling the backup pump components, make sure you have all the parts required for installation. This includes the backup pump, battery case, control unit, check valve, and any additional accessories that may have come with your particular model. Refer to the manufacturer’s instructions for specific details regarding the assembly process.
Connecting the Backup Pump to the Discharge Pipe
Once you have assembled the backup pump components, it’s time to connect the pump to the discharge pipe. Begin by identifying the discharge pipe connection on the backup pump. This is typically located on the top of the pump. Use a wrench or pliers to remove the cap or plug from the discharge pipe connection.
Next, take the discharge pipe and insert it into the pump’s discharge pipe connection. Ensure a secure and tight fit by firmly twisting the pipe clockwise. If necessary, use a coupling or adapter to connect the two pieces securely. Once the connection is complete, double-check for any leaks or loose fittings.
Mounting the Backup Pump in the Sump Pit
With the backup pump connected to the discharge pipe, it’s time to mount the pump inside the sump pit. Lower the backup pump into the pit, making sure to align it properly with the check valve and discharge pipe to ensure optimal performance.
Use bricks or concrete blocks to elevate the backup pump off the bottom of the pit, ensuring it is secure and stable. This will prevent debris from interfering with the pump’s operation. Additionally, consider placing a rubber pad or insulating material beneath the pump to reduce vibration and noise.
Once the backup pump is securely mounted, connect the control unit to the pump and follow the manufacturer’s instructions for proper wiring and setup. Test the pump to ensure it is functioning correctly before completing the installation.
Step 4: Connecting The Electrical Components
Now that you have properly positioned your battery backup sump pump and installed the necessary plumbing components, it’s time to tackle the electrical connections. This step is crucial as it ensures the backup pump will function seamlessly whenever there is a power outage.
Wiring the Backup Pump to the Battery
First, we need to connect the backup pump to the battery. Here’s how:
- Locate the red and black wires on the backup pump.
- Connect the red wire to the positive terminal of the battery.
- Attach the black wire to the negative terminal of the battery.
- Ensure the connections are tight and secure.
Connecting the Backup System to the Primary Pump
Next, we’ll connect the backup system to the primary pump. Follow these steps:
- Identify the float switch on the backup pump and locate the corresponding wires.
- Connect these wires to the same terminals as the float switch on the primary pump.
- Ensure the connections are properly tightened.
Testing the Electrical Connections
Before considering the installation complete, it’s crucial to test the electrical connections. Here’s what you need to do:
- Fill the primary pump pit with water to activate the float switch.
- Observe if the primary pump activates and if the backup pump starts after a short delay.
- Confirm that both pumps turn off once the water level drops and the float switch resets.
By following these steps, you can ensure that your battery backup sump pump is properly connected and ready to protect your home in case of power failures. Remember, proper installation and regular maintenance are essential to keep your sump pump system in top-notch condition.
Step 5: Testing And Maintenance
Once you have successfully installed your battery backup sump pump, your job is not quite finished yet. In order to ensure that it will function properly when you need it most, testing and regular maintenance are essential. This step will give you peace of mind and help you avoid any unpleasant surprises.
Activating and Testing the Backup Pump
After installation, it is crucial to activate and test your battery backup sump pump to confirm that it is working effectively. This will help you identify any potential issues or malfunctions and make any necessary adjustments. Follow the steps below to ensure a proper test:
- Make sure the pit is clear of any debris or obstructions that could hinder the pump’s operation.
- Locate the backup pump’s control panel and switch it on.
- Allow the backup pump to run for a few minutes to ensure it is pumping water from the pit effectively.
- Observe the pump’s performance and ensure the water is being discharged properly.
- If everything appears to be functioning correctly, switch the backup pump off.
By conducting this test regularly, preferably once a month, you can identify any potential issues and address them promptly. It is important to remember that a backup pump, just like the primary sump pump, can experience wear and tear over time, so ongoing testing is crucial for its reliability.
Regular Maintenance Tips for Optimal Performance
Maintaining your battery backup sump pump is essential for optimal performance. Here are some maintenance tips to consider:
- Inspect the battery terminals and cables frequently. Ensure they are clean, secure, and free from corrosion.
- Regularly check the battery fluid level. If your battery requires it, add distilled water to maintain the recommended level.
- Clean the inlet screen to prevent clogs and maintain proper water intake.
- Check and test the battery regularly to ensure it is holding a charge. Replace the battery if necessary.
- Monitor the alarm system and test it periodically to ensure it is functioning correctly.
- Consider installing a battery backup alarm to notify you if there is a power loss or any issues with the backup pump.
Following these maintenance tips will help you keep your battery backup sump pump in excellent condition and ready for action when needed. Regular maintenance reduces the risk of unexpected failures and ensures your home remains protected from potential water damage.
Frequently Asked Questions For How To Install Battery Backup Sump Pump
Can You Install A Battery Backup On An Existing Sump Pump?
Yes, you can install a battery backup on an existing sump pump. It provides an extra power source during power outages, ensuring your pump continues to work effectively. This backup system adds an additional layer of protection to prevent basement flooding.
How Do You Plumb A Battery Backup Sump Pump?
To plumb a battery backup sump pump, connect the discharge pipe from the pump to a pipe that directs the water away from your foundation. Make sure to use an appropriate check valve to prevent water from flowing back into the sump pit.
Lastly, attach the battery backup system to the pump for uninterrupted operation during power outages.
How Much Does It Cost To Put In A Battery Backup Sump Pump?
The cost of installing a battery backup sump pump varies, but on average, it ranges between $500 to $2,000. Factors such as the type of pump, complexity of installation, and any additional features can influence the final cost. Considering professional installation ensures proper setup and functionality.
Are Battery Backup Sump Pumps Worth It?
Battery backup sump pumps are worth it. They provide added protection during power outages or pump failures. These pumps automatically kick in, preventing flooding and costly water damage to your basement. They are a reliable and cost-effective solution for peace of mind.
Conclusion
Installing a battery backup sump pump is a wise investment for protecting your home against potential flooding and water damage. By following the step-by-step guide provided in this blog post, you can ensure the proper installation of this essential equipment.
Remember to regularly test and maintain your battery backup sump pump to guarantee its optimal performance. With this reliable addition to your home, you can have peace of mind knowing that you are well-prepared for any unforeseen water emergencies.