To install a water filter on a Whirlpool refrigerator, follow these steps: Remove the old filter, locate the filter housing, insert the new filter, and rotate it clockwise to secure it in place. Introducing a water filter to your Whirlpool refrigerator not only ensures clean and refreshing drinking water but also helps in enhancing the overall performance of your fridge.
With a simple installation process, you can provide yourself and your family with purified water straight from the appliance. We will guide you through the quick and easy steps to install a water filter on your Whirlpool refrigerator, ensuring that you have access to clear and great-tasting water with each pour.
Whether you’re replacing the filter for the first time or need a quick refresher, read on to learn how to install a water filter on your Whirlpool refrigerator effectively.
Preparing For Installation
Preparing for installation is an essential step to ensure a successful installation of a water filter on your Whirlpool refrigerator. By gathering the necessary tools and materials, familiarizing yourself with the Whirlpool refrigerator model, and finding the location of the water filter, you will be well-equipped to complete the installation process smoothly.
Gather the Necessary Tools and Materials
Before starting the installation process, it is important to gather all the necessary tools and materials. Having everything on hand will save you time and effort during the installation. Here is a list of the tools and materials you will need:
| Tools | Materials |
|---|---|
| Screwdriver | Water filter cartridge |
| Adjustable wrench | Water line |
| Teflon tape | Bucket or towel |
Having these tools and materials readily available will ensure a smoother installation process.
Familiarize Yourself with the Whirlpool Refrigerator Model
Each Whirlpool refrigerator model may have slight variations in the installation process. To ensure you install the water filter correctly, it is important to familiarize yourself with your specific Whirlpool refrigerator model. Refer to the refrigerator’s user manual or consult the Whirlpool website to access the model’s specific instructions and diagrams.
Familiarizing yourself with the Whirlpool refrigerator model will allow you to understand the unique installation steps required for your specific model.
Find the Location of the Water Filter
Locating the water filter is crucial before you begin the installation process. The water filter location may vary depending on the Whirlpool refrigerator model.
To find the location of the water filter:
- Refer to the refrigerator’s user manual for specific instructions
- Inspect the front, side, or back panels of the refrigerator for a designated water filter compartment
- Look for any labels or markings indicating the location of the water filter
Once you have located the water filter, ensure you have easy access to it for installation and future replacements. Remember to turn off the water supply to the refrigerator before removing the old filter.
By following these steps to prepare for installation, you will have a seamless experience installing a water filter on your Whirlpool refrigerator.
Removing The Old Water Filter
Before installing a new water filter on your Whirlpool refrigerator, it’s important to remove the old one first. This step is crucial to ensure the proper functioning of the new filter and maintain the quality of your drinking water. In this guide, we will walk you through the process of removing the old water filter in a few simple steps.
Turn Off the Water Supply
The first step in removing the old water filter is to turn off the water supply to your refrigerator. This is necessary to prevent any leakage or water flow during the removal process. Locate the shut-off valve on the water line connected to your refrigerator and turn it clockwise until it is fully closed. This will ensure that no water is flowing into the refrigerator while you work on replacing the filter. Safety first!
Locate and Remove the Old Water Filter
Once the water supply is turned off, you can now locate the old water filter inside your Whirlpool refrigerator. The location may vary depending on the model, but most refrigerators have the filter located either in the grille at the bottom or inside the refrigerator compartment. Refer to the user manual for your specific model to identify the exact location.
To remove the old filter, follow these simple steps:
- Open the filter compartment or grille cover, if applicable.
- Gently twist the old filter counterclockwise to release it from its housing.
- Once loose, carefully pull the filter straight out to remove it from the refrigerator.
If the filter is difficult to remove, try using a gentle rocking motion while pulling it out. Be cautious not to use excessive force as it may damage the refrigerator or the filter housing. You’re almost there!
Properly Dispose of the Old Filter
After successfully removing the old water filter, it’s important to properly dispose of it. This ensures that no contaminants or impurities are reintroduced into your water system. Follow these guidelines for safe disposal:
- Check the manufacturer’s instructions or packaging for any specific disposal recommendations.
- If no specific instructions are provided, wrap the old filter in a plastic bag and seal it tightly to prevent any leaks.
- Dispose of the old filter according to your local waste management regulations. In most cases, it can be placed in your regular household trash.
- Consider recycling options in your area for a more eco-friendly disposal method.
By responsibly disposing of the old water filter, you contribute to a cleaner environment while enjoying the benefits of a fresh and clean water supply.
Now that you know how to remove the old water filter, you’re ready to install a new one. Stay tuned for our upcoming guide on installing a water filter on your Whirlpool refrigerator!
Installing The New Water Filter
Installing the New Water Filter One of the essential maintenance tasks for your Whirlpool refrigerator is replacing the water filter regularly. An outdated filter can compromise the taste and quality of the water dispensed by your refrigerator. In this section, we will guide you through the process of installing a new water filter in your Whirlpool refrigerator, ensuring clean and purified water for you and your family.Preparing the New Filter for Installation
Before installing the new water filter, it is crucial to prepare it properly. Follow these steps to ensure a smooth installation process:- Remove the new filter from its packaging.
- Locate the filter cap provided with your refrigerator model. It is typically situated in the grille beneath the freezer door.
- Turn the filter cap counterclockwise to release it, and then place it aside.
- Remove the protective cover from the new filter. Check for any packaging materials or seals and discard them.
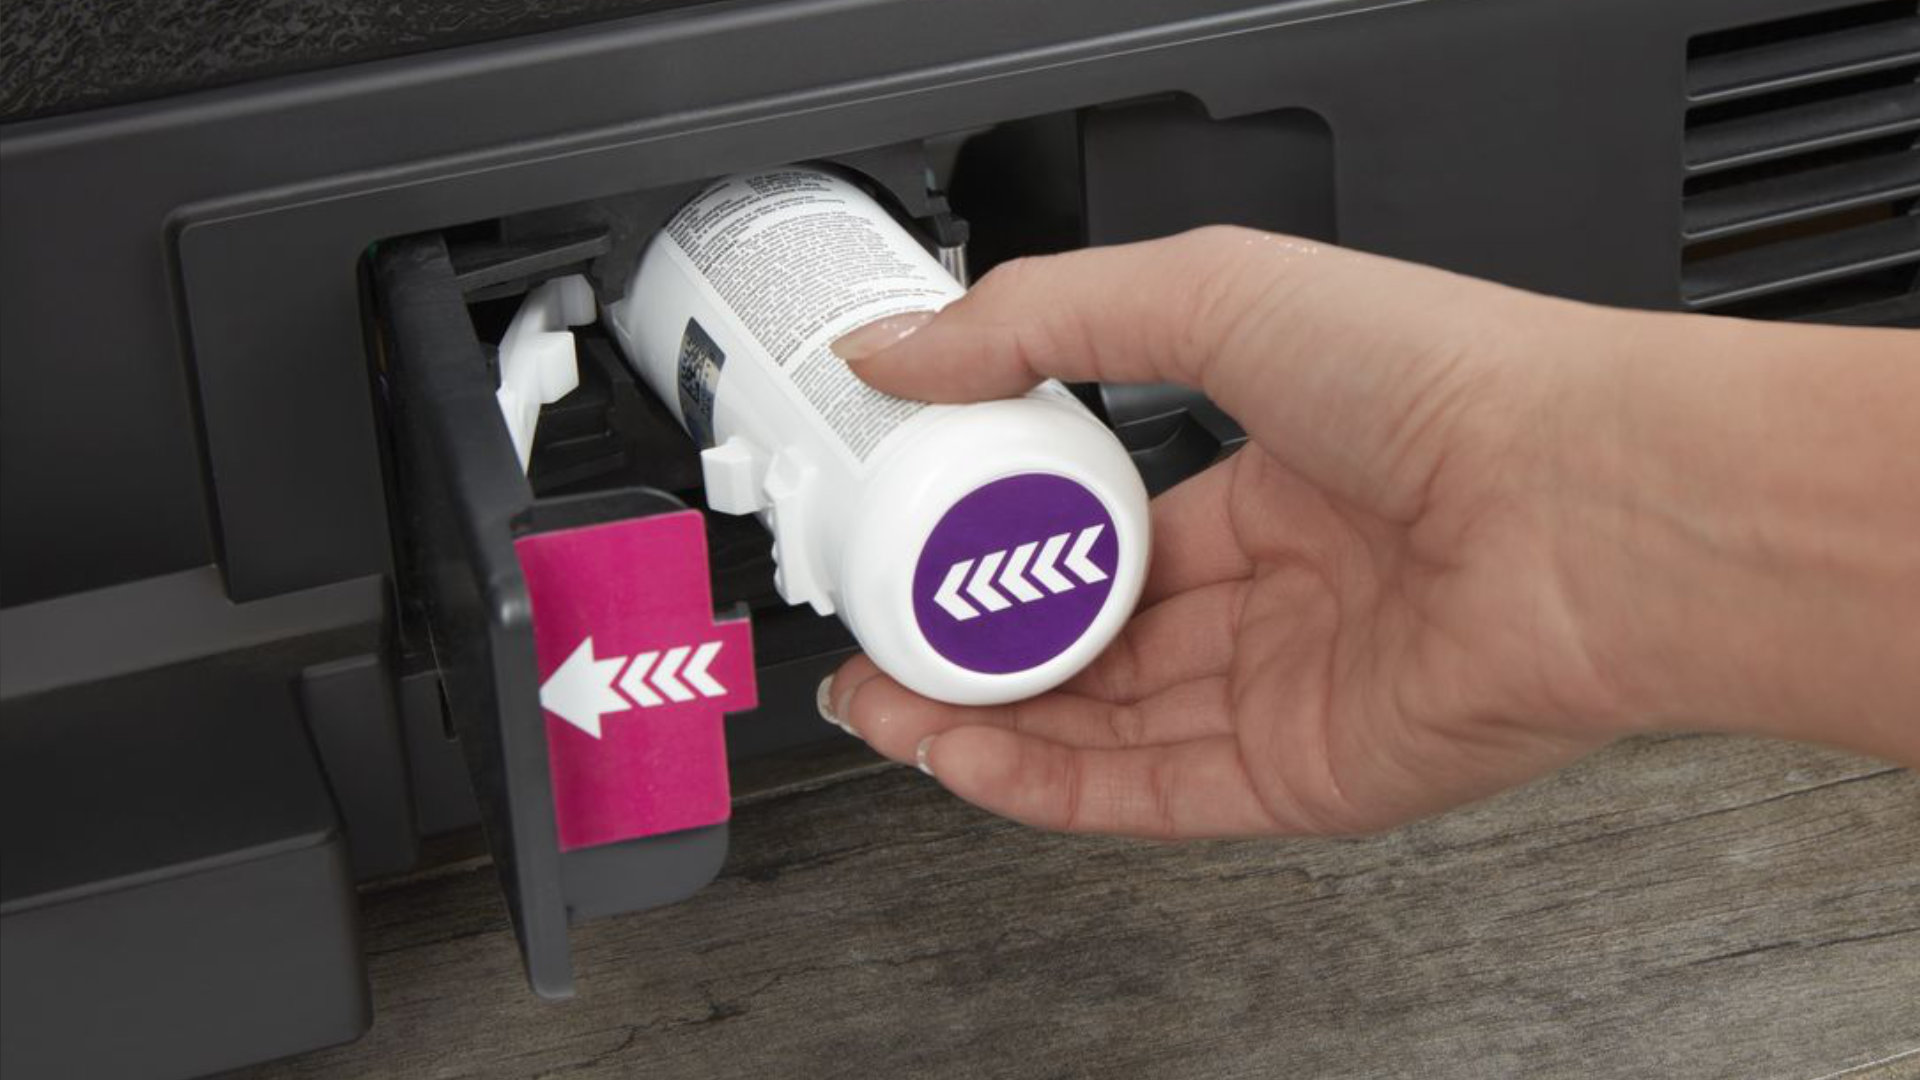
- Locate the arrow on the filter and ensure it is facing upward. This arrow indicates the correct direction for water flow.
- Run water through the filter for approximately 2 minutes to flush out any carbon fines or sediments. This step will help prepare the filter for optimal performance.
Inserting the New Filter into the Refrigerator
Once you have prepared the new filter, it’s time to insert it into your Whirlpool refrigerator. Follow these steps to complete the installation:- Locate the filter compartment inside your refrigerator. The exact location may vary depending on your model.
- Grasp the filter, align it with the filter compartment bracket, and push it into place.
- Ensure the filter is fully inserted and flush against the bracket. A firm push may be required.
- If your refrigerator has a push button for filter release, press and hold the button while inserting the filter.
Securing the Filter in Place
To ensure that the newly installed water filter remains securely in place, follow these final steps:- Turn the filter cap clockwise until it locks into position. Applying a slight pressure will help ensure a tight fit.
- If necessary, check the filter cap to verify that it is snugly in place and properly aligned.
- Close the refrigerator door and check for any leaks or drips around the filter area. If you notice any leakage, make sure the filter is properly seated and tighten the cap as needed.
Activating And Testing The Water Filter
Activating and Testing the Water Filter
In order to ensure that your Whirlpool refrigerator water filter is installed properly and functioning correctly, you need to activate and test it. This will help to guarantee that your water is clean and free from impurities. Follow these simple steps to activate and test your water filter:
<h3>Connecting the Water Supply Line</h3>
Before you can activate and test the water filter, you need to make sure that the water supply line is properly connected to your refrigerator. Start by locating the water supply line that is usually located behind the refrigerator or underneath the sink. Once you have found the water supply line, connect it to the designated inlet valve at the back of the refrigerator. Ensure that the connection is secure and tight to prevent any leaks.
<h3>Turning on the Water Supply</h3>
After successfully connecting the water supply line, it is time to turn on the water supply. Locate the water shut-off valve, usually found under the sink or near the water line connection, and turn it clockwise to open the valve. This will allow water to flow to the refrigerator’s water filter. It is essential to check for any leaks or drips after turning on the water supply to avoid any potential damage.
<h3>Running the Water Dispenser to Flush the System</h3>
Once you have turned on the water supply, it is crucial to flush the system to remove any air or impurities that may be present. To do this, simply press and hold the water dispenser lever or button until a steady flow of water is observed. Allow the water to run for approximately three to four minutes to ensure that the system is thoroughly flushed. This step is essential to ensure that any residual contaminants or air bubbles are eliminated from the water filter.
<h3>Checking for Leaks and Proper Functioning</h3>
After flushing the system, visually inspect for any leaks or drips around the water filter and connections. Be sure to check the inlet and outlet connections, as well as any junctions or valves along the water supply line. If you notice any leaks, tighten the connections or replace any faulty parts as necessary.
Once you have confirmed that there are no leaks, it is time to test the water filter for proper functioning. Fill a glass with water from the dispenser and check for any unusual odors, discoloration, or taste. If everything appears to be normal, congratulations! Your water filter is now activated and functioning correctly.
By following these simple steps and ensuring that your water filter is properly activated and tested, you can enjoy clean and filtered water straight from your Whirlpool refrigerator.
Maintenance And Replacement Tips
Proper maintenance and regular replacement of the water filter in your Whirlpool refrigerator are essential to ensure clean and fresh drinking water for you and your family. In this section, we will discuss some important tips to help you monitor the lifespan of the water filter, regularly change the filter, and clean the filter housing.
Monitoring the Lifespan of the Water Filter
Monitoring the lifespan of the water filter is crucial to ensure its effectiveness in removing impurities from your drinking water. Whirlpool recommends replacing the water filter every six months, or more frequently if you notice a decrease in water flow or quality. To keep track of when to replace the filter, consider the following tips:
- Mark the installation date of the new filter on your calendar as a reminder.
- Set an alarm or use a reminder app on your smartphone to alert you when it’s time to replace the filter.
- Note any changes in water taste, odor, or clarity as potential signs that the filter may need replacement.
Regularly Changing the Filter
Regularly changing the water filter is crucial for maintaining the quality of your drinking water. To ensure a smooth process, follow these steps:
- Locate the filter compartment on your Whirlpool refrigerator. It is usually located inside the refrigerator, near the back wall or ceiling.
- Turn off the ice maker and unplug the refrigerator.
- Gently remove the old filter by twisting it counterclockwise.
- Dispose of the old filter in accordance with local regulations and guidelines.
- Take the new filter out of its packaging and remove any protective coverings.
- Align the new filter with the filter housing and insert it by twisting it clockwise until it locks into place.
- Make sure the filter is properly installed and secure.
- Plug in the refrigerator and turn on the ice maker.
Cleaning the Filter Housing
Cleaning the filter housing is necessary to remove any dirt or debris that may accumulate over time. Follow these steps to clean the filter housing:
| 1. | Turn off the ice maker and unplug the refrigerator for safety. |
| 2. | Locate the filter housing inside the refrigerator. |
| 3. | Remove the filter from the housing by twisting it counterclockwise. |
| 4. | Prepare a mixture of mild dish soap and warm water. |
| 5. | Dip a clean cloth or sponge into the soapy water and gently wipe the inside of the filter housing. |
| 6. | Rinse the filter housing thoroughly with clean water to remove any soap residue. |
| 7. | Allow the filter housing to dry completely before reinstalling the new filter. |
| 8. | Follow the steps outlined earlier to install the new filter securely. |
By following these maintenance and replacement tips, you can ensure the longevity and effectiveness of the water filter in your Whirlpool refrigerator, providing you with clean and great-tasting water for months to come.
Troubleshooting Common Issues
Installing a water filter on your Whirlpool refrigerator is a great way to ensure that you are always getting clean and refreshing drinking water. However, like any other appliance, you may encounter some common issues along the way. In this section, we will discuss the troubleshooting steps for three common problems that you may face with your water filter: low water flow, filter compatibility issues, and strange tastes or odor in the water.
Low Water Flow
If you notice that the water flow from your Whirlpool refrigerator is lower than usual, there are a few things you can check to address this problem:
- First, inspect the water supply valve to ensure that it is fully open. Sometimes, it may not be turned on all the way, causing low water pressure.
- Next, check if the water filter is clogged. Over time, sediment and impurities can build up, restricting the flow of water. Replace the filter if it looks dirty or has been in use for more than six months.
- Another possible cause of low water flow is a kinked or twisted water supply line. Carefully inspect the line behind the refrigerator to ensure it is not bent or pinched.
- Lastly, check the water pressure in your home. Low water pressure in the main supply can affect the flow to your refrigerator. Contact your water provider if you suspect this to be the issue.
Filter Compatibility Issues
In some cases, you may experience compatibility issues when installing a new water filter on your Whirlpool refrigerator. Follow these steps to troubleshoot this problem:
- Make sure that you have purchased the correct filter for your specific Whirlpool refrigerator model. Refer to the user manual or the manufacturer’s website for the compatible filter part number.
- Double-check if the filter is properly installed in the filter housing. Sometimes, an improper installation may cause compatibility issues. Remove and reinstall the filter, ensuring a snug fit.
- If you have confirmed that the filter is compatible and properly installed, but it still does not work, contact Whirlpool customer support for further assistance. They can guide you through troubleshooting steps specific to your refrigerator model.
Strange Tastes or Odor in the Water
If you detect any unusual tastes or odors in the water dispensed from your Whirlpool refrigerator, try the following troubleshooting tips:
- Flush the water system by dispensing at least two gallons of water. This can help remove any air or lingering impurities that may be causing the taste or odor.
- Check the expiration date of the water filter. Using an expired filter can result in unpleasant tastes or odors. Replace the filter with a new one if necessary.
- If the issue persists, consider testing your home’s water quality. An external water test can help identify any contaminants or issues with the water supply. Contact a professional water testing service for assistance.
- In rare cases, the refrigerator’s water lines or components may need cleaning or maintenance. Refer to the user manual or contact Whirlpool customer support for specific instructions on how to clean the water system.
By following these simple troubleshooting steps, you can quickly address common issues that may arise during the installation or use of a water filter on your Whirlpool refrigerator. Remember, regular maintenance and proper care are essential to ensure clean and great-tasting water for you and your family.
Additional Considerations And Tips
While installing a water filter on your Whirlpool refrigerator is a relatively straightforward process, there are a few additional considerations and tips that can help ensure a successful installation. By following these guidelines and exploring alternative filtration options, you can enjoy clean and fresh water directly from your fridge.
Using a Water Filter Bypass Plug
If you prefer not to use a water filter or if you are waiting for a replacement filter to arrive, you can utilize a water filter bypass plug. This plug acts as a direct connector between the water supply line and the refrigerator’s water valve, bypassing the need for a filter. It is important to note that certain Whirlpool refrigerator models may require a specific bypass plug, so it’s essential to check your specific model’s requirements.
Alternative Water Filtration Options
While the built-in water filter is a convenient option for most Whirlpool refrigerator owners, there are alternative filtration options available. One such option is an external water filter system, which can be installed separately from the refrigerator. These systems are typically installed under the sink and provide filtered water directly to the fridge. Additionally, there are pitcher-style filters and faucet-mounted filters that can also be used to improve the quality of the water.
Another alternative worth considering is a whole-house water filtration system. These systems filter water at the point of entry into your home, ensuring that all the water used in your house is filtered, including the water running to your refrigerator. While these systems may be more expensive and require professional installation, they offer comprehensive water filtration for the entire household.
Seeking Professional Help for Installation
If you’re unsure about the installation process, or if you want to ensure that it is done correctly, seeking professional help is a viable option. Whirlpool offers professional installation services, and their technicians have the expertise to ensure that the water filter is properly installed and functioning optimally. Additionally, a professional can provide personalized advice and recommendations based on your specific needs and requirements.
It’s important to remember that regular maintenance and replacement of the water filter is essential to maintain its effectiveness. Whirlpool recommends replacing the filter every 6 months to ensure proper filtration and water quality. By following these additional considerations and tips, you can enjoy the benefits of clean and filtered water straight from your Whirlpool refrigerator.
Credit: authorizedco.com
Frequently Asked Questions For How To Install Water Filter On Whirlpool Refrigerator
How Do You Change The Water Filter On A Whirlpool Side By Side Refrigerator?
To change the water filter on a Whirlpool side by side refrigerator, follow these simple steps: 1. Locate the filter. It’s usually on the grille, at the bottom of the fridge. 2. Turn the old filter counterclockwise to remove it. 3.
Insert the new filter and twist it clockwise until it locks in place. 4. Run water through the dispenser for a few minutes to flush the new filter. 5. Enjoy clean and fresh water from your Whirlpool side by side refrigerator.
How To Install Water Filter In New Whirlpool French Door Refrigerator?
To install a water filter in a new Whirlpool French door refrigerator, follow these steps: 1. Locate the water filter compartment inside the fridge. 2. Twist the old filter counterclockwise to remove it. 3. Insert the new filter and twist it clockwise until it locks in place.
4. Run water through the dispenser for a few minutes to flush the system. 5. Reset the filter indicator if applicable.
How Do You Install A Whirlpool Water Filter?
To install a Whirlpool water filter, follow these steps: 1. Locate the filter compartment, usually at the front base of the refrigerator. 2. Twist the old filter counterclockwise to remove it. 3. Remove the protective cap from the new filter.
4. Insert the new filter and twist it clockwise to lock it in place. 5. Run water through the filter for a few minutes to flush out air and impurities.
Do You Have To Turn Water Off To Change Whirlpool Refrigerator Filter?
Yes, you need to turn off the water to change the Whirlpool refrigerator filter.
Conclusion
Installing a water filter on your Whirlpool refrigerator is a simple and straightforward process that ensures clean and fresh water for you and your family. By following the step-by-step instructions in this guide, you can easily accomplish this task without any hassle.
Remember, regular maintenance and filter replacement are essential to keep your refrigerator functioning optimally and maintaining the quality of your drinking water. Cheers to a healthier and more refreshing hydration experience!